background image

Kramer Electronics Ltd. 


VIA GO² 

– Technical Specifications 

81 


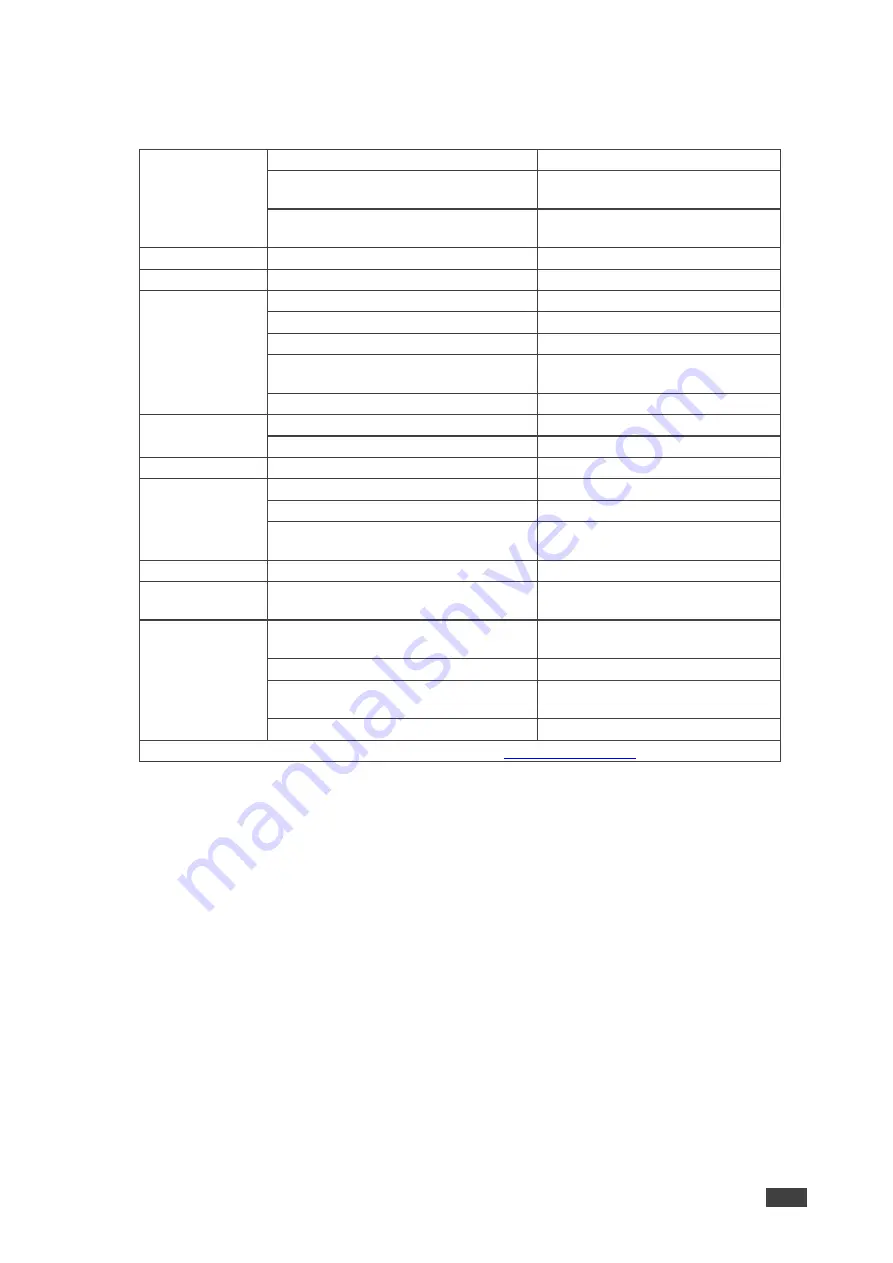
Technical Specifications 

Ports 

1 Ethernet 

On an RJ-45 connector 

1 USB 3.0 

On a female USB type-A 
connector 

1 USB 2.0 

On a female USB type-A 
connector 

Outputs 

1 HDMI 

On a female HDMI connector 

Video 

Max Resolution 

4K@30Hz 

General 

Processor 

Intel® Gemini Lake SOC 

Main Memory 

4GB LPDDR4 (2400) 

Storage 

32GB eMMC 

Networking 

802.11 ac/b/g/n dual band 
Wireless LAN and Bluetooth 4.1 

Operating System 

Linux 

Power 

Source 

12V DC 

Consumption 

2A 

Enclosure 

Cooling 


Environmental 
Conditions 

Operating Temperature 

0° to +40°C (32° to 104°F) 

Storage Temperature 

-40° to +70°C (-40° to 158°F) 

Humidity 

10% to 90%, RHL non-
condensing 

Accessories 

Included  

Power adapter 

Regulatory 
Compliance  

Safety 

CE 

Physical 

Product Dimensions 

7.00cm x 7.00cm x 3.34cm (2.76" 
x 2.76" x 1.31") W, D, H 

Product Weight 

0.4kg (0.9lbs) approx. 

Shipping Dimensions 

15.20cm x 12.00cm x 8.50cm 
(5.98" x 4.72" x 3.35") W, D, H 

Shipping Weight 

0.9kg (2.0lbs) approx. 

Specifications are subject to change without notice a

www.kramerav.com


Summary of Contents for VIA GO2

Page 1: ...P N 2900 301300 Rev 4 www kramerav com USER MANUAL MODEL VIA GO Wireless Presentation Solution for Firmware Version 3 3 ...

Page 2: ...en Editor 23 Configuring VIA Settings Template 36 Configuring Display Controller 48 Integrating Third Party Calendar 49 Configuring Digital Signage 52 Maintaining Your VIA Unit 60 For Web Administrator Configuring Settings Gateway Dashboard 65 Logging in to Gateway Dashboard Settings 65 Changing LAN Settings 66 Accessing System Controls 66 For User Running Kramer VIA App 68 Running Kramer VIA App ...

Page 3: ...nal quality due to poor matching and elevated noise levels often associated with low quality cables Do not secure the cables in tight bundles or roll the slack into tight coils Avoid interference from neighboring electrical appliances that may adversely influence signal quality Position your Kramer VIA GO away from moisture excessive sunlight and dust Safety Instructions Caution This equipment is ...

Page 4: ...es industry leading 1024 bit encryption for secure use on the internal network Key Features Quick and Reliable Wireless Connectivity A simple and intuitive user interface enables iOS Android Chromebook PC and Mac device users to instantly connect to a main display either using VIA Pad or Bluetooth 2 4GHz 5GHz Wi Fi and MIMO antennas establish and maintain a fast and reliable connection Clientless ...

Page 5: ...spaces Glossary The following are definitions of some common terms found in this User Manual Screenshots in this section are representative only and may not accurately reflect the features associated with your VIA device VIA Meeting A session where one or more users are logged into your VIA unit using the Kramer VIA app Gateway A VIA device such as VIA GO Main Display Video display connected to th...

Page 6: ...amer Electronics Ltd VIA GO Introduction 4 VIA App User Dashboard Main interface for meeting participants using the VIA app This dashboard appears after logging into a VIA meeting Figure 1 User Dashboard ...

Page 7: ...n 5 VIA Gateway Dashboard VIA app interface used from the main display by either a keyboard and a mouse connected to the gateway Click the VIA icon in the lower left corner of the main display to open this interface Figure 2 Gateway Dashboard ...

Page 8: ...ted to the same network as the gateway Supported Devices The following user devices are supported by the VIA GO Wireless Presentation Solution Windows 8 10 32 bit 64 bit computer Macintosh computer using OSX 10 12 x or newer Chromebook iPad iPhone tablet smartphone iPad 2 or later iOS 12 or later When using the Airplay service no Kramer VIA application is needed However we recommend using iOS12 Mo...

Page 9: ...rd Slot Not in use Power Button with LED Press to power ON or turn OFF the device USB 3 0 Connector Connect to a USB device for example a keyboard or mouse USB 2 0 Connector Connect to a USB device for example a keyboard or mouse Lock Opening Connect to a security locking cable HDMI Connector Connect to an HDMI sink RJ 45 Connector Connect to a LAN default mode Power Connector Connect to the 12V D...

Page 10: ...low is compatible for the device Avoid uneven mechanical loading Appropriate consideration of equipment nameplate ratings should be used for avoiding overloading of the circuits Reliable earthing of rack mounted equipment should be maintained You can install VIA GO using one of the following methods Place the device on a flat surface Place the device on a flat surface Mount on a wall or the back o...

Page 11: ...SB 3 0 Connector and the USB 2 0 Connector 2 Connect an HDMI display to the HDMI Connector to be used as the main display for the meeting see Connecting Main Display on page 10 3 Connect the LAN Local Area Network cable to the RJ 45 connector OR Connect to your network using a commercial wireless router 4 Connect wirelessly with a supported device see Supported Devices on page 6 after installing t...

Page 12: ... up the VIA gateway screen appears on the main display All collaboration activity is then displayed here VIA GO enables connecting the following display type VIA GO s internal video card reads the EDID Extended Display Identification Data for any connected display and sets the optimum display resolution and image refresh rate automatically through the display connectors ...

Page 13: ...GO unit VIA GO enables you to do the following Logging in to Gateway Management Pages on page 12 User Management on page 14 Managing Network Settings on page 15 VIA Pad Configuration on page 20 Site Management on page 22 VIA Screen Editor on page 23 Configuring VIA Settings Template on page 36 Configuring Display Controller on page 48 Integrating Third Party Calendar on page 49 Configuring Digital...

Page 14: ...r VIA GO gateway device The Gateway Management Pages are accessed from any computer connected to the same network as your gateway To log in to the VIA GO Gateway Management Pages 1 Connect your computer to the same network to which VIA GO is connected 2 Open a Web browser and go to the IP address for your VIA GO unit The Gateway Management Pages Welcome page appears Figure 6 Gateway Welcome Page ...

Page 15: ... user with Web Administrator user role to access settings through the Gateway Management Pages see User Management on page 14 5 Type the two Captcha Text strings with a space between them in the text box To disable the Captcha see Security on page 45 6 Click Login The Gateway Management Pages appear with the Dashboard open Figure 8 Gateway management Page Click the tabs in the navigation pane on t...

Page 16: ...user account is required to join a VIA meeting To add a user account to your VIA GO database 1 Click User Management on the Gateway Management Pages navigation pane The User List page appears Figure 9 User Management Page 2 Click Add User The Add User pane appears Figure 10 Add User Panel 3 Enter the new Username Password and then Confirm Password 4 Under User Role select from the following admini...

Page 17: ...g Up Secure Wireless Guest Access Point on page 16 Connecting VIA GO to Network Wirelessly on page 17 Connecting VIA GO to 802 1x Network on page 19 Uploading an SSL Certificate see Certificate on page 46 Changing Device IP Address The default IP setting is DHCP that assigns an automatic IP address to your VIA GO device This enables easy plug and play setup when connecting your VIA GO to the netwo...

Page 18: ...sers to connect to your VIA GO network This setup is ideal for guest users whom you may not want to connect directly to your network Figure 11 LAN Setting Page To set up a secure wireless guest access point 1 Click Device Management Network Settings The Network Settings page appears 2 Click WiFi The WiFi tab appears Figure 12 WiFi setting Tab 3 Click the Switch On or Off Wifi switch The switch tur...

Page 19: ...ect Enable Guest Mode to let meeting participants enable Access Point mode from the VIA taskbar menu When in Moderator Mode see Moderator Mode on page 41 only the moderator can enable the Access Point 7 Click Apply The secure wireless guest access point is set up Connecting VIA GO to Network Wirelessly VIA GO enables you to wirelessly connect your VIA GO device as a client device to your main netw...

Page 20: ...ient Mode tab appears Figure 14 Client Mode Tab 4 If you do not see the desired network in the dropdown click Click Here to Scan all Networks 5 Select an available network from the drop down 6 Enter the network password and click Apply Figure 15 Client Mode Setting Page 7 Disconnect the LAN cable if connected and reboot the device Client Wi Fi Mode is set up ...

Page 21: ... Radius server IP address and password will be passed while configuring the 802 1x security type on the access point This password is the same one that is used in the Radius server 3 Click Device Management Network Settings in the navigation pane The Network Settings page appears 4 Click WiFi The WiFi tab appears 5 Click the Switch On or Off Wifi switch The switch turns green and the WiFi settings...

Page 22: ...rocedure includes Configuring VIA Pad Settings on page 20 Pairing a VIA Pad Device on page 22 Configuring VIA Pad Settings VIA GO enables you to configure VIA Pad settings that define how a VIA Pad device operates when paired with your VIA GO unit To configure VIA Pad settings 1 Click Device Management VIAPad Configuration on the navigation pane The VIAPad Configuration page appears Figure 16 VIA ...

Page 23: ...the meeting space Wi Fi network a SSID Name of the network Make sure that you write it EXACTLY as defined This parameter is case sensitive b Authentication Mode Security used by your Wi Fi access point Select from the pre set options WEP Open WEP Shared WPA Personal WPA2 Personal c Encryption Type of encryption key used by your router d Key Password required to join your network up to 50 character...

Page 24: ...les an administrator to monitor and make changes to all VIA gateways connected to a network VIA GO enables you to activate VSM management for a VIA gateway and define which gateway functions are managed by VSM Contact your regional sales representative for more details about this solution If VIA discovery is enabled and configured in VSM your VIA device is automatically added under VSM supervision...

Page 25: ...mmediately any error entered at this stage like duplication of ID must be corrected manually at a later stage 4 In the Step 2 Configuration section under the VSM column select all the functions that you want to be managed by VSM After clicking Apply and Reset changes take 30 minutes to 1 hour to take effect to allow time to communicate with VSM VIA Screen Editor VIA GO enables you to customize the...

Page 26: ...ormation Create and save several versions of the screen layout and load them as needed To create a new screen layout for the main display 1 Click Device Management VIA Screen Editor on the Gateway Management Pages navigation pane The Screen Editor page appears Figure 19 VIA Screen Editor Page 2 Click Add Screen Layout The wallpaper upload window appears Figure 20 Wallpaper Editor Page 3 Drag an im...

Page 27: ...een elements from the left side of the window into the workspace in the middle The widget appears on the screen layout preview and the property controls appear on the right of the preview 5 Format the widget with the property controls on the right side of the window see Formatting Screen Layout Widgets on page 26 6 Click and drag the widgets according to your preferred screen layout Select the Gri...

Page 28: ...tion you can display a customized DNS Domain Name System name instead of the default room name if local DNS services are supported by the network and a DNS server is defined see Changing LAN Settings on page 66 Figure 21 Screen Editor Widgets Formatting Text on page 27 Formatting Room Name 1 on page 28 Formatting Room Code on page 29 Formatting Code Popup on page 30 Formatting Date on page 30 Form...

Page 29: ...uto Resize click ON to automatically resize the box to fit the size of the text When the layout is published on the main display the box size adjusts to fit the size of the text Format the following on the COLORS tab Figure 23 Text Color Tab Click the Background color box and select a fill color for the text box Select the opacity of the text box Click the Font Color box and select a font color Un...

Page 30: ...ee bullet above If you enter a name in the Custom Room Name it does not change the IP address but adds a custom name that can make it easier to identify the meeting space This name appears in the meeting space list along with the IP address A participant can start typing the custom name instead of the IP address to join the meeting see Joining a VIA Meeting on page 70 Custom room names only work i...

Page 31: ...following on the PROPERTIES tab Figure 25 Room Code Properties Tab Under Always show on wallpaper click ON to always show the room code on the main display background The code will be hidden if there is content covering it Under Show Room Code on second Display also click ON to show the room code on both displays when using dual displays see Connecting Main Display on page 10 Under Room Code Refre...

Page 32: ...ing Date The Date widget displays the date according to the time zone settings of the VIA device see Date Time on page 41 Format the following on the PROPERTIES tab Figure 27 Date Properties Tab Select one of the following date formats DD MON YYYY Day Month Year for example 1 January 2019 MON DD YYYY Month Day Year for example January 1 2019 DD MON Day Month for example 1 January MON DD Month Day ...

Page 33: ...lished on the main display the box size adjusts to fit the size of the text For formatting on the COLORS tab see Formatting Text on page 27 Formatting Date Time The Date Time widget displays the date and time according to the time zone settings of the VIA device see Date Time on page 41 Format the following on the PROPERTIES tab Figure 29 Date Time Properties Tab Select 24 hour or AM PM time forma...

Page 34: ...code without entering the room code Under Keep QR code always on top click ON to always show the QR code on top of all content being presented on the screen To download and print a hard copy of the QR code to post in the meeting space go to the Screen Editor page and click the QR code icon in the Preview column of the active screen layout Formatting Calendar The Calendar widget displays informatio...

Page 35: ... meeting organizer Under No of Records to display select how many upcoming meetings to display Under Please choose font size select the font size Format the following on the COLORS tab Figure 32 Calendar Color Tab Click the Background color box and select a fill color for the calendar Select the opacity of the calendar Click the Meeting Tile Font Color box and select a font color Select a bar colo...

Page 36: ...ose middle text font size select the font size for the time Under Meeting alert display select the amount of time before the next meeting to display the notification and start the countdown For formatting on the Color tab see Formatting Text on page 27 Formatting Availability The Availability widget is a pop up that displays meeting space availability in hours and minutes Format the following in t...

Page 37: ...layout is saved as a new layout Deleting a Screen Layout To delete a screen layout 1 Click Device Management VIA Screen Editor on the navigation pane The Screen Editor page appears 2 Select the layout that you want to delete and click Delete A confirmation message appears 3 Click OK The selected screen layout is deleted from the VIA device and removed from the list Exporting and Importing a Screen...

Page 38: ...the screen layout list Make sure that the exported layout file fits the resolution of the VIA device to which it is imported Configuring VIA Settings Template VIA GO enables you to configure settings such as power saver time date audio and features availability and save them as part of a settings template This enables you to define and save different settings for different types of meetings Just l...

Page 39: ...he following a Click Update Template to update the template without resetting and applying this template Changes are saved and the template remains open for more edits OR b Click Publish Exit to update the template and apply the newly edited template Changes are saved to the template and the session resets with the new template applied This will take several moments and you will need to log back i...

Page 40: ... and Searching System Activity Logs on page 60 Activate Energy Saver Mode Automatically send your VIA GO unit into sleep mode after being inactive for a defined period After activating this feature select the period in minutes from the Sleep Time field default OFF Quick Client Access Display a shortcut in the bottom left corner of the main display to open the VIA gateway dashboard default OFF Quic...

Page 41: ...t Guide available for download at www kramerav com downloads VIA GO Hide VIAAdmin at the client side Hides the VIAAdmin user from the Participants list default OFF Presentation Configure the following settings in the VIA settings template see Configuring VIA Settings Template on page 36 that affect how participants share content during a meeting iOS Mirroring The VIA gateway will act as an Apple A...

Page 42: ...oduct VIAcast Figure 41 Miracast Setting Tab Web admin can select as follows 1 Presenter For a single presenter using Wifi Direct Default ON 2 Presenter For two presenters using local network Reset Session Enables all users to reset the current VIA session from an icon that appears in the VIA tray menu default ON Default Encoding for Presentation PC Mac clients connected to the VIA gateway default...

Page 43: ... Configuring VIA Settings Template on page 36 that define the date and time displayed on the Gateway Management Pages Figure 44 Date Time Setting Tab Date and Time Format for Web Interface Select the format for displaying the date and time on the Dashboard page VIA Gateway Timezone Configuration Select the time zone for VIA GO Moderator Mode A meeting moderator has control over certain VIA functio...

Page 44: ...moderator see Security on page 45 If required select one or more of the following checkboxes that define what special features are available to a moderator Allow Participants to confirm start of Presentation see Showing Participant Screen on Main Display on page 79 Wait for Moderator to Start Session VIA session does not start until a moderator joins the meeting Participant dashboard features are ...

Page 45: ...ator Mode tab see Moderator Mode on page 41 Figure 46 Active Directory Moderator Mode Setting Tab 2 Click the Activate Moderator Mode switch and select Active Directory The Active Directory settings appear 3 In the Active Directory Domain text box enter the Active Directory domain name 4 Select User principal name or Same account name 5 Select the Group Based or OU Based radio button as per your A...

Page 46: ...s Figure 48 Host Configuration Page 9 On the Host Configuration page enter the Active Directory server IP Space Active Directory Domain Name and click save Active Directory Moderator Mode is configured VIA GO does not discover and connect to the Active Directory rather it relies on you to correctly enter the details If there is a typographical error in any of the fields the users Moderators and Pa...

Page 47: ...After rebooting the unit resetting a session or returning to a meeting after all users have logged off the volume returns to 100 Security Configure the following settings in the VIA settings template see Configuring VIA Settings Template on page 36 that affect login security for the Gateway Management Pages and for VIA meetings Figure 50 VIA Security Setting Tab Web Session Timeout Select the amou...

Page 48: ...asic mode see Moderator Mode on page 41 To remove the password requirement clear the password field Certificate VIA GO enables you to upload a custom SSL certificate to better provide for the security needs of your organization To prevent damage to the system make sure you upload files that can be used by the system If you are unsure of how to use this feature contact technical support For informa...

Page 49: ...t will handle all URLs that are used during your VIA meeting for example Youtube URLs used for the Youtube player feature and for firmware downloads To define a proxy server In the Proxy Server tab in the VIA settings template see Configuring VIA Settings Template on page 36 enter your proxy server parameters After entering the parameters click Test Proxy Server to verify that all parameters were ...

Page 50: ...ack showing that the feature is now hidden Changes are reflected in the menu after the new template is published Hidden features move to the bottom of the list Configuring Display Controller VIA GO enables you to control a display screen that is connected to the same network as your VIA GO This feature enables you to configure one of the following actions When the first person joins the meeting th...

Page 51: ...or example power OFF display 7 Select ASCII or HEX to define command format accepted by your display Refer to the User Manual for your display for the correct format of the commands Configuring your VIA GO as a display controller is complete Integrating Third Party Calendar VIA GO enables you to display scheduled meeting information on the main display home screen VIA automatically retrieves infor...

Page 52: ...the following permission types for the user None Impersonation Delegate 5 In Resource Calendar enter a calendar name to identify the created calendar This field is enabled only after selecting Impersonation or Delegate as the permission type 6 Click Test Save to test if the details entered are correct Your Office 365 calendar is integrated with VIA Calendar Integrating Microsoft Exchange When a re...

Page 53: ...t Save to test if the details entered are correct Microsoft Exchange is integrated with VIA Calendar Integrating Google Calendar To integrate your Google Calendar with VIA Calendar 1 Click Device Management Calendar on the navigation pane The Calendar Account appears 2 Select Google from the Calendar Type drop down The Google Calendar controls appear 3 Click Click here to get code Google sign in p...

Page 54: ...Digital Signage Media on page 52 Creating Custom Digital Signage Templates on page 56 Configuring a Digital Signage Campaign on page 58 Scheduling Digital Signage Campaign on page 59 Adding Fonts to Digital Signage on page 60 Creating and Uploading Digital Signage Media VIA GO enables you to create a library of media content to be displayed through the digital signage feature The types of media th...

Page 55: ...d to create a static text display that does not scroll 5 Set the font parameters To add a font click Upload Font or see Adding Fonts to Digital Signage on page 60 The following variables can be entered into the text field airplayname Displays the airplay name roomname Displays the room name code for joining into the meeting appass Displays the Access Point password apname Displays the Access Point...

Page 56: ...e 57 RSS Setting Tab 2 Click RSS The RSS tab appears 3 Enter the RSS feed URL address 4 Click Get tags and select the required tag from the Select a tag drop down list 5 In the RSS Name field enter a name for the RSS feed that will appear in the Existing Media table 6 Under options select the speed display style font settings and background color for the RSS feed 7 Click Create The new RSS feed is...

Page 57: ...ntation To add a web url for digital signage 1 On the Manage Content page click Add Content The Add Content pane appears with the Scroller tab open Figure 58 Web URL Setting Tab 2 Click Web URL The Web URL tab appears 3 Select the Auto Refresh checkbox to display a URL with dynamic content OR Clear the Auto Refresh checkbox to display a URL as a static page 4 Type the URL address and File Name and...

Page 58: ... 4 Select an image or video file and click Upload The file is added and appears in the Existing Media table Creating Custom Digital Signage Templates Templates dictate the layout of the digital signage content Up to 3 frames of content can be displayed at once VIA GO enables you to use predefined templates and to create custom templates To create a custom digital signage template 1 Click Digital S...

Page 59: ...review 6 Click and drag the box to move and resize it 7 Select the Audio checkbox to play audio from the selected frame Only one frame can include audio 8 Repeat steps 5 9 to add up to two more frames The layering order of the frames from bottom to top is Frame 1 Frame 2 Frame 3 9 Click Save The new template is added and appears in the Saved Templates table on the Custom Templates tab Click the Pr...

Page 60: ... 2 Click Add Campaign The Campaign Editor appears Figure 63 Campaign Editor Pane 3 Click a System or Custom Template The template appears in the preview box 4 Click and drag one or more elements from the Content List into each frame The active frame turns blue and a list of the content items appears below the preview 5 Set a Playlength for relevant items of content in the frame Videos and other co...

Page 61: ...e a digital signage campaign 1 Click Digital Signage Schedule Campaign on the navigation pane The Schedule Campaign page appears Figure 64 Schedule Campaign Page 2 Click Add Schedule The Scheduling pane appears Figure 65 Schedule Pane 3 Select a Campaign to schedule 4 Set a start date end date and hours 5 Enter a name for the Campaign 6 Click Schedule The Campaign is scheduled and it appears on th...

Page 62: ...on VIA GO and can be used for Digital Signage Maintaining Your VIA Unit VIA GO enables you to maintain your VIA unit by performing the following Viewing and Searching System Activity Logs on page 60 Updating Firmware on page 61 Activating VIA Gateway License on page 63 Digital Signage License on page 63 Resetting Default Settings on page 64 Viewing and Searching System Activity Logs VIA GO embedde...

Page 63: ...tivity Log Page 2 Select the Start Date and the End Date to define the date range of log entries to be displayed 3 Enter a search term and press the Enter key The filtered search results appear in the table at the bottom of the page Click Export to PDF or Export to CSV to save a file of the log table on your computer Updating Firmware VIA GO enables you to update your VIA GO firmware If you are ru...

Page 64: ...using an update file on the website and you have an internet connection a Click Check for Update A message appears with information about an available update Check for Updates is also available on the System Information Page b If an update is available confirm the download The new firmware is downloaded to your computer c Click Browse File A file browser appears d Select the relevant firmware upda...

Page 65: ...pens 3 Select the relevant license file 4 Click Upload The license is installed on VIA GO and license information appears at the bottom of the page To Activate your VIA GO license If a Digital License is already installed on your device the name of the license appears on the bottom of the page 1 Select UTILITY VIA License on the navigation pane The VIA License page appears 2 Click Activate License...

Page 66: ...changes take effect once the VIA is rebooted or the VIA session is reset Figure 70 Factory Reset Page To reset default settings 1 Click Utility Maintenance on the navigation pane The Maintenance page appears 2 Select the default configurations you would like to reset or click Select All to select all settings 3 Click Apply Default settings reset after reboot To reset Logs 1 Click Utility Maintenan...

Page 67: ...n be accessed by connecting a mouse and keyboard directly to the VIA gateway unit see For Installer Connecting VIA GO on page 9 To log in to the Gateway Dashboard Settings Make sure Quick access Client is active see System on page 38 1 Click the VIA icon in the lower left of the main display The gateway dashboard appears Figure 71 Gateway Dashboard Setting Login Page 2 Click Settings The login win...

Page 68: ...board settings see Logging in to Gateway Dashboard Settings on page 65 and select LAN Settings Figure 72 LAN Setting Tab on Gateway Dashboard 2 Under Connection Type select Static 3 Enter as required the Host Name IP Address Subnet Mask Default Gateway DNS Server 4 Click Apply 5 Click OK in the Confirmation Message The system reboots with the new settings Accessing System Controls VIA GO enables y...

Page 69: ...r Configuring Settings Gateway Dashboard 67 To access system controls 1 Login to Gateway Dashboard settings and select System Controls The System Controls tab appears Figure 73 Systems Control Tab 2 Click the required icon System controls are accessed ...

Page 70: ...ones Using iOS OS X Airplay Service on page 76 Running Kramer VIA App for PC and Mac To run Kramer VIA for PC and Mac computers 1 Open your Web browser and enter the IP address for your VIA GO unit The VIA Welcome page appears 2 Click one of the following two options Run VIA Downloads a file that runs Kramer VIA virtually without installing it on your computer Once downloaded locate the file on yo...

Page 71: ...ireFox web browser without downloading any app to your device To join a meeting locally using Chromebooks Chrome or Firefox web browser 1 Navigate to the VIA GO IP address with your browser The Gateway Management Pages Welcome page appears 2 Click Join through browser The VIA login page appears Figure 74 Join Through Browser Login Page 3 Enter your screen nick name and click Login You are logged i...

Page 72: ...age 74 Joining a VIA Meeting Participants can join log into a VIA meeting in the following ways Joining a VIA Meeting Manually on page 70 Joining a VIA Meeting using QR Code on page 73 Joining a VIA Meeting Using a VIA Pad on page 74 Joining a VIA Meeting Manually VIA GO enables you to manually enter credentials for joining a VIA meeting To join a VIA meeting manually 1 Connect your device to the ...

Page 73: ...en Calendar is configured In Use Reserved for hh mm minutes A meeting is in progress and will end after the displayed amount of time 4 In the Nick Name field enter a nick name username for your device it can be any combination of letters and numbers This is the name that appears on the main display when you collaborate 5 Click Join next to the meeting that you want to join The Join a Meeting windo...

Page 74: ...Screen see Mirroring Device Screen on page 75 Tap to Present Moderator see Becoming Meeting Moderator on page 79 Only if moderator mode is active Show Options Opens the Features and Participants tabs Volume Controls the VIA GO audio output volume VERSA is Active Versa is installed and available to the Video Conferencing application OR Click to install VERSA Link to install Versa driver ...

Page 75: ...sers To join a VIA Meeting using the QR Code 1 Connect your device to the same network as the VIA GO and run the Kramer VIA app on your device The Kramer VIA Meeting Spaces screen appears Allow the Kramer VIA app to access your camera Figure 77 Android Toolbar 2 On the toolbar at the bottom of the screen tap Scan A capture screen appears on your device 3 Scan the QR code that appears on the main d...

Page 76: ...IA Pad lights blue when ready The VIA Dashboard and taskbar appear on your device screen 5 Use VIA Pad to present Press once Starts presenting or stops presenting your screen on the main display When you are presenting the VIA Pad LED banner lights green When you stop presenting the LED banner lights blue Press twice while presenting Freezes or unfreezes your screen When your screen is frozen the ...

Page 77: ...n on page 75 Mirroring an App from Your Device on page 76 Mirroring Device Screen VIA GO enables you to mirror your entire device screen on the main display To mirror your Windows laptop or Android device screen using Kramer VIA 1 Connect your laptop or Android device to the network to which your VIA GO is connected 2 Join the VIA meeting see Joining a VIA Meeting on page 70 The VIA dashboard appe...

Page 78: ...n on page 39 Minimum requirements for mirroring using Airplay services are iPhone or iPad Mini iPad Minimum version iOS 10 iOS 12 or higher is recommended Mac Books and Apple Computers Minimum version OS X 10 11 Mojave or higher is recommended AirPlay discovery relies on Bonjour mDNS For more information see VIA IT Deployment Guide available for download at www kramerav com downloads VIA GO To mir...

Page 79: ... installation of the required drivers When using this feature for the first time the system asks you to install the drivers Please accept and follow the on screen instructions Once the drivers are installed reboot your PC to enable the feature Mac users can use AirPlay to simulate the same behavior see Mirroring Apple Laptops and iPhones Using iOS OS X Airplay Service on page 76 To mirror with the...

Page 80: ...e the meeting moderator see Becoming Meeting Moderator on page 79 2 On the VIA dashboard click Present Your screen is presenting on the main display Figure 78 User Dashboard in Moderator Mode 3 Click Do Not Disturb The icon turns white and you enter the Do Not Disturb mode In moderator mode only the moderator can enable disable DND feature and have full access to all the other features The other p...

Page 81: ...een onto the main display by clicking the Display Status icon of that participant in the Participant tab of the dashboard To show a participant screen on the main display 1 Become the moderator of the meeting see Becoming Meeting Moderator on page 79 2 In the Participants tab click the Display Status icon for the relevant participant The selected participant s screen is mirrored on the main displa...

Page 82: ...esentation request window to assist the moderator to accept or deny the request 3 Select Allow full screen in case of a single presenter or Allow auto position in case of multiple presenters The participant s presentation appears on the main display The moderator can present at any time without permission ...

Page 83: ...ss LAN and Bluetooth 4 1 Operating System Linux Power Source 12V DC Consumption 2A Enclosure Cooling Environmental Conditions Operating Temperature 0 to 40 C 32 to 104 F Storage Temperature 40 to 70 C 40 to 158 F Humidity 10 to 90 RHL non condensing Accessories Included Power adapter Regulatory Compliance Safety CE Physical Product Dimensions 7 00cm x 7 00cm x 3 34cm 2 76 x 2 76 x 1 31 W D H Produ...

Page 84: ... Location Access precise location only in the foreground Access approximate location network based only in the foreground Same as Network permissions This is additional permission required in Android 9 and higher Storage Read modify or delete the contents of your shared storage Acquiring and saving image video pdf and other types of files from the device SD Card Bluetooth network Access Bluetooth ...

Page 85: ...rized dealer from which it was purchased or any other party authorized to repair Kramer Electronics products this product must be insured during shipment with the insurance and shipping charges prepaid by you If this product is returned uninsured you assume all risks of loss or damage during shipment Kramer Electronics will not be responsible for any costs related to the removal or re installation...

Page 86: ...s and a list of Kramer distributors visit our website where updates to this user manual may be found We welcome your questions comments and feedback The terms HDMI HDMI High Definition Multimedia Interface and the HDMI Logo are trademarks or registered trademarks of HDMI Licensing Administrator Inc All brand names product names and trademarks are the property of their respective owners ...

Reviews: