background image

Your WAP-1 Audio Wall Plate 


3

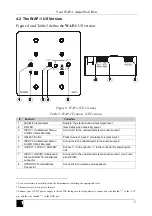
Table 1: WAP-1 Features 

Feature 

Function 

Panel Screw Holes 

Fasten the panel to the internal frame via the four panel screws 

LEVEL Potentiometer 

Adjusts

1

 the stereo audio output signal level 

ON LED 

Illuminates when receiving power 

INPUT 1 Unbalanced Stereo 
AUDIO 3.5mm Mini Jack 

Connects

2

 to the unbalanced stereo audio source 1 

SELECT Button 

Press to select input 2, or release to select input 1 

INPUT 2 Unbalanced Stereo 
AUDIO 3.5mm Mini Jack 

Connects to the unbalanced stereo audio source 2 

SUPPLY (12VDC) / POWER

3


Connect “-” to the Ground; “+” to the connector for powering the unit 

INPUT 1 (REAR) Unbalanced 
Stereo AUDIO Terminal Block 
connector 

Connects

2

 to the unbalanced stereo audio source 1 (via 3 rear 

panel PINS) 

SPKR OUT Terminal Block 
Connector 

Connects to the stereo audio speakers 


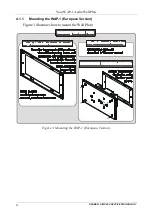
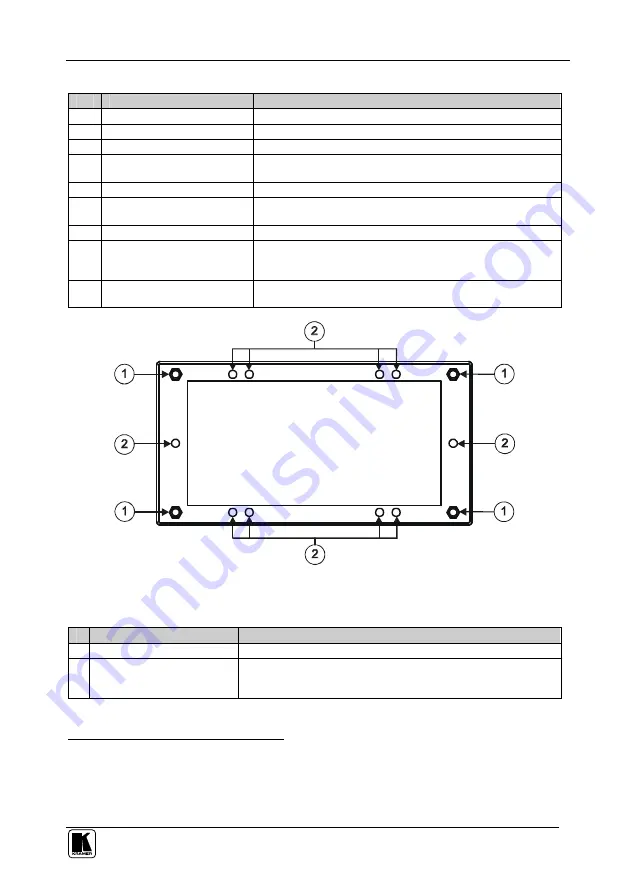
Figure 2: WAP-1 Internal Frame (European Version) 

Table 2: WAP-1 Internal Frame Features 

Feature 

Function 

Panel Screw Holes  

For connecting the panel to the frame 

Frame Screw Holes 

For connecting the frame to the wall using the self-tapping screws 
(provided). Use the holes according to your local standard (two or 
four screws) 


1 Use a screwdriver to carefully rotate the Potentiometer, adjusting the appropriate level 

2 Alternative ways to connect to source 1 

3 Connect your 12V DC power supply to these PINS, taking care that the polarity is correct: the wire labeled “+” to the +12V 

pin, and the wire labeled “–” to the GND pin 

Summary of Contents for Wall Plate Series

Page 1: ...Kramer Electronics Ltd USER MANUAL Wall Plate Series WAP 1...

Page 2: ...ersion 5 4 2 1 Mounting the WAP 1 US Version 6 5 Technical Specifications 6 Figures Figure 1 WAP 1 European Version 2 Figure 2 WAP 1 Internal Frame European Version 3 Figure 3 Mounting the WAP 1 Europ...

Page 3: ...ls for possible future shipment Review the contents of this user manual Use Kramer high performance high resolution cables4 3 Overview The Kramer WAP 1 is a wall plate with two unbalanced stereo audio...

Page 4: ...securely and in a location that is free from moisture and away from excessive sunlight and dust 4 Your WAP 1 Audio Wall Plate The WAP 1 is available in two versions The European version1 including Eng...

Page 5: ...NPUT 1 REAR Unbalanced Stereo AUDIO Terminal Block connector Connects 2 to the unbalanced stereo audio source 1 via 3 rear panel PINS 9 SPKR OUT Terminal Block Connector Connects to the stereo audio s...

Page 6: ...KRAMER SIMPLE CREATIVE TECHNOLOGY Your WAP 1 Audio Wall Plate 4 4 1 1 Mounting the WAP 1 European Version Figure 3 illustrates how to mount the Wall Plate Figure 3 Mounting the WAP 1 European Version...

Page 7: ...nbalanced Stereo AUDIO 3 5mm Mini Jack Connects to the unbalanced stereo audio source 2 6 SUPPLY 12VDC POWER 3 Connect to the Ground to the connector for powering the unit 7 INPUT 1 REAR Unbalanced St...

Page 8: ...on 3 5mm Mini Jacks input 1 also on a 3 PIN Terminal Block OUTPUTS 1 Stereo Output for speakers OUTPUT POWER 9W RMS continuous per channel BANDWIDTH 3dB 50kHz S N RATIO 70dB CROSSTALK all hostile 69dB...

Page 9: ...iginal dated invoice or a copy must be presented as proof of warranty coverage and should be included in any shipment of the product Please also include in any mailing a contact name company address a...

Page 10: ...or the latest information on our products and a list of Kramer distributors visit our Web site www kramerelectronics com where updates to this user manual may be found We welcome your questions commen...

Reviews: