background image

6

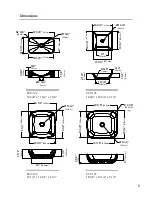
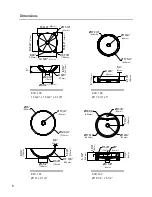
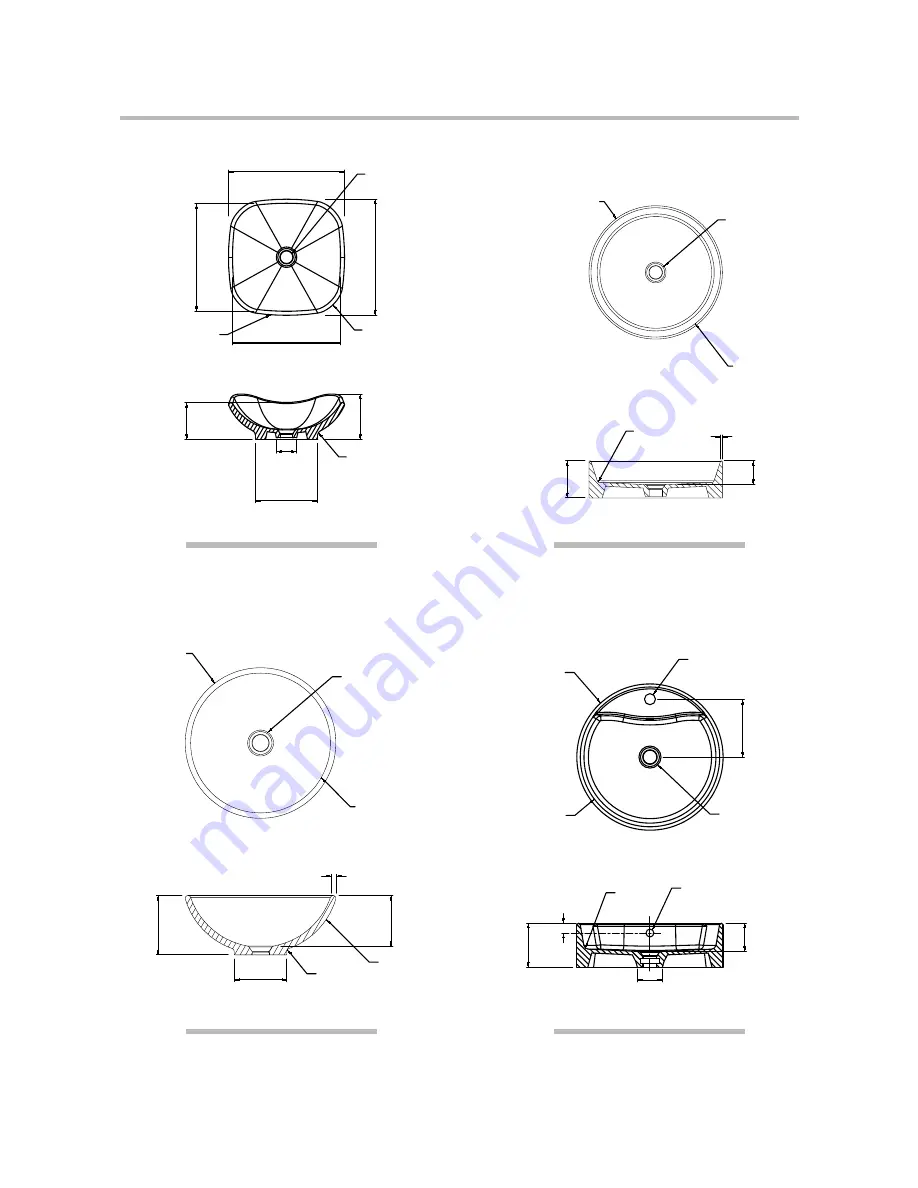
KCV-135

15 3/4 " x 15 3/4 " x 6 1/8"

KCV-140

Ø

17 3/4" x 5"

Dimensions

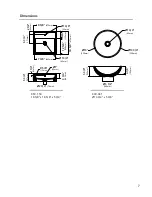
KCV-141

Ø

16" x 6 1/4"

15 3/4"


(400mm)

5"

(127mm)

Ø

2 3/4"

(70mm)

6 1/8"

(156.2mm)

15 3/4"


(400mm)

14 5/8"


(372mm)

14 5/8"


(372mm)

Ø

8 1/2"

 (215mm)

R3 7/8"

(100mm)

R 30"

(762mm)

Ø

17 3/4"

(450mm)

R 3/8"

(10mm)

1/4"

(6mm)

3 1/8"

(80mm)

5"

 (125mm)

Ø

17 1/4"

(438mm)

Ø

1 3/4"

(45mm)

Ø

1 3/4"

(45mm)

R 5/8"

(15mm)

KCV-142

Ø

18 1/4" x 5 1/2"

Ø

16"

(406mm)

5/8"

(15mm)

5 3/8"

(135mm)

Ø

5 1/2"

(140mm)

R 3/8"

(10mm)

6 1/4"

(158mm)

R 7 7/8"

(200mm)

Ø

14 3/4"

(375mm)

5 1/2"

(140mm)

Ø

1 3/8"

(35mm)

Ø

18 1/4"

(463mm)

7 1/4"

(184mm)

1 1/4"

(32mm)

3 1/2"

(90mm)

Ø

3 1/8"

(80mm)

R 5/8"

(15mm)

Ø

1"

(25mm)

Ø

17 3/8"

(442mm)

Ø

1 3/4"

(45mm)

Ø

1 3/4"

(45mm)

Summary of Contents for KCV-127

Page 1: ... I Toll Free 1 800 775 0703 I 2018 Kraus USA Inc I REV January 8 2021 Ceramic Bathroom Vessel Sinks KCV 120 KCV 121 KCV 122 KCV 125 KCV 126 KCV 127 KCV 135 KCV 140 KCV 141 KCV 142 KCV 150 KCV 341 R INSTALLATION MANUAL ...

Page 2: ...e any problems with your product Please contact our Customer Service Team 1 800 775 0703 customerservice kraususa com Have the model number available and retain a copy of your receipt with purchase date for reference If for any reason this product does not meet your expectations please be sure to repack this product in the original box and packaging material to avoid damage during transit DO NOT R...

Page 3: ...e required to avoid damaging the sink WARNING This product is fragile and can break chip or cause injury if handled recklessly Please consult with a professional when installing 3 For technical assistance or replacement parts please contact Kraus Customer Service and one of our representatives will be happy to help Toll Free 800 775 0703 or customerservice kraususa com The step by step guidelines ...

Page 4: ...il Tape Measure Dimensions KCV 121 19 1 4 x 15 1 4 x 5 3 8 5 1 2 140mm 15 1 4 386mm 4 3 8 110mm 1 5 8 40mm Ø2 3 4 70mm 15 1 4 386mm R 3 4 20mm 14 356mm 14 356mm R 5 8 15mm Ø1 3 4 45mm 5 3 8 135mm 19 1 4 488mm 1 3 4 45mm 15 1 4 386mm Ø2 3 4 70mm 4 3 8 110mm R 1 5 8 40mm 14 356mm 18 458mm Ø1 3 4 45mm R 5 8 15mm ...

Page 5: ...m 16 3 4 427mm 4 1 2 114mm 11 3 8 290mm R 5 8 15mm 3 4 20mm 3 1 2 90mm 10 255mm 15 1 4 387mm 15 1 4 387mm Ø1 3 4 45mm Ø1 3 4 45mm Ø1 3 4 45mm 16 1 2 420mm 16 1 2 420mm 5 1 2 140mm 4 1 4 109mm 15 1 4 388mm 15 1 4 388mm 12 388mm KCV 126 16 1 2 x 16 1 2 x 5 1 2 16 1 2 420mm 18 1 8 460mm 5 1 2 140mm R 3 1 4 83 6mm typ 4 101mm Ø1 3 4 45mm 16 7 8 430mm 15 3 8 390mm KCV 127 18 1 8 x 16 1 2 x 5 1 2 ...

Page 6: ... R3 7 8 100mm R 30 762mm Ø17 3 4 450mm R 3 8 10mm 1 4 6mm 3 1 8 80mm 5 125mm Ø17 1 4 438mm Ø1 3 4 45mm Ø1 3 4 45mm R 5 8 15mm KCV 142 Ø18 1 4 x 5 1 2 Ø16 406mm 5 8 15mm 5 3 8 135mm Ø5 1 2 140mm R 3 8 10mm 6 1 4 158mm R 7 7 8 200mm Ø14 3 4 375mm 5 1 2 140mm Ø1 3 8 35mm Ø18 1 4 463mm 7 1 4 184mm 1 1 4 32mm 3 1 2 90mm Ø3 1 8 80mm R 5 8 15mm Ø1 25mm Ø17 3 8 442mm Ø1 3 4 45mm Ø1 3 4 45mm ...

Page 7: ... 3 4 70mm 1 1 4 32mm 3 3 4 96 5mm 18 5 8 472mm 17 3 8 442mm 2 1 2 65mm 5 3 8 135mm 6 3 4 171mm 18 5 8 472mm Ø1 3 8 35mm R 5 8 15mm Ø1 25mm Ø1 3 4 45mm 12 5 8 320mm Ø1 3 4 45mm 4 1 8 105mm Ø13 3 4 350mm 5 3 8 135mm Ø5 1 2 140mm Ø13 330mm KCV 341 Ø13 3 4 x 5 3 8 ...

Page 8: ...lash faucet and sink plumbing NOTE Please allow a minimum of 4 5 from wall to edge of sink for faucet placement clearance NOTE For model numbers KCV 142 and KCV 150 faucet hole location should be measured from center of drain hole to center of faucet hole on sink 2 2 1 2 2 Drill Countertop Cut the drain opening in the countertop by carefully placing the 4 hole saw on the area marked by pencil ...

Page 9: ...n and press firmly Allow sealant to set for 30 60 minutes NOTE Please make sure Kraus logo is facing you when mounting sink NOTE Use acetone or rubbing alcohol to remove any excess sealant immediately after application 4 Install Plumbing Fixtures Connect drain to sink Connect trap to drain Connect water supply connections to faucet according to manufacturer s instructions Run water into sink and c...

Page 10: ...ation of the product or failure to follow care or installation instructions enclosed with your product Avoid using abrasive cleaners such as powders bleach ammonia alcohol or chlorine Avoid using abrasive pads steel wool or wire brushes as these will damage and wear down the finish This warranty does not apply to Products that have not been installed or operated in accordance with instructions sup...

Page 11: ... and you may also have other rights which vary from state to state If you are a homeowner please contact a Kraus Customer Service Representative at Kraus USA Inc 12 Harbor Park Drive Port Washington NY 11050 Toll Free 800 775 0703 Customerservice kraususa com If you are a plumbing contractor or trade professional please contact a Kraus Pro Representative at Kraus USA Inc 12 Harbor Park Drive Port ...

Page 12: ...Register Your Kraus Product Activate Your Warranty Access Premium Customer Support Get Product Information REGISTER TODAY http www kraususa com registration R www kraususa com IMPORTANT ...

Page 13: ...www kraususa com I Toll Free 1 800 775 0703 I 2018 Kraus USA Inc I REV September 17 2020 RamusTM Single Lever Vessel Faucet FVS 1007 R INSTALLATION MANUAL ...

Page 14: ...e any problems with your product Please contact our Customer Service Team 1 800 775 0703 customerservice kraususa com Have the model number available and retain a copy of your receipt with purchase date for reference If for any reason this product does not meet your expectations please be sure to repack this product in the original box and packaging material to avoid damage during transit DO NOT R...

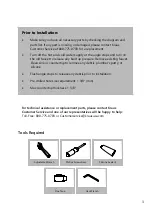
Page 15: ...re Remove existing faucet Clean sink or countertop to remove any debris plumber s putty or silicone Flush angle stops to release any debris prior to installation Pre drilled hole size requirement 1 3 8 min Max countertop thickness 1 3 8 3 Tools Required Adjustable Wrench Phillips Screwdriver Silicone Sealant For technical assistance or replacement parts please contact Kraus Customer Service and on...

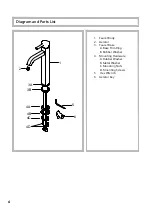
Page 16: ...arts List 1 Faucet Body 2 Aerator 3 Faucet Base A Base Trim Ring B Rubber Washer 4 Mounting Hardware A Rubber Washer B Metal Washer C Mounting Nuts D Mounting Screws 5 Hex Wrench 6 Aerator Key 3A 4A 4B 4C 4D 2 6 5 3B 1 ...

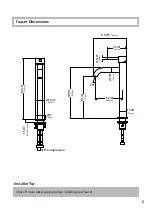
Page 17: ... main water supply before installing new faucet Faucet Dimensions 12 1 2 316mm Ø1 3 4 45mm Ø2 50mm 1 5 8 42 5mm Max 3 8 Compression 3 3 4 96mm Ø 3 8 10mm 1 3 8 35mm 10 1 8 257mm Ø 7 8 22mm 8 1 4 211mm 6 5 8 168mm 20 5 3 4 146mm ...

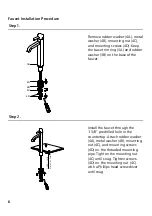
Page 18: ... mounting screws 4D on the threaded mounting pipe Tighten the mounting nut 4C until snug Tighten screws 4D on the mounting nut 4C with a Phillips head screwdriver until snug Step 1 Remove rubber washer 4A metal washer 4B mounting nut 4C and mounting screws 4D Keep the base trim ring 3A and rubber washer 3B on the base of the faucet 3A 4A 4B 4C 4D 27mm 41 3mm 1 1 16 1 5 8 ...

Page 19: ...tighten with an adjustable wrench Turn on both the cold and hot main valves Apply pipe tape optional Step 4 After installing the faucet remove the aerator 2 with the included aerator key 6 Turn on the water to remove any leftover debris then reassemble the aerator 2 ...

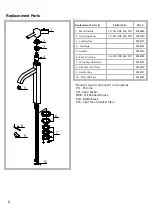
Page 20: ...eplacement Parts List Finish Color Part KP44069 KP44070 KP44071 KP44072 KP44073 KP44074 KP44075 KP44076 KP44077 KP44022 CH SN ORB MB SFS 5 Aerator Denotes faucet component color options CH Chrome SN Satin Nickel ORB Oil Rubbed Bronze MB Matte Black SFS Spot Free Stainless Steel 1 2 3 4 5 6 7 8 9 CH SN ORB MB SFS CH SN ORB MB SFS 10 10 Filter Washers ...

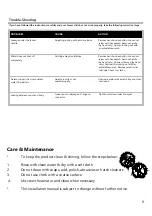
Page 21: ... product clean shining follow the steps below 1 Rinse with clean water dry with a soft cloth 2 Do not clean with soaps acid polish abrasives or harsh cleaners 3 Do not use cloth with a coarse surface 4 Unscrew the aerator and clean when necessary This installation manual is subject to change without further notice Water does not shut off completely Cartridge may be defective Remove handle index bu...

Page 22: ...with a product of equal value at the option of Kraus This warranty extends to the original owner or end user and is not transferable to a subsequent owner RESTRICTIONS This warranty does not cover antediluvian discontinued or display products whether such items are purchased at discount outlets unauthorized dealers and or sold on clearance This warranty does not cover instances of negligence misus...

Page 23: ... the above limitations or exclusions may not apply to you This warranty gives you specific legal rights and you may also have other rights which vary from state to state KRAUS USA has the right to change modify and or update the warranty policy at any time For the latest most up to date comprehensive warranty go to www kraususa com warranty If you are a homeowner please contact a Kraus Customer Se...

Page 24: ...Register Your Kraus Product Activate Your Warranty Access Premium Customer Support Get Product Information REGISTER TODAY http www kraususa com registration R www kraususa com IMPORTANT ...

Page 25: ...down the finish This warranty does not apply to Products that have not been installed or operated in accordance with instructions supplied by Kraus and all applicable rules regulations and legislation pertaining to such installations This warranty does not apply unless the Kraus product is installed by a fully insured and licensed trade professional Kraus insists that such professionals have exper...

Page 26: ...his installation manual is subject to change without notice a Drain Body b Thin Gasket c Concave Gasket d Plastic Washer e Nut f Gasket g Tailpiece h Nut a b c d e f g h 1 Drain Cap 2 Gasket 3 Thin Gasket 4 Concave Gasket 5 Plastic Washer 6 Nut 7 Gasket 8 Tailpiece 9 Nut 1 2 3 4 5 6 7 8 9 a b c d e f g h h e f g a b c d e g STEP 4 Connect tailpipe g to p trap STEP 3 Tighten mounting nut e with adj...

Reviews: