background image

 WARNING!

Hazardous media / contamination of persons and equipment

Possible consequences: Fatality or serious injuries, property damage

Ensure the resistance of the device against the medium that is to be conveyed

Always adhere to the safety data sheet of the medium that is to be conveyed The system
owner is responsible that the safety data sheet is present and up-to-date

The safety data sheet of the conveyed medium is always authoritative for the initiation of
countermeasures in case of a leak of the conveyed medium

Adhere to the general limitations with respect to viscosity limits, chemical stability and
density

 WARNING!

Risk of injury due to hot surfaces!

The surfaces of components can become very hot during operation. Direct contact with hot
surfaces causes severe skin burns.

Note:

Always wear protective clothing and protective gloves for all work in the vicinity of hot
parts.

Ensure that all surfaces have sufficiently cooled down prior to starting any work.

 CAUTION!

Risk of injury caused by compressed air!

Uncontrolled leaks of compressed air can lead to serious injuries.

Note:

Prior to any work on the device/machine, all compressed-air lines must be closed and
disconnected.

Never point compressed air at living beings.

2.8  Residual risks

Devices, machines or systems made by Krautzberger GmbH have been manufactured based on
state-of-the-art technology and in compliance with technical safety regulations.

Nonetheless, their use may pose a threat to the life or health of users or third parties, or harm the
device, the machine, the system or other material assets.

n

Mechanical hazards (crushing, shearing, cutting, jamming, burning, etc.) are possible at any
time during the installation, during operation as well as during maintenance work and serv-
icing.

Diaphragm pump MP-560

ENGLISH

Article No. 200-0192


GB–11

Summary of Contents for 200-0192

Page 1: ...Article No 200 0192 Translation of the original operating instructions T Dok 300 GB Rev 1 GB Diaphragm pump MP 560 Operating instructions...

Page 2: ...of the device Due to optional finishing variants it is possible that the figures shown in this operating manual deviate from your device Information about explosion protection Many of our competitors...

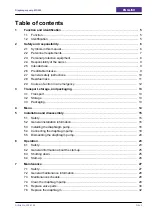
Page 3: ...g 13 3 1 Transport 13 3 2 Storage 13 3 3 Packaging 13 4 Menu 14 5 Installation and disassembly 15 5 1 Safety 15 5 2 General installation information 16 5 3 Installing the diaphragm pump 16 5 4 Connect...

Page 4: ...0 Accessories 41 11 Disassembly and disposal 42 11 1 Safety 42 11 2 Disassembly 42 11 3 Disposal 42 12 Technical data 44 12 1 General specifications 44 12 2 Material delivery properties 44 12 3 Dimens...

Page 5: ...tomati cally The fluid pressure is maintained until material is extracted at the extraction point The dia phragm pump switches on automatically and keeps the set fluid pressure constant 1 2 Identifica...

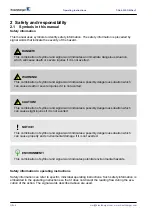
Page 6: ...and signal word indicates a possibly dangerous situation which can cause slight injuries if it is not averted NOTICE This combination of symbol and signal word indicates a possibly dangerous situation...

Page 7: ...t and fault free operation Additional identifications The following symbols are used in this manual to highlight operating instructions results lists ref erences and other elements Identification Expl...

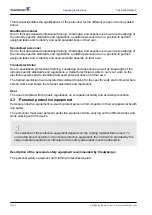
Page 8: ...trical systems and to identified and avert potential risks on his her own The trained electrician has completed specialised training for the specific work environment where he she works and knows the...

Page 9: ...lways in perfect tech nical condition Therefore the following applies n The owner must ensure that the maintenance intervals described in this operating manual are adhered to n The owner must have all...

Page 10: ...f the product is voided in case of structural modifications of the diaphragm pump n Do not use the diaphragm pump in the food or pharmaceutical sectors WARNING Improper of the diaphragm pump can lead...

Page 11: ...ective clothing and protective gloves for all work in the vicinity of hot parts Ensure that all surfaces have sufficiently cooled down prior to starting any work CAUTION Risk of injury caused by compr...

Page 12: ...and internal company regulations concerning the course of action in case of an emergency must be adhered to and if necessary respective safety measures must be taken on the system owner s side Operati...

Page 13: ...ep away from any aggressive media n Protect from UV radiation n Avoid mechanical shocks n Storage temperature 15 to 40 C n Relative atmospheric humidity max 60 3 3 Packaging The diaphragm pump is pack...

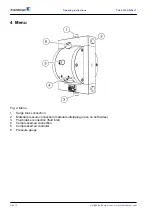
Page 14: ...sure connection material outlet plug open on both sides 3 Fluid intake connection fluid inlet 4 Compressed air connection 5 Compressed air controller 6 Pressure gauge Operating instructions T Dok 300...

Page 15: ...starting any work Carefully handle open sharp edged components Maintain order and cleanliness at the installation site Components that are loosely stacked or are scattered around can cause accidents A...

Page 16: ...all the diaphragm pump vertically and with the fluid intake connection pointing down n Vibrations may occur on the diaphragm pump during operation Ensure sufficient fastening n Make sure that the conn...

Page 17: ...ury from electrostatic charge Electrostatic charges can cause shocks and sparks and thus lead to explosions Ensure proper earth connection Use conductive hose line 1 MW Diaphragm pump MP 560 ENGLISH A...

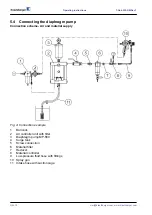
Page 18: ...Air controller unit with filter 3 Diaphragm pump MP 560 4 Surge tank 5 Screw connection 6 Material filter 7 Reducer 8 Material controller 9 Low pressure fluid hose with fittings 10 Spray gun 11 Intake...

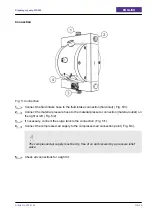
Page 19: ...ion material outlet on the right or left Fig 5 2 3 If necessary connect the surge tank to the connection Fig 5 1 4 Connect the compressed air supply to the compressed air connection point Fig 5 4 The...

Page 20: ...ressed air can cause serious injuries Note Prior to any work on the device all compressed air lines must be closed and secured against a restart Never point compressed air at living beings Activate th...

Page 21: ...isassembly 4 Disconnect the compressed air supply from the compressed air connection point Fig 6 4 5 Disconnect the fluid intake hose from the fluid intake connection fluid inlet Fig 6 3 6 Disconnect...

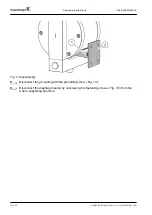
Page 22: ...ing with the grounding screw Fig 7 1 9 Disconnect the diaphragm pump by unscrewing the fastening screws Fig 7 2 from the wall or supporting structure Operating instructions T Dok 300 GB Rev 1 mail kra...

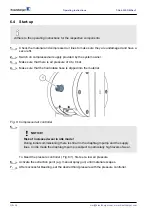
Page 23: ...heet Make sure that the connected compressed air is oil free and free of solid matter WARNING Risk of death risk of injury or property damage due to hazardous media Potential consequences The applicat...

Page 24: ...chemical stability and density WARNING Risk of fatal injury risk of injury or property damage due to damaged or disconnected lines Damaged or disconnected lines can cause death serious injuries or pro...

Page 25: ...e large number of fluids concentrations temperatures and impurities used For this reason please test the suitability because we cannot extend any respective guaran tees n Adhere to the spray media man...

Page 26: ...8 Compressed air controller 5 NOTICE Risk of increased wear in idle mode During initial commissioning there is still air in the diaphragm pump and the supply lines In idle mode the diaphragm pump is s...

Page 27: ...the personnel as well as damage malfunctions or complete failure Only use original spare parts from Krautzberger or spare parts that have been approved by Krautzberger In case of questions always cont...

Page 28: ...r intervals The level of wear depends on the abrasive ness of the spray fluid used Escaping air and spray fluid are signs that parts are worn Contact Krautzberger Customer Care with any questions on m...

Page 29: ...terrupt the compressed air supply in a suitable location e g shut off device 2 Dip the fluid intake hose into a suitable detergent 3 Switch on the compressed air supply 4 Rinse out the diaphragm pump...

Page 30: ...nnect the pressure and suction connection Fig 9 2 6 Remove the valve ball Fig 9 3 and seal Fig 9 4 The valve seats Fig 9 5 can only be replaced by Krautzberger GmbH You have to return the pressure and...

Page 31: ...merse the valve housing in cleaning product Do not use any high pressure cleaning devices 9 Clean the valve housing 10 Install all valve parts Fig 9 3 to 4 in the sequence shown 11 Connect the pressur...

Page 32: ...uction connection Chapter 7 5 Replace valve parts on page 30 Fig 10 Diaphragm 5 Unfasten all 6 screws Fig 10 1 and remove the diaphragm cover Fig 10 2 6 Unscrew the diaphragm Fig 10 3 from the control...

Page 33: ...10 4 9 Attach the diaphragm cover Fig 10 2 10 Lightly grease all 6 screws Fig 10 1 and screw tight Tightening torque 26 Nm 11 Fit the pressure and suction connection Chapter 7 5 Replace valve parts on...

Page 34: ...switch off the system 2 Determine cause for malfunction 3 Inform responsible party at the operating site about the malfunction 4 In the event that the troubleshooting requires work in the hazard zone...

Page 35: ...ragm pump does not start up No compressed air available Switch on or check com pressed air supply Pressure controller control valve faulty Replace the pressure con troller control valve Chapter 8 4 1...

Page 36: ...1 Dismantling the diaphragm pump Chapter 5 5 Dismantling the diaphragm pump on page 20 Fig 11 Panelling 2 Unscrew the screws Fig 11 2 and 4 and remove the panelling at the front and rear Fig 11 1 and...

Page 37: ...screw connection Fig 12 2 5 Remove pressure controller Fig 12 4 from the pump Installing the pressure controller 6 Insert the new pressure controller Fig 12 4 and fasten it in place with the screws Fi...

Page 38: ...ck the throttle Fig 13 2 and seal Fig 13 1 for damage and replace it as necessary Installing the control valve 11 Insert the seal Fig 13 1 and throttle Fig 13 2 in the order shown 12 Put on the contro...

Page 39: ...ing Fig 14 1 and 3 at the rear and front and fasten it in place with the screws Fig 14 2 and 4 14 Installing the diaphragm pump Chapter 5 5 Dismantling the diaphragm pump on page 20 Diaphragm pump MP...

Page 40: ...please provide the following information Serial number Model product name Designation Item number according to spare parts list Quantity Desired shipping method post freight sea air express Delivery a...

Page 41: ...e set material pressure n Suction devices in various designs with filter basket n Pressure pipe with pressure gauge for displaying the set material pressure n Material filter with drain valve n Materi...

Page 42: ...components and tools are sources for accidents Properly dismantle components Pay attention to very high individual weight of some of the components If necessary use hoisting equipment Secure componen...

Page 43: ...ord ingly n Properly dispose of potential spray fluid residue separately from the device If in doubt obtain information about environmentally appropriate disposal with the local municipali ties or spe...

Page 44: ...strokes 100 DS min Weight 50 kg Noise pressure level at 8 bar and 100 DS 80 dB A Transmission ratio 1 1 Compressed air supply oil free filtered 12 2 Material delivery properties Material Suitability...

Page 45: ...12 3 Dimensions Fig 15 Dimensions in mm Diaphragm pump MP 560 ENGLISH Article No 200 0192 GB 45...

Page 46: ...13 Declaration of conformity Fig 16 Declaration of conformity Operating instructions T Dok 300 GB Rev 1 mail krautzberger com www krautzberger com GB 46...

Page 47: ...____________________________________________________________________________ ______________________________________________________________________________ ____________________________________________...

Page 48: ...______________ ______________________________________________________________________________ ______________________________________________________________________________ ___________________________...

Page 49: ...________________________________ ______________________________________________________________________________ ______________________________________________________________________________ _________...

Page 50: ...l 42 E Earth connection 16 Error 34 Error messages 34 F Function 5 M Misuse 9 O Owner 9 P Personal protective equipment 8 Personnel 7 Product number 5 Protective equipment 8 S Safety information 10 Sc...

Page 51: ...U User qualification 7 W Weight 44 Diaphragm pump MP 560 ENGLISH Article No 200 0192 GB 51...

Page 52: ......

Page 53: ...Krautzberger GmbH Stockbornstrasse 13 65343 Eltville am Rhein Germany Hotline 49 0 6123 698 222 Reception 49 0 6123 698 0 Fax 49 0 6123 698 200 Email mail krautzberger com Internet www krautzberger co...

Reviews: