X - 17
Mowers
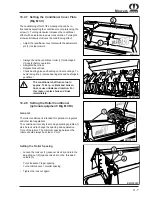
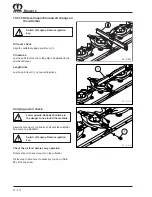
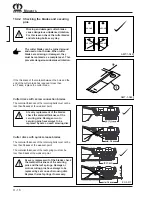
To mount the blades, insert the blade (5) between the
wear plate (2) and the mower disc (1).
Insert the retaining bolt (3) from below through the
wear plate, the blade and the mower disc.
Place the hex nut (4) on the bolt from above and
tighten it firmly. (Torque moment see section 10.3.2)
Repeat this process for all blades, even on the mower
drums.
Clockwise rotating blades
Order-No.: 139-889
Anti-clockwise rotating blades Order-No.: 139-888
After fitting the blades, fold the protective cloth down
again.
The hex nut (4) used to secure the
retaining bolts must not be used more
than 1 times.
After changing the blade, check that
they fit perfectly and check that they
are freely moblile.
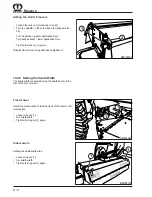
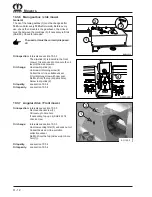
Push the special tool (1) {blade key} between the
cutter disc (4) and leaf spring (3) and press down with
one hand.
Guide blade (2) onto retaining bolt and allow the blade
key to return upwards.
10.4.4 Changing blades on cutter discs
with quick-release blades
After changing the blades check that
they fit perfectly and that they are
freely movable.
10.4.3 Changing the blades on the cutting
discs with screw connection blades
Clockwise rotating blades
Order-No.: 139-889
Anti-clockwise rotating blades Order-No.: 139-888
After fitting the blades, fold the protective cloth down
again.
EC-0-007
EC-0-006
Summary of Contents for Big M II
Page 2: ......
Page 4: ...Vorwort Notizen ...
Page 28: ...II 14 Safety ...
Page 35: ...III 7 Controls 3 7 Roof Console BMII 192 A B A Compartment B Airconditioning heating ...
Page 42: ...III 14 Controls ...
Page 64: ...VI 8 Cabin ...
Page 68: ...VII 4 Check before Start up ...
Page 74: ...VIII 6 Engine Operation ...
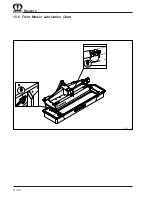
Page 100: ...X 20 Mowers 10 6 Front Mower Lubrication Chart EC 087 1 ...
Page 136: ...XII 16 Maintenance Electrical System ...
Page 148: ...XV 4 Belt Drive ...
Page 154: ...A 2 Appendix ...
Page 155: ...A 3 Appendix ...


