Settings
166
Pos: 71.72 /BA/Sonderausstatung/EasyCut / AM Mähwerke/Querförderer/Einstellung Transportband QFB EC B 1000 @ 210\mod_1389087261593_78.docx @ 1729241 @ 2 @ 1
15.2
Setting Conveyor Belt
x
x
A1
A2
L1
L2
Fig. 107
The drive roller (A) can only be set on one side.
A1= inside / A2 = outside
The running roller (L) can be set on both sides.
L1= inside / L2 = outside
•
Move the machine to the working position.
•
Lower the cross conveyor over the terminal.
•
Switch off the PTO and then the tractor engine, secure the tractor against rolling and
remove the ignition key.
•
Release the screw type bearings (1) at the front and rear of the running roller.
•
Unclamp the conveyor belt by releasing the clamping screws (4,5) at the front and rear of
the running roller.
•
Raise the cross conveyor over the terminal.
•
Mark the conveyor belt above and below at intervals of x = 1000 mm.
•
Use the adjustment screws (4,5) to tighten the conveyor belt until the marks have a spacing
of x = 1005 mm.
•
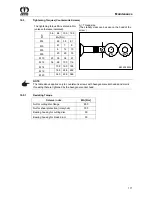
Tighten the screw type bearings (1) at the front and rear (see Maintenance section ,
'Tightening torques').
•
Move the conveyor belt by hand through 2 or 3 revolutions (the markings must become
visible again).
•
Check the markings (x = 1005 mm) and retension the conveyor belt if necessary.


