background image


Instruction Manual KA-1 

18 


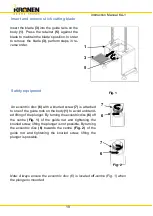
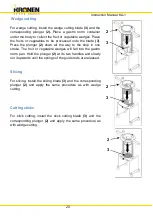
Insert and remove wedge cutting blade 

 
Insert the blade 

(3)

 into the opening of the body 

(1)

The blade’s position is determined by the pins in the 
body 

(1)

.  In  order  to  lock  the  blade 

(3)

,  turn  the  2 

retaining plates 

(4)

 until the blade 

(3) 

can no longer 

be  lifted.  In  order  to  remove  the  blade 

(3)

,  perform 

steps in reverse order.  


Insert and remove slicing blade 
 

Insert the blade 

(3)

 into the opening of the body 

(1)

In  order  to  lock  the  blade 

(3)

,  turn  the  2  retaining 

plates 

(4)

 until the blade 

(3) 

can no longer be lifted. 

Press the retainer 

(5) 

against the blade to maintain 

the  blade’s  position.  In  order  to  remove  the  blade 

(3)

, perform steps in reverse order.  


Summary of Contents for KKS 1

Page 1: ...Kombi cutter Type KKS 1 3 Translation of the Original Instruction Manual English ...

Page 2: ...Instruction Manual KA 1 2 Instruction Manual KKS 1 3 Version 1 0 Date of release 09 11 2015 ...

Page 3: ... Information 4 2 Safety 8 3 Technical Characteristics 10 4 Installation and Function 11 5 Transportation and Packaging 14 6 Installation and Initial Operation 15 7 Use and Operating 16 8 Malfunctions 22 9 Maintenance 23 10 Appendix 24 11 Index 25 ...

Page 4: ...the machine the first time make sure that you read the instruction manual first Explanation of the symbols used in the documents Limitation of liability If you do not follow the instruction manual the manufacturer is not liable Manufacturer Kronen Küchengeräte GmbH Gewerbestr 3 D 77731 Willstätt Phone 49 0 78 54 96 60 0 Fax 49 0 78 54 96 60 50 info kronen germany de Caution risk of injury Follow t...

Page 5: ...lectrical factors any modifications of the mer chandise performed without our consent 5 The Buyer shall allow the Seller the necessary time and opportunity to per form any subsequent improvement or substitute delivery which we regard in our reasonable judgment to be necessary 6 In the event of legitimate complaints the Seller shall bear the immediate costs of the subsequent improvement or substitu...

Page 6: ... shall be made at the customer s expense and risk 3 Warranty claims are excluded in the following cases Normal wear and tear Incorrect installation of the appliance Willful damage or incorrect operation Damage caused by calcium deposits Damage caused by inspection or repair by persons who are not authorised by Kronen Küchengeräte GmbH 4 Kronen Küchengeräte GmbH restricts the terms and conditions o...

Page 7: ...ost of the re placement can be acknowledged Parts which are subject to above average wear and tear by the operator are excluded from the above warranty cover Copyright Protection It is forbidden to copy all the documents delivered with the kombi cutter partly or completely without the permission of the manufacturer Disposal of the Machine The kombi cutter respectively all the parts have to be disp...

Page 8: ...n the kombi cutter because this could result in serious danger for the us er While you are using the machine stay concentrated and never get dis tracted Just use goods which are listed in the instruction manual Always keep your working environment clean and dry to make sure you don t slip and fall Don t put objects on the kombi cutter which don t belong there and don t use the machine as a storage...

Page 9: ...getables must not be frozen under no circumstances Any other improper use is prohibited Product misuse may occur if blades or plungers are not inserted into the ma chine or if the wrong ones are used The kombi cutter is intended for industrial use and only should be used by trained workers of the company Personal protective equipment is not needed for the use of the kombi cutter Stricter company r...

Page 10: ...Instruction Manual KA 1 10 3 Technical Characteristics Weight 5 8 kg Dimensions 265 x 205 x 571 mm Requirements for intended place horizontal and flat Not slippery Table height between 600 and 900 mm ...

Page 11: ...body is made of stainless steel and comprises an open ing and 2 guide rails in which the blades are inserted to as well as 2 guide rods with springs for the plunger Plunger 2 The punch which is attached to the plunger is pressed down on the fruits or vegetables with the plunger The plunger is guid ed by two guide rods on the body Blade 3 The blades are placed in the opening or in the rails on the ...

Page 12: ...Instruction Manual KA 1 12 Overview of modules 1 Body 2 Plunger 3 Blade 4 Retaining plate 5 Retainer 2 3 4 1 5 ...
Page 13: ...Instruction Manual KA 1 13 Accessories Wedge cutting blade 6 er 8 er Wedge cutting plunger Slicing blade 5 5 mm Slicing plunger 5 5 mm Stick cutting blade 10 mm Stick cutting plunger 10 mm GN container ...

Page 14: ...of damages talk to the responsible shipping company Open the box by slicing the tape with a tape slicer Do not use sharp knives Lift the kombi cutter out of the box and put it on the table Make sure that shipment consists out of the things you ordered In case the shipment is not complete talk to the responsible salesman There are no transportation devices installed on the vegetable slicer Dispose ...

Page 15: ...t Not slippery Table height between 600 and 900 mm Workstation is not made of wood After you have placed the kombi cutter to the intended working place push it briefly to the work surface The suction feet of the kombi cutter suck thereby firmly on the countertop The kombi cutter is secured against slipping Before the first use make sure you cleaned the kombi cutter Follow the instruc tions in chap...

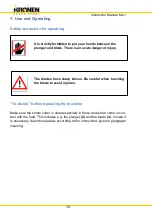
Page 16: ...reas that come in con tact with the food This includes e g the plunger 2 and the blade 3 In case it is necessary clean those areas according to the instructions given in paragraph cleaning The blades have sharp knives Be careful when touching the blade to avoid injuries It is strictly forbidden to put your hands between the plunger and blade There is an acute danger of injury ...

Page 17: ...6 via the knurled screw 7 Now the plunger 2 can be removed from the guide rods 1 that are attached to the body In order to install the plunger 2 place it onto the guide rods and lock the eccentric disc 6 by fastening the knurled screw 7 By doing so unintended lifting of the plunger 2 remains im possible 2 1 6 7 6 7 ...

Page 18: ... until the blade 3 can no longer be lifted In order to remove the blade 3 perform steps in reverse order Insert and remove slicing blade Insert the blade 3 into the opening of the body 1 In order to lock the blade 3 turn the 2 retaining plates 4 until the blade 3 can no longer be lifted Press the retainer 5 against the blade to maintain the blade s position In order to remove the blade 3 perform s...

Page 19: ...ed screw 7 is attached to one of the guide rods on the body 1 to avoid unintend ed lifting of the plunger By turning the eccentric disc 6 off the centre Fig 1 of the guide rod and tightening the knurled screw lifting the plunger is not possible By turning the eccentric disc 6 towards the centre Fig 2 of the guide rod and tightening the knurled screw lifting the plunger is possible Note Always ensu...

Page 20: ... the way to the stop in one stroke The fruit or vegetable wedges will fall into the gastro norm pan Hold the plunger 2 at its two handles and slowly run it upwards until the springs of the guide rods are released Slicing For slicing install the slicing blade 3 and the corresponding plunger 2 and apply the same procedure as with wedge cutting Cutting sticks For stick cutting install the stick cutti...

Page 21: ...remove the blade 3 and the plunger 2 and clean them separately in a water bath or in the machine dishwasher Clean now to kombi cutter with a common household dish detergent and remove stubborn remaining product with a brush Then rinse thoroughly with clean wa ter after to remove traces of detergent and rub the kombi cutter with a tea towel dry After cleaning disinfect the blades 3 and the plunger ...

Page 22: ...ause Solution Results are not satisfac tory Blade blunts Correction of such a defect may only be carried out by quali fied specialists or by your after sales ser vice Kombi cutter slips during operation The suction cups do not stick to the worktop The kombi cutter is placed on a wooden worktop Press the kombi cutter onto the work top until it adheres to it Place the kombi cutter on a worktop with ...

Page 23: ...ne by customer service only Support Customer Service Hotline Sales Department and customer service Kronen Küchengeräte GmbH Gewerbestraße 3 D 77731 Willstätt Phone 49 0 78 54 96 60 0 Fax 49 0 78 54 96 60 50 info kronen germany de Local Sales Department and customer service Partner Street Zip Code Place Tel Fax Service yes no To be filled out by local representative Maintenance if not specifically ...

Page 24: ...illstätt declares that the following product Product name KKS 1 3 Serial Number ________________________ conform with the guideline mentioned on top including the changes of the statement at this point of time Following engineer standards apply 1935 2004 ordinance for materials and parts that get in contact with food DIN EN 1672 2 Food processing machinery Basic concepts Part 2 Hygiene requirement...

Page 25: ...icks 20 Declaration of conformity 24 Defects and Claims 5 Disposal 7 Eccentric disc 19 Error Correction 22 Included in delivery 11 Installation 15 Intended place 10 15 Packaging 14 Plunger 11 17 Slicing 20 Terms and Conditions of Warranty 6 Transportation 14 Wedge cutting 20 ...

Reviews: