background image

Krontek KT160 Rev 4.10 

9

Select


The Timer Control Menu allows for timer operation. Both count up and count down timer modes 
are supported. Other than PReset the timer functions are self explanatory. PReset has two 
modes of operation depending on the count up or down mode. In count up mode, PReset will 
reset the display to zero once the timer is stopped. In count down mode, PReset will load the 
programmed preset count into the timer. If the preset time is greater than zero the timer will count 
down to zero and halt. If the preset time is zero, the timer will count down from zero i.e. the next 
second will be 99:59:59.        

The Clock Options Menu enables the selection of various display options. Of importance is the 
ability to disable (or lock) the adjustment keys on the rear of the clock. It is recommend that the 
keys be locked if the clock is network enabled.  

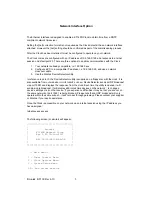
The System Setup Menu requires more detailed explanation:   

  -- System Menu --  

 1 - Set Time Server poll period 
 2 - Set Daylight Saving 
 3 - Set Time Zone Offset 
 4 - Set Time Server IP address 
 5 - Set Clock IP address 
 6 - Reset Poll Error Counts 
 7 - Display System Stats 
 8 - Set/Change Passcode  

 9 - Exit to Main Menu  

Select 


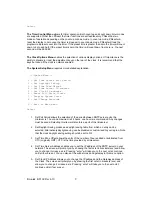
1.  Set Poll Period allows the selection of the period between SNTP server polls, the 

minimum is 1 hour and maximum is 24 hours, one hour is recommended. Any changes 
must be saved. Selecting this item will also force a poll of the timeserver.  

2.  Set Daylight Saving produces a daylight saving table from which an entry can be 

selected. Alternatively daylight saving can be disabled or customised to your region. Note 
that the clock daylight saving setting should be set to  OF


3.  Set Time Zone Offset allows the entry of the number of hours added or subtracted from 

UTC (originally GMT). UTC is the time provided by a timeserver.  

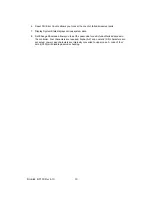
4.  Set Time Server Address enables you to set the IP address of the SNTP server on your 

network. The screen will prompt you by showing the first octet in brackets (xxx) and allow 
you to change it or leave as is. Pressing  enter  will take you to the next octet, continue 
until all four are set. You can also set the subnet mask and gateway in this menu option.  

5.  Set Clock IP Address allows you to change the IP address and the Gateway address of 

the Clock. The screen will prompt you by showing the first octet in brackets (xxx) and 
allow you to change it or leave as is. Pressing  enter  will take you to the next octet, 
continue until all four are set.   

Summary of Contents for KT160C

Page 1: ...Krontek KT160 Rev 4 10 1 Krontek KT160S C Digital Clock Operators Manual ...

Page 2: ...s manual When the clock first powers up it will briefly display its software revision number in the following format X YY where X is the primary revision number and YY is the secondary A C is appended for the calendar version Holding down any key during power up will reset the clock configuration to its default state The default state is Time 00 00 00 24 hour display Seconds on Correction format N...

Page 3: ...nce to the seconds Set the seconds about 10 seconds ahead of actual time then wait until actual time is the same before pressing TIME to set the time Pressing SYS will exit time setting without saving any changes made 2 Selecting 12 24 hour format Press and hold SYS the clock will display 12Hr or 24Hr depending on the setting Press ADJ to alternate between the two settings Use TIME to exit this mo...

Page 4: ... ADJ to select one of the settings Use TIME to exit this mode 5 Setting the Time Zone Offset Press SYS four 4 times the clock will display the current offset as HHMM Press ADJ and the offset will change in 30 minute increments from 00 00 up to 23 30 and then from 23 30 down to 00 00 Use TIME to exit this mode 6 Setting Daylight Savings Press SYS five 5 times the clock will display the current offs...

Page 5: ... applied to the action terminals on the rear of the clock There are three display options for the action display 2 for the non calendar clock these are 1 Alert 2 Evacuate calendar clock only 3 Timer Select the desired action message using the ADJ key If Alert or Evacuate is selected press TIME to exit to the normal display If timer mode is selected you have the option of a count up or count down t...

Page 6: ...g this format daylight savings should not be set as the master clock will provide the adjustment Extended BCD Ebcd This format provides hours minutes seconds day month and year It updates once a second When using this format daylight savings should not be set as the master clock will provide the adjustment Minute Impulse corrective Sr2 This correction format was designed for mechanical analogue cl...

Page 7: ... important that all clocks except one be set as Slaves Having two Masters on the same circuit will have unpredictable results Alpha ALPH This format is compatible with the time string used by used by Adaptive Micro Systems for their moving message displays Syncroline SLIN This is the Krontek Syncroline format Net nET This format is compatible with SNTP Simple Network Time Protocol The clock will d...

Page 8: ... to point 3 the DeviceDetector utility is supplied on a floppy disc with the clock It is also available from our website www krontek com au DeviceDetector sends a UDP broadcast via port 10991 and displays the response from the clock Each time the utility is opened it will send a single broadcast It will display all Krontek time devices on the network to change a device s settings click on that dev...

Page 9: ...Set Change Passcode 9 Exit to Main Menu Select 1 Set Poll Period allows the selection of the period between SNTP server polls the minimum is 1 hour and maximum is 24 hours one hour is recommended Any changes must be saved Selecting this item will also force a poll of the timeserver 2 Set Daylight Saving produces a daylight saving table from which an entry can be selected Alternatively daylight sav...

Page 10: ...ts displays various system data 8 Set Change Passcode allows you to set the passcode to restrict unauthorized access to the controller Four characters are required Alpha A Z and numeric 0 9 characters are accepted Lower case characters are internally converted to upper case A code of four zeros 0000 will disable passcode checking ...

Reviews: