30.
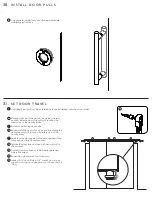
I N S TA L L D O O R P U L L S
1
If applicable, install door pulls following applicable
installation instructions.
31.
S E T D O O R T R AV E L
Starting with one of the door in the desired closed
position, slide the door stop so that it touches the
safety stop of the nearby trolley.
Note any protruding door pulls!
Repeat with the door in the open position, sliding the
door stop so that it touches the safety stop of the
nearby trolley.
Verify that the door guide is properly engaged in the
fully open and fully closed positions.
Tighten the door stops in place by hand with a 3/16”
allen wrench.
Confirm locations haven’t shifted while tightening.
Adjust if needed.
Repeat the process with the other door.
Insert a 3/16” hex bit into a 1/4” socket on a torque
wrench, and torque all door stops to 110 inch-lbs (9.5
ft-lbs).
1
2
3
4
5
6
If installing Premium Door Stops, reference those installation instructions in parallel.
6


