background image

- 18 -

C
K

W

L

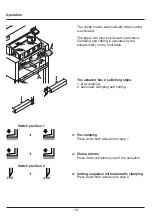
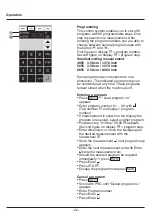
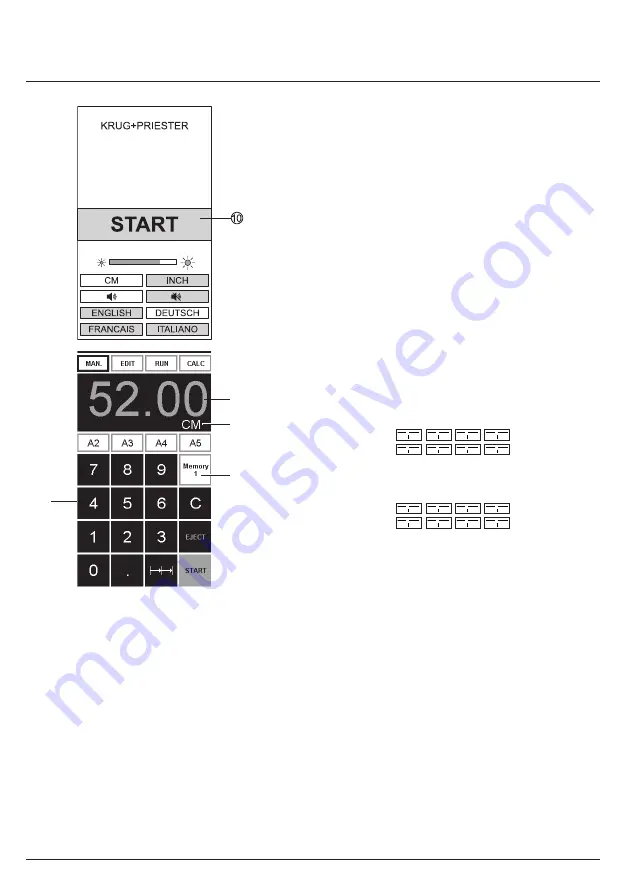
Start machine

• 

Main switch 

D

 to position "I", insert the key 


F

 for the control panel and turn  to the right.

  Start screen appears

  The following functions are changeable:

 Brightness

 CM/INCH

  Touchtone ON/OFF

 Language


Press START 

J


 

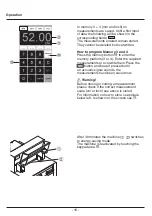
backgauge 

moves 

to the rear and searches for the reference           

position, wait until a measurement

  is shown in the display 

C


4855 = 45.00 cm, 17.717 inches

  5255 = 52.00 cm, 20.472 inches

  6655 = 61.00 cm, 24.016 inches

• 

The DIN and free programmable 

  measurements are recallable with the 

  respective buttons 

W

  Memory 1: A2, A3, A4, A5,

  Memory 2: A6, A7, B3, B4

  Memory 3: 

  Memory 4:                                                          

and in inch

  Memory 1: 4¼“, 5 ½“, 7“, 8 ½“

  Memory 2: 11“, 12“, 14“, 17“

  Memory 3: 

  Memory 4:

Operation

Summary of Contents for EBA 4855

Page 1: ...EN Operating Instructions Guillotines www eba de EBA 4855 EBA 5255 EBA 6655...

Page 2: ...4 Operating elements 5 Installation 10 Startup 12 Operation 15 Blade and cutting stick replacement 26 Maintenance and cleaning 35 Annual inspection Safety test 36 Possible malfunctions 37 Accessories...

Page 3: ...ty precautions The operating instructions must always be available Children must not operate the machine Do not reach beneath the blade Never leave the blade unattended Do not extract or transport the...

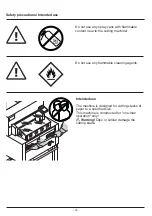
Page 4: ...a specified size This machine is constructed for one man operation only Warning Clips or similar damage the cutting blade Safety precautions Intended use Do not use any spray cans with flammable conte...
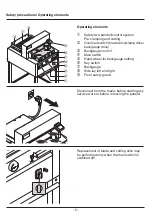
Page 5: ...ormed only when the main switch is switched off Operating elements A Safety two handed control system Pre clamping and cutting B Overload switch blade drive clamp drive backgauge drive C Backgauge con...

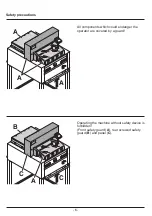
Page 6: ...A B All components which could endanger the operator are covered by a guard Operating the machine without safety device is forbidden Front safety guard A rear screwed safety guard B and panel C Safety...

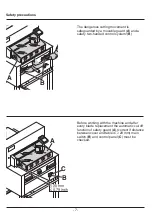
Page 7: ...and a safety two handed control system B Before working with the machine and after every blade replacement the automatic cut off function of safety guard A correct if distance between cover and table...

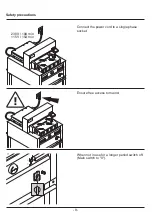
Page 8: ...8 230V 10A min 115V 15A min Connect the power cord to a single phase socket Ensure free access to mains When not in use for a longer period switch off Main switch to 0 Safety precautions...

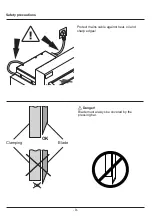
Page 9: ...9 Danger Blade must always be covered by the pressing bar Protect mains cable against heat oil and sharp edges Clamping Blade OK OK Safety precautions...

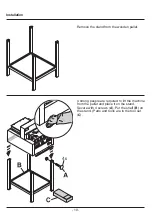
Page 10: ...d from the wooden pallet 4 strong people are required to lift the machine from the pallet and place it on the stand Secure with 4 screws A Put the shelf B on the stand Parts and tools are in the tool...

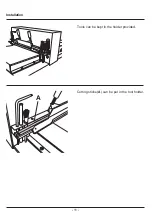
Page 11: ...11 A Tools can be kept in the holder provided Cutting sticks A can be put in the tool holder Installation...

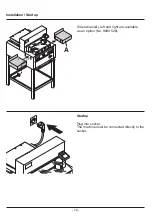
Page 12: ...12 A Startup Plug into socket The machine must be connected directly to the socket Side tables A left and right are available as an option No 9000 528 Installation Startup...

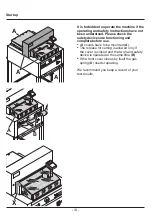
Page 13: ...afety devices are functioning and complete before use All covers have to be mounted A The release for cutting is allowed only if the cover is closed and the two hand safety device is operated at the s...

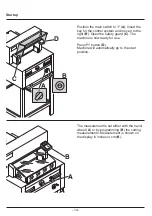
Page 14: ...measurements Measurement is shown on the display in inches or cm B Position the main switch to I A Insert the key for the control system and move it to the right B Open the safety guard C The machine...

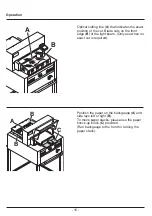
Page 15: ...ade cuts on the front edge B of the light beam Only use when no exact cut is required Position the paper on the backgauge A and side lays left or right B To move paper stacks please use the paper knoc...

Page 16: ...actuators A on the front table Cutting sequence with automatic clamping Press down both actuators to step 2 Clamp returns Press down completely one of the actuators Pre clamping Press down both actua...

Page 17: ...rs of the two handed control system A simultaneously and keep pressed until the paper is completely cut To interrupt or stop cutting To interrupt or stop cutting release both actuators A of the two ha...

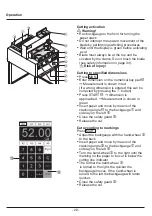
Page 18: ...J backgauge Gmoves to the rear and searches for the reference position wait until a measurement is shown in the display C 4855 45 00 cm 17 717 inches 5255 52 00 cm 20 472 inches 6655 61 00 cm 24 016 i...

Page 19: ...tform 3 or 4 Enter the required measurements or overwrite them Press the button and keep it pressed until an acoustic signal sounds the measurements have been saved now Warning Before storing or cutti...

Page 20: ...cted by pressing the Y button Press STARTM dimension is approached Measurement is shown in green Insert paper and move by means of the stacking angle J to the backgauge G and side lay on the left H Cl...

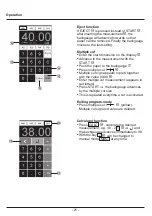
Page 21: ...backgauge G Press multiple cut O Multiple cut sign appears top left together with the value 00 00 P Enter multiple cut measurement appears in red letters Press START the backgauge advances by the mul...

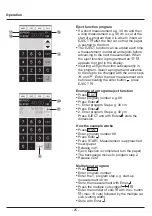
Page 22: ...when the machine is off Entering a program Press EDIT Load program no appears Enter program number 01 99 with Top number Q on display program number If measurement is shown on the display the program...

Page 23: ...up measurement 40 cm Store the measurement with enter Press CALC X calculate the desired measurement e g 40 2 Y the calculated measurement 38 a flashes Pressing the Enter key again the calculated meas...

Page 24: ...RUN mode the original data is stored again Delete a step Press EDIT Enter program number confirm with Enter Select program step with the arrow keys b and j Scroll with STEP until Delete step no appea...

Page 25: ...ment and before activating the enter button press EJECT N Example of a program eject function Press EDIT Enter program number e g 08 Press Enter 1 Enter program Step e g 30 cm Press Enter 2 Enter prog...

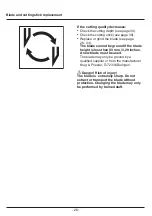
Page 26: ...he blade height is less than 83 mm 3 29 inches A new blade must be used The blade may only be ground by a qualified supplier or from the manufacturer Krug Priester D 72336 Balingen Danger Risk of inju...

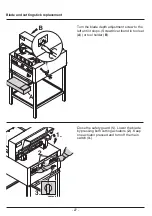
Page 27: ...to the left until it stops Screwdriver found in tool set A or tool holder B Close the safety guard 1 Lower the blade by pressing both cutting actuators 2 Keep one actuator pressed and turn off the ma...

Page 28: ...wrench and attachable extension pipe A in the tool set The slot must correspond to position 0 B Only 4855 Unscrew the blade screws C on the right hand side Remove the special wrench Close the safety...

Page 29: ...g tool A into place and fasten it to the blade 3 Remove 2 blade screws 1 4855 and 3 blade screws 1 5255 6655 Loosen the grips 2 of the blade changing tool A lightly and allow the blade to be taken dow...

Page 30: ...tick according to top picure Turn the cutting stick the non used side must be near to the blade and plug it into the holding bolt Danger Risk of injury Cutting test after replacing the cutting stick n...

Page 31: ...he blade carrier and push it up to the top and screw it into place with the grips 2 Take the exchange blade carefully out of the blade box and screw it to the blade changing tool A Make sure there is...

Page 32: ...htly tighten 3 4855 has 2 of the 5 blade screws with washers 1 Remove the blade changing tool 2 Lightly tighten the remaining blade screws with washers 3 Return blade changing tool to tool holder B On...

Page 33: ...Open the safety guard 4 With the special wrench B the 3 eccentrics should be screwed down 5 until the paper is cut along the entire length of the blade The blade must remain parallel not too deep int...

Page 34: ...or blade depth adjustment A turn to the right until the paper is cut along the entire length Do not set too low as blade will become blunt sooner Danger by blade replacement Blade must always be cover...

Page 35: ...tool set or tool holder Remove any paper Grease the machine Check the 4 joining bolts and 2 pushing bars for wear D If necessary inform your service personnel Mount the machine With more than 5 hours...

Page 36: ...ester com 2021 Safety test The safety regulations are according to the regulations of the country where the cutting machine is operated The manufacturer recommends a safety check is made every 5 years...

Page 37: ...37 A B Is the machine plugged in Main switch to position I A Control system activated B Turn key to the right Release a cut see page 17 Machine does not function Possible malfunctions...

Page 38: ...38 Cut cannot be made If cover is open close it If cover is closed open and re close it Security check Possible malfunctions...

Page 39: ...time and reset the safety button A or B Machine blocked Blade is blunt Eliminate the cause and push the safety button A Backgauge blocked Safety button C ejects Eliminate the cause and push the safety...

Page 40: ...last sheet Turn or turn around the cutting stick A readjust the blade by means of the blade adjusting knob B see page 34 Poor cutting quality or blade stays in the paper stack Change the blade C see...

Page 41: ...aker After 30 minutes the screen switches to energy saving mode The screen is reactivated by touching the keypad area L Motor runs but blade does not move downwards Security brake has been activated I...

Page 42: ...0 126 4855 No 9000 131 5255 No 9000 135 6655 Cutting stick 6 pieces No 9000 022 4855 No 9000 024 5255 No 9000 026 6655 Blade changing tool 1 No 9000 523 4855 No 9000 524 5255 No 9000 526 6655 Paper kn...

Page 43: ...hine must still carry its original identification label Cutting length mm Table depth mm Minimum space requirement W X D X H mm Weight kg 4855 475 450 762 x 992 x 1296 228 5255 520 520 860 x 1120 x 12...

Page 44: ...ved by independent safety laboratories and is in compliance with the EC regulations 2006 42 EG and 2014 30 EG Sound level information Sound measurement to EN 13023 72 5 db A Subject to alteration with...

Page 45: ...s the following certifications Quality management system according to DIN EN ISO 9001 2015 Environmental management system according to DIN EN ISO 14001 2015 Energy management system according to DIN...

Page 46: ...ive 2014 30 EG EMV Electromagnetic compatibility directive 2011 65 EU 2015 863 EU RoHS directive Applied harmonised standards in particular EN 60204 1 EN 1010 1 EN 1010 3 EN 55014 1 EN 55014 2 EN 6100...

Page 47: ...47...

Page 48: ...Krug Priester GmbH Co KG Simon Schweitzer Str 34 D 72336 Balingen Germany www krug priester com 01 2020 10 01 2020 zm Document Shredders Trimmers and Guillotines 9700214 9700157 Made in Germany...

Reviews: