background image

Bedienungsanleitung

9

D

E

Owner’s manual

9

E

N

SAFETY INSTRUCTIONS

Read this instruction manual and keep it for future reference.

Producer does not take responsibility for damages caused by

inappropriate handling and use of the product.

1. Protect this device from extreme temperatures, sources of heat

and direct sunlight. Do not expose the device to water or

humidity nor install near strong magnetic field. Do not handle

this device with wet hands.

2. Disconnect from power outlet if the device is not going to be

used for a long time.

3. Do not use this device if it has been damaged.

4. Place the device on flat, stable surface.

5. Prevent the device from falling on the ground or being strongly

impacted.

6. Producer does not claim liability for any damage caused by

inappropriate use and handling or any mechanical damage.

7. Producer does not guarantee compatibility with every external

device.

8. This product is not a toy; keep it beyond children's reach.

9. Do not disassemble nor repair this device yourself. The device

has no user serviceable parts inside. In case of damage, contact

authorized service point for check-up or repair.

10.Always disconnect the product from the power source before

cleaning. Clean the device with a soft, slightly damp cloth. Do not

use any chemical agents to clean this device.

Summary of Contents for KM0752

Page 1: ...Gaming mouse KM0752 DE EN PL RO BEDIENUNGSANLEITUNG OWNER S MANUAL INSTRUKCJA OBSŁUGI MANUAL DE UTILIZARE ...

Page 2: ...Bedienungsanleitung 2 DE ...

Page 3: ...eine flache stabile Oberfläche aufstellen 5 Verhindern Sie dass das Gerät auf den Boden fällt oder starken Stößen ausgesetzt wird 6 Der Hersteller übernimmt keine Haftung für Schäden die durch unsachgemäße Verwendung und Handhabung oder mechanische Beschädigungen verursacht wurden 7 Der Hersteller garantiert keine Kompatibilität mit jedem externen Gerät 8 Dieses Produkt ist kein Spielzeug halten S...

Page 4: ...e Maustasten INSTALLATION 1 Verbinden Sie den USB Stecker der Maus mit einem kompatiblen USB Steckplatz am Computer 2 Das Betriebssystem erkennt automatisch die Maus und installiert die zugehörigen Treiber 3 Die Maus ist betriebsbereit INSTALLATION DER ANWENDUNG Um die zusätzlichen Funktionen der Maus nutzen zu können muss die Anwendung installiert werden Laden Sie die Installationsdatei 1 2 3 4 5...

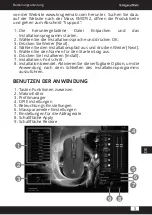
Page 5: ... Installationspfad aus und drücken Weiter Next 5 Wählen Sie den Namen für den Starteintrag aus 6 Drücken Sie Installieren Install 7 Installations Fortschritt 8 Installation beendet Aktivieren Sie die verfügbare Option um die Anwendung nach dem Schließen des Installationsprogramms auszuführen BENUTZEN DER ANWENDUNG 1 Tasten Funktionen zuweisen 2 Makro Editor 3 Profilmanager 4 DPI Einstellungen 5 Be...

Page 6: ...eignis einfügen Insert event 6 Um ein Makro zu aktivieren weisen Sie einer der Tasten eine Makrofunktion zu Profilmanager 1 Drücken Sie die Schaltfläche um ein neues profil hinzuzufügen 2 Drücken Sie die Schaltfläche Mülltonne um das Profil zu löschen 3 Drücken Sie die Schaltfläche Optionen um das Profil zu exportieren importieren oder den Profilnamen zu ändern Zusätzliche Einstellungen DPIEinstel...

Page 7: ...der chemische Mittel TECHNISCHE DATEN Empfindlichkeit 800 1600 2400 3600 5000 dpi Sensor Laser Sensormodell Pixart3360 Beschleunigung 50G Abfragerate 1000 Hz s Knöpfe 10 Scrollrad Scrollen Taste Rad und Logo Hintergrundbeleuchtung einstellbar 7 Modi DPI Schalter 5 Modus Tastenlebensdauer bis zu 2 Millionen mal Pad Lebensdauer 10 km Abhebabstand 2 2 5 mm Rutsch Pads Kunststoff Material ABS struktur...

Page 8: ...ourcen zu fördern Private Nutzer sollten den Händler bei dem das Produkt gekauft wurde oder die zuständigen Behörden kontaktieren um in Erfahrung zu bringen wie sie das Gerät auf umweltfreundliche Weise recyceln können Gewerbliche Nutzer sollten sich an Ihren Lieferanten wenden und die Bedingungen des Verkaufsvertrags konsultieren Dieses Produkt darf nicht zusammen mit anderem Gewerbemüll entsorgt...

Page 9: ...is device if it has been damaged 4 Place the device on flat stable surface 5 Prevent the device from falling on the ground or being strongly impacted 6 Producer does not claim liability for any damage caused by inappropriate use and handling or any mechanical damage 7 Producer does not guarantee compatibility with every external device 8 This product is not a toy keep it beyond children s reach 9 ...

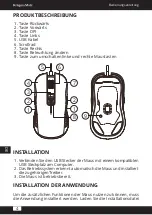
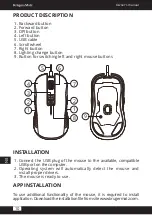
Page 10: ... mouse buttons INSTALLATION 1 Connect the USB plug of the mouse to the available compatible USB port on the computer 2 Operating system will automatically detect the mouse and install proper drivers 3 The mouse is ready to use APP INSTALLATION To use additional functionality of the mouse it is required to install application Download the installation file from site www krugermatz com 1 2 3 4 5 6 7...

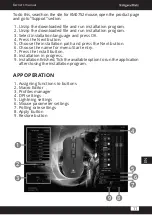
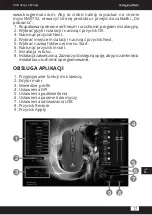
Page 11: ...e installation path and press the Next button 6 Choose the name for menu Start entry 7 Press the Install button 8 Installation in progress 9 Installation finished Tick the available option to run the application after closing the installation program Owner s manual 11 EN APP OPERATION 1 Assigning functions to buttons 2 Macro Editor 3 Profiles manager 4 DPI settings 5 Lightning settings 6 Mouse par...

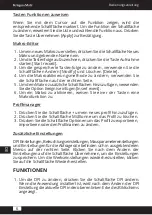
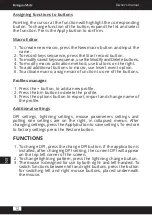
Page 12: ... profile 2 Press the bin button to delete the profile 3 Press the options button to export import and change name of the profile Additional settings DPI settings lightning settings mouse parameters settings and polling rate settings are on the right in collapsed menus After changing settings press the Apply button to save settings To restore to factory settings press the Restore button FUNCTIONS 1...

Page 13: ...e 1000 Hz s Buttons 10 Scroll wheel scroll button Wheel and logo backlight adjustable 7 modes DPI switch 5 modes Stroke life up to 2 million times Pad life 10 km Lift off distance 2 2 5 mm Skid pads plastic Material ABS textured rubber Power supply via USB 5 V 100 mA Communication Connection type wired Interface USB 2 0 Supported OS Windows XP Windows Vista Windows 7 Windows 8 Windows 8 1 Windows ...

Page 14: ...er household wastes at the end of its working life To prevent possible harm to the environment or human health from uncontrolled waste disposal please separate this from other types of wastes and recycle it responsibly to promote the sustainable reuse of material resources Household users should contact either the retailer where they purchased this product or their local government office for deta...

Page 15: ...skiej suchej i stabilnej powierzchni 5 Urządzenie należy chronić przed upadkiem lub silnym naciskiem 6 Producent nie ponosi odpowiedzialności za uszkodzenie spowodowane niewłaściwym użytkowaniem konserwacją czy uszkodzeniami mechanicznymi 7 Producent nie gwarantuje kompatybilności urządzenia ze wszystkimi urządzeniami zewnętrznymi 8 Urządzenie nie jest zabawką należy przechowywać je w miejscu nied...

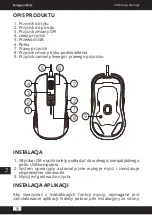
Page 16: ...rzycisku INSTALACJA 1 Wtyczkę USB myszki należy podłączyć do wolnego kompatybilnego portu USB komputera 2 System operacyjny automatycznie wykryje mysz i zainstaluje odpowiednie sterowniki 3 Mysz jest gotowa do użycia INSTALACJA APLIKACJI Aby skorzystać z dodatkowych funkcji myszy wymagane jest zainstalowanie aplikacji Należy pobrać plik instalacyjny ze strony 1 2 3 4 5 6 7 2 1 8 9 Instrukcja obsłu...

Page 17: ...Next 4 Wybrać miejsce instalacji i nacisnąć przycisk Next 5 Wybrać nazwę folderu w menu Start 6 Nacisnąć przycisk Install 7 Instalacja w toku 8 Instalacja zakończona Zaznaczyć dostępną opcję aby po zamknięciu instalatora uruchomić oprogramowanie OBSŁUGA APLIKACJI 1 Przypisywanie funkcji do klawiszy 2 Edytor makr 3 Menedżer profili 4 Ustawienia DPI 5 Ustawienia podświetlenia 6 Ustawienia parametrów...

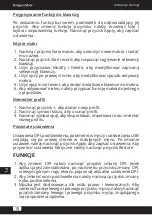
Page 18: ...nowy profil 2 Nacisnąć symbol kosza aby usunąć profil 3 Nacisnąć symbol opcji aby eksportować importować oraz zmieniać nazwę profilu Pozostałe ustawienia Ustawienia DPI podświetlenia parametrów myszy i odświeżania USB znajdują się po prawej stronie w rozwijanych menu Po zmianie ustawień należy nacisnąć przycisk Apply aby zapisać ustawienia Aby przywrócić ustawienia fabryczne należy nacisnąć przyci...

Page 19: ...360 Przyspieszenie 50G Odświeżanie USB 1000 Hz s Ilość przycisków 10 Rolka przewijanie przycisk Podświetlenie rolki i logo regulowane 7 trybów Przełącznik DPI 5 trybów Trwałość przycisków do 2 milionów kliknięć Trwałość stopki 10 km LOD 2 2 5 mm Ślizgacze plastikowe Materiał ABS teksturowana guma Zasilanie przez USB 5 V 100 mA Komunikacja Komunikacja z komputerem przewodowa Interfejs USB 2 0 Obsłu...

Page 20: ...iejsca i sposobu bezpiecznego dla środowiska recyklingu tego produktu użytkownicy w gospodarstwach domowych powinni skontaktować się z punktem sprzedaży detalicznej w którym dokonali zakupu produktu lub z organem władz lokalnych Użytkownicy w firmach powinni skontaktować się ze swoim dostawcą i sprawdzić warunki umowy zakupu Produktu nie należy usuwać razem z innymi odpadami komercyjnymi Wyproduko...

Page 21: ...tilizați acest dispozitiv dacă acesta a fost deteriorat 4 Așezați dispozitivul pe o suprafață plană stabilă 5 Evitați șocurile mecanice 6 Producătorul nu este răspunzător pentru eventualele daune cauzate de folosirea necorespunzătoare manipularea sau orice deteriorare mecanică a produsului 7 Producătorul nu garantează compatibilitatea cu oricare dispozitiv extern 8 Acest produs nu este o jucărie n...

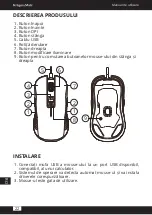
Page 22: ...apta 8 Buton modificare iluminare 9 Buton pentru comutarea butoanelor mouse ului din stânga și dreapta INSTALARE 1 Conectați mufa USB a mouse ului la un port USB disponibil compatibil al unui calculator 2 Sistemul de operare va detecta automat mouse ul și va instala driverele corespunzătoare 3 Mosue ul este gata de utilizare 1 2 3 4 5 6 7 2 1 8 9 ...

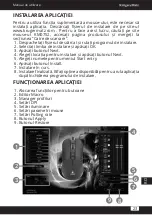
Page 23: ...ramul de instalare 2 Selectați limba de instalare și apăsați OK 3 Apăsați butonul Next 4 Alegeți locația pentru instalare și apăsați butonul Next 5 Alegeți numele pentru meniul Start entry 6 Apăsați butonul Install 7 Instalare în curs 8 Instalare finalizată Bifați opținea disponibilă pentru a rula aplicația după închiderea programului de instalare FUNCȚIONAREA APLICAȚIEI 1 Alocarea funcțiilor pent...

Page 24: ... event 6 Pentru a acriva funcția macro alocați funcția macro unuia dintre butoane Manager profilui 1 Apăsați butonul pentru a adăuga un profil nou 2 Apăsați butonul coș de gunoi pentru a șterge profilul 3 Apăsați butonul opțiuni pentru a exporta importa și modifica denumirea profilului Setări suplimentare Setările DPI setările pentru iluminare setările parametrilor mouse ului și setările polling r...

Page 25: ...I Parametri tehnici Rezolutie 800 1600 2400 3600 5000 dpi Senzor laser Model senzor Pixart3360 Accelerare 50G Refresh 1000 Hz s Butoane 10 Rotiță derulare scroll derulare buton Lumină de fundal rotiță și logo reglabilă 7 moduri Comutator DPI 5 modele Durabilitate buton până la 2 milioane de acționări Durabilitate piciorușe mouse 10 km LOD 2 2 5 mm Glisiere plastic Material ABS cauciuc Alimentare p...

Page 26: ...asnici sunt rugati să ia legatura fie cu distribuitorul de la care au achizitionat acest produs fie cu autoritatile locale pentru a primi informatii cu privire la locul si modul in care pot depozita acest produs in vederea reciclarii sale ecologice Utilizatorii institutionali sunt rugati să ia legatura cu furnizorul și să verifice condițiile stipulate in contractul de vanzare Acest produs nu trebu...

Page 27: ...Manual de utilizare 27 RO ...

Page 28: ...www krugermatz com is a registered trademark ...

Reviews: