background image

information in the sales catalogues or from the illu-
strations presented in this booklet. However, this
will not reduce safety or invalidate the information
supplied to this regard.

3. SAFETY INFORMATION

3.1 BASIC RECOMMENDATIONS
(

) Carefully read the “instruction manual”

before starting, using, performing unschedu-
led or routine maintenance or any other work
on the machine.

) Rigorously comply with all the instruc-

tions provided in this manual and in those for
the batteries and battery chargers (with par-
ticular attention to warnings and danger no-
tices).
The manufacturer will not be held responsi-
ble for injuries to persons or damage to pro-
perty due to non-compliance with the
aforementioned instructions.
(

)

Before using the machine, make sure that

each part is in the correct position.  

The machine can only be used by personnel

who have received appropriate training, who have
proven their skills and who have been expressly as-
signed to use it. To avoid unauthorised use, keep
the machine in a place that denies access to unau-
thorised personnel when not being used and re-
move the key from the control panel.

)

Minors are prohibited from using the machine. 

)

Do not operate this machine for any other pur-

pose except for the use for which it was specifically
designed. Evaluate the type of building where it will
be utilised and rigorously comply with the current
safety regulations and conditions.

(

)

Do not use the machine in places without ade-

quate lighting, in explosive environments, when
harmful dirt is present (dust, gas, etc.), on roads or
public passage ways and in outdoor environments
in general.

)

The machine operating temperature range is

+4°C to + 35°C; when not being used, store the
machine in a dry and non-corrosive environment
within a temperature range of b 10°C and
+ 50°C.
When using the machine under any condition the
humidity must range between 30% and 95%.

(

) Never use or vacuum liquids, gases, dry

dust, acids and solvents (e.g. paint thinners,
acetone, etc.), even if diluted, inflammables
or explosives (e.g. petrol, fuel oil, etc.); never
vacuum flaming or incandescent objects.

) Do not use the machine on slopes or

ramps steeper than 2%;

for small slopes, do not use the machine sideways,
always handle it with caution and never move back-
wards. When transporting the machine on steeper
ramps or slopes, be very careful to avoid tipping

and/or uncontrolled accelerations. 
The machine can be handled on ramps and/or
steps only with the brush head and squeegee lifted
off the ground. 

) Never park the machine on a slope.  

(

)

Never leave the machine unattended with the

key in and connected; it may be left only after ha-
ving disconnected it and taken the key out and gua-
ranteeing against accidental movements and, if
necessary, disconnecting it from the electrical
power supply.

(

)

Make sure there are no other persons, and

children in particular, in the area where the machine
is being used.  

)

Do not use the machine to transport per-

sons/things or to tow objects. Do not tow the ma-
chine. 

(

)

Do not use the machine as a support surface

for any weight for any reason. 
Do not block the ventilation and heat dispersion
openings. 

Do not remove, modify or by-pass the safety

devices. 

Always use individual safety devices to ensure

operator safety: aprons or safety overalls, non-slip
and waterproof shoes, rubber gloves, goggles and
earphones, and masks to protect the respiratory
tract. Before starting to work, remove necklaces,
watches, ties and other objects that may cause se-
rious injuries.

Do not insert hands between moving parts.

(

)

Do not use detergents that differ from those

required and follow the instructions indicated on
the relative safety sheets. Detergents should be
stored in a place that is inaccessible to children. In
case of contact with the eyes, rinse immediately
with copious amounts of water and, if swallowed,
immediately consult a physician. 
Make sure that the battery charger power sockets
are connected to an efficient earthing system and
that they are protected by magnetothermal and dif-
ferential circuit-breakers. 

)

Follow the battery manufacturer’s instructions

and comply with legal provisions. The batteries
should always be clean and dry to avoid surface
leakage currents. Protect the batteries against im-
purities, such as metallic dust. 

(

)

If the machine is equipped with gel batteries it

is essential to make sure the run-down indicator
(located on the panel) is adjusted correctly. Con-
tact your dealer or refer to the specific paragraph.

(

)

Do not place tools on top of the batteries: they

may cause a short-circuit or an explosion.

(

)

When using battery acid, rigorously respect the

relative safety instructions. In the presence of par-
ticularly strong magnetic fields, evaluate the possi-
ble effect on electronic control devices.
Never spray water on the machine to clean it.

(

)

Recovered fluids contain detergents, disinfec-

25

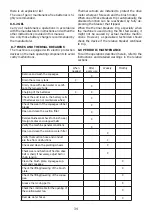
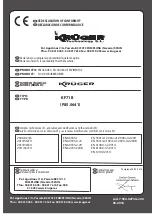
Summary of Contents for KF71B

Page 1: ...SECADORA DE PAVIMENTOS FLOOR SCRUBBER DRIER KF71B Technical data plate Placa dato técnicos ADVERTENCIA leer atentamente las advertencias antes el uso de aparado WARNING read the instructions carefully before use ...

Page 2: ...stalaci6nnoconformeconlasindicacionesdelmanualo por un uso imperfecto del aparato ConditionsofWarranty All our appliances are subjected to rigorous tests and are covered by warranty against material or manufacturing defects for a pe riod of 12 months The warranty comes into effect from the date of purchase The date of purchase is the date indicated on the re ceipt issued by the Reseller when the a...

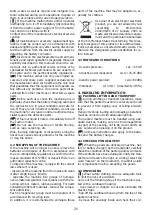
Page 3: ...3 3 1 2 8 7 6 5 4 5 2 4 7 3 1 A B 9 6 8 10 ...

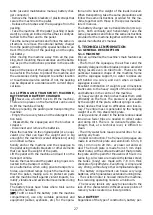
Page 4: ...4 4 3 1 5 6 1 2 3 4 4 3 2 5 6 5 6 C D 7 2 ...

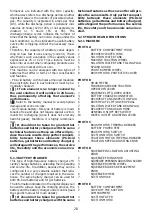
Page 5: ...5 E 2 1 4 3 ...

Page 6: ...6 F G 2 2 1 Gel Acid 1 3 ...

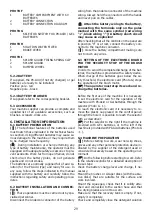
Page 7: ...7 H 1 2 1 2 3 I ...

Page 8: ...BOQUILLA DE SECADO 7 2 2 DESMONTAJE DE LA BOQUILLA DE SECADO 7 2 3 SUSTITUCIÓN DE LOS LABIOS DE LA BOQUILLA DE SECADO 7 2 4 REGULACIÓN DE LA BOQUILLA DE SECADO 7 2 5 MONTAJE Y DESMONTAJE DEL PROTECTOR CONTRA SALPICADURAS 7 3 MONTAJE DESMONTAJE Y REGULAC IÓN DE LOS ACCESORIOS CEPILLOS PLATOS DE ARRASTRE Y DISCOS ABRASIVOS 7 4 LLENADO Y DESCARGA DEL DEPÓSITO DE LA SOLUCIÓN LIMPIADORA 7 5 VACIADO DEL...

Page 9: ...almente utilizan la máquina y que co nocen su funcionamiento pero que no tienen conocimientos técnicos específicos para poder rea lizar las intervenciones que pudieran ser necesa rias Técnico Por técnico se entienden las personas con la experiencia preparación técnica y conoci mientos legislativos y normativos necesarios para permitir realizar todo tipo de intervención en la má quina con la capaci...

Page 10: ...cos y en ambientes exteriores en general El campo de temperatura previsto para el uso de la máquina es de 4 C a 35 C coloque la má quina en reposo en un lugar seco y no corrosivo donde la temperatura esté comprendida entre 10 C y 50 C El campo de humedad previsto para la máquina en cualquier condición en que la misma se encuentre es del 30 al 95 No use o aspire nunca líquidos gases polvos secos ác...

Page 11: ...s proporcionados exclusivamente por el fabricante puesto que sólo estos recambios garan tizan que la máquina funcione de modo seguro y sin inconvenientes No use piezas desmontadas de otras máquinas u otros juegos de piezas como re cambios Compruebe la máquina cada vez que deba uti lizarla En especial compruebe que el cable de re carga de la batería y el conector estén en buenas condiciones y que s...

Page 12: ... para proteger la máquina y los accesorios en caso de transporte a otro lugar o a los centros de asistencia autorizados Si no desea guardar el embalaje el mismo deberá eliminarse según lo establecido en las leyes vigen tes en materia 4 4 ELEVACIÓN Y TRANSPORTE MÁQUINA BATERÍA Y CARGADOR DE BATERÍAS Nunca levante la máquina con una carretilla elevadora el bastidor no tiene los elementos nece sarios...

Page 13: ...ralmente se indica en 20 horas C20 o bien 20h o bien no se indica expresamente o 5 horas C5 o bien 5h Los ciclos de descarga carga son la indi cación del número de veces que la batería soporta la carga en las mejores condiciones es decir indi can la vida útil de la batería respetando todas las prescripciones previstas Por lo tanto la capacidad de una batería varía en función de la velocidad con la...

Page 14: ...IÓN FOTO E 1 HABITACULO BATERÍAS 12 TAPON DE INSPECCIÓN DEL ASPIRACIÓN 3 FILTRO DE ASPIRACIÓN 4 MOTOR DE ASPIRACION FOTO F 1 HABITACULO BATERÍAS CON BATERÍAS 6V 2 CONEXIÓN DE LAS BATERÍAS 3 DIAGRAMA DE CONEXIÓN DE LAS BATERÍAS FOTO G 1 SELECTOR PARA BATERÍAS PB ACIDO GEL FOTO H 1 FILTRO DE LA SOLUCION LIMPIADORA 2 FRENO FOTO I 1 MUELLE DE FIJADO DEL PROTECTOR DE SALPICADURAS 2 PROTECTOR DE SALPICA...

Page 15: ... remítase a los párrafos especí ficos para una detallada descripción de estas fases Compruebe el nivel de carga de la batería y si fuera necesario recárguela Monte los cepillos o los platos de arrastre con los discos abrasivos del tipo adecuado para la super ficie y el trabajo que se ha de realizar Monte la boquilla de secado compruebe que esté bien fijado y contactado al tubo de aspiración asi mi...

Page 16: ...álicos sobre el labio ante rior e insertar las vides de fijado en los agujeros Acercar primera de un lado luego del otro el labio anterior y los listeles con las vides al cuerpo del ter gipavimento y centrar los agujeros de guía Añadir a este punto el labio posterior centrando una vez más los agujeros sobre las vides salientes Cerrar los listeles con los pómulos de fijado Foto D 5 empezando de una...

Page 17: ... normas de seguridad especificadas en el correspondiente párrafo y en el envase del deter gente Para tener una lista completa de los detergentes adecuados disponibles diríjase al fabricante de la máquina Añada el detergente después de haber lle nado de agua el depósito para evitar así que se forme espuma en su interior No deje sin vigilancia el tubo del agua para el lle nado introdúzcalo completam...

Page 18: ...ntra el cargador de baterías para recargar las mismas Las baterías se pueden dañar irremediable mente si el nivel de carga residua se reduce exce sivamente véase el manual de uso de la batería no fuerce la descarga de la batería más allá de los límites fijados por los dispositivos de seguridad apagando y volviendo a encender la llave o de nin gún otro modo 7 7 3 LAVADO DIRECTO O PARA SUPERFI CIES ...

Page 19: ... secado 8 3 BOQUILLA DE SECADO No maneje la boquilla de secado a manos de scubiertas póngase guantes y todas las prendas de seguridad adecuadas para la operación Desacople la boquilla de secado de la máquina y límpielo colocando debajo de un chorro de agua corriente con una esponja o un cepillo Compruebe la eficacia y el desgaste de los labios en contacto con el pavimento Las mismas tienen la func...

Page 20: ...dos un técnico especializado debe comprobar que el di spositivo funcione correctamente en caso de que el disyuntor continúe interviniendo 8 8 MANTENIMIENTO PROGRAMADO Para todas las operaciones descritas en este pár rafo remítase a las instrucciones y a las adverten cias detalladas en los correspondientes párrafos 20 A la necesidad Después de cada empleo Cada semana Cada mes Desmontaje y lavado de...

Page 21: ...stá vacío Llenar el depósito de la solución después de haber vaciado el depósito de recuperación La palanca de regulación del flujo está cerrada o casi cerrada Regular aumentar el flujo de salida de la solu ción según se desee El conducto de suministro del detergente está obstruido en algún punto Liberar el conducto eliminando la suciedad 9 5 FALTA ASPIRACIÓN El tubo de aspiración no está conectad...

Page 22: ...ulador alcanza las máximas prestaciones transcurridos unos 20 30 ciclos de recarga comple tos El electrolito se ha evaporado y no cubre com pletamente las placas Controlar el manual de uso y mantenimiento del fabricante de las baterías Hay notables diferencias de densidad entre los diferentes elementos Cambiar la batería dañada Consulte siempre el manual de uso y manteni miento de las baterías y d...

Page 23: ...D ADJU STMENT 7 2 1 SQUEEGEE ASSEMBLY 7 2 2 SQUEEGEE DISASSEMBLY 7 2 3 SQUEEGEE BLADES DISASSEMBLY AS SEMBLY 7 2 4 SQUEEGEE ADJUSTMENT 7 2 5 SPLASH GUARD ASSEMBLY DISASSEMBLY 7 3 BRUSH ASSEMBLY DISASSEMBLY 7 4 FILLING AND DRAINING THE DETER GENT SOLUTION TANK 7 5 DRAINING THE RECOVERY TANK 7 6 DRIVING THE MACHINE 7 7 WORK METHOD 7 7 1 PREPARATION AND WARNINGS 7 7 2 OPERATING CONTROLS 7 7 3 DIRECT ...

Page 24: ...erson who has the experience technical education legi slative and regulatory knowledge that allows him to carry out any type of required work and the abi lity to recognise and to avoid possible risks during machine installation operation handling and main tenance INDICATION SYMBOL Particularly im portant information to avoid machine malfunctions ATTENTION SYMBOL Very important infor mation to avoi...

Page 25: ...ry careful to avoid tipping and or uncontrolled accelerations The machine can be handled on ramps and or steps only with the brush head and squeegee lifted off the ground Never park the machine on a slope Never leave the machine unattended with the key in and connected it may be left only after ha ving disconnected it and taken the key out and gua ranteeing against accidental movements and if nece...

Page 26: ... and clean it after emptying any liquids separate the machine into groups of homoge neous materials plastics in accordance with the re cycling symbol metals rubber packing For parts containing different materials contact the compe tent authorities Each homogeneous group must be disposed of in accordance with recycling laws In addition it is recommended to eliminate those parts of the machine that ...

Page 27: ...hooks etc for the opera tion and to bear the weight of the loads involved When transporting take the same precautions and follow the same instructions provided for the ma chine together with those in the special manufac turer s manual The battery charger can be transported on its sup ports both vertically and horizontally Take the same precautions and follow the same instructions provided for the ...

Page 28: ...y and the economic value inve sted 5 1 3 BATTERY CHARGER This type of high frequency battery charger effi ciently charges batteries extending their operating and service life In addition because they can be configured it is a very versatile solution that redu ces the number of chargers required in the ware house The same battery charger can be used for both Pb Acid batteries and for gel batteries ...

Page 29: ...rminals only on the poles marked with the same symbol red wiring black wiring A battery short circuit may cause an explosion After checking that all the controls on the panel are in position 0 or at rest connect the battery con nector to the machine connector Close the battery compartment making sure not to crush any wires 6 3 SETTING OF THE ELECTRONIC BOARD FOR THE SECURITY STOP OF THE BRUSH MOTO...

Page 30: ... check the element liquid in tensity on a regular basis if one or more elements are discharged and the others fully charged the battery has been damaged and should be replaced or repaired refer to the battery service manual Close the element plugs and lower the superior cover Hold the connectors with the hands don t pull them using the cables Reconnect the machine connectors 7 2 SQUEEGEE AND SPLAS...

Page 31: ...n them in the rotation direction while lowering to release them from the guide plate 7 4 FILLING AND DRAINING THE DETER GENT SOLUTION TANK The temperature of the water or the de tergent should never exceed 50 C Always empty the detergent solution tank before filling it up To fill Remove the plug in the front of the machine Leave 2 cm between the mouth of the plug and the liquid level Do not fill b...

Page 32: ... unit off on to the ground Suction switch to turn on the suction motor Solution flow adjustment lever to regulate the quantity maximum toward the bottom minimum toward the top of detergent solution to be applied on the floor Battery charge control the sequence of lights pro gressively turns off until the battery is discharged When the red light turns on turn off the brush motor close the solution ...

Page 33: ... SQUEEGEE Do not handle the squeegee with bare hands wear gloves and any safety clothing needed to carry out the operation Detach the squeegee from the machine and clean it under running water using a sponge or a brush Check the efficiency and the wear on the strips in contact with the floor They are designed to scrape the film of detergent and water on the floor and to isolate that portion of the...

Page 34: ...to trip 8 8 PERIODIC MAINTENANCE For all the operations described herein refer to the instructions and detailed warnings in the relative sections 34 When needed After every use Weekly Monthly Remove and wash the squeegee X Drain the recovery tank X Drain rinse with clean water or sanifi cate the recovery tank X Charging of the batteries X X Check the acid level in the battery cells if batteries ar...

Page 35: ...ENT SUCTION The recovery tank cover was not correctly ti ghtened Tighten it correctly The recovery tank drain hose plug is not perfec tly closed Close it correctly The suction hose the squeegee conduit or the inspection compartment is clogged Clean out and remove any obstructions from the conduits 9 6 THE BRUSH MOTOR OR THE SUCTION MOTOR DOESN T STOP Stop the machine cutting off the main power sup...

Page 36: ...CE y sus sucesivas modificaciones y también con la norma EN Declara bajo su propia responsabilidad que la màquina Declares under its responsability that the machine General manager Director general Pamplona 09 05 2016 Pol Agustinos C G Parcela B2 31013 PAMPLONA Navarra SPAIN Tfno 948 318 405 948 317 616 Fax 948 318 453 www kruger es Pol Agustinos C G Parcela B2 31013 PAMPLONA Navarra SPAIN Tfno 94...

Reviews: