background image

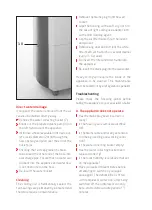
Direct water drainage

If required, the water removed from the air 
can also be drained directly away.

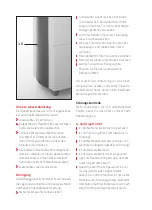
Remove the water collecting bucket (7)
Knock out the prepared plastic part (10) on 
the left-hand side of the ap pli ance
Introduce a hose (available from trade out-
lets, inside diameter 12 mm) through the 
new opening and push over the end of the 
outlet pipe
Ensuring that a steep gradient is main-
tained, lead the other end of the hose into 
a discharge pipe. Ensure that no water can 
run back into the appli ance and water flow 
is not obstructed in the hose.
Re-insert the water bucket

Cleaning

The cooling unit is hermetically sealed; the 
fan bearings are permanently lubri cated and 
therefore require no mainten ance.

Remove the mains plug from the wall 
socket.
Wipe the housing with a soft, dry cloth. In 
the case of light soiling use a damp cloth 
with a mild cleaning agent.
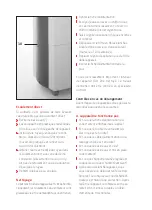
Grip the air filter frame (5) at the indent 
and pull out.
Remove any dust and lint from the white 
filter mesh with a brush or vac uum cleaner 
(every 3 – 4 weeks).
Re-insert the filter and filter frame into 
the appliance.
Re-insert the mains plug into the wall socket.

Heavy soiling will require the inside of the  
appliance to be cleaned. This main ten ance 
must be carried out by a refrig eration specialist.

Troubleshooting

Please check the following points before 


taking the appliance to your specialist retailer:

A. The appliance does not operate

Has the mains plug been inserted cor-
rectly?
Is the fuse in your electrical switchbox
OK?
Is the mains cable and/or any ex ten sion
cord being used in good working condi-
tion?
Is the water collecting bucket empty?
Has the water collecting bucket been
replaced correctly?
Is the room humidity level above that set
on the appliance?
Have you waited three minutes before
attempting to switch on your appli-
ance again? The dehumidifier is fitted
with compressor protection. After being
switched off, the compressor can only
be re-started after an idle period of 3
minutes.

10

Summary of Contents for 349.02

Page 1: ...Deutsch Seite 2 Fran ais Page 8 Italiano Pagina 12 English Page 16 entfeuchten heizen k hlen sanieren AIRSEC 3000 Bedienungsanleitung...

Page 2: ...pia di controllo secchiello Water container indicator light 4 Abtau Lampe Lampe t moin d givrage Spia di controllo sbrinamento Defrost light 1 3 4 2 A Ger t ausgeschaltet Appareil arr t Apparecchio sp...

Page 3: ...filter frame 6 Luftfilter Filtre air Filtro dell aria Air filter 7 Wasserbeh lter Bac eau Secchiello Water container 8 Traggriff Poign e Maniglia Carrying handle 9 Luft Austrittsklappe Volet de sortie...

Page 4: ...Verl ngerungskabel nur dann verwenden wenn Sie sich zuvor von dessen einwand freiem Zustand berzeugt haben Bei einer Kabelrolle ist das gesamte Kabel von der Rolle zu ziehen Das Ger t ist nicht in Be...

Page 5: ...nd T ren schliessen Netzstecker einstecken Betriebslampe 2 brennt Luft Austrittsklappe oben am Ger t ffnen ACHTUNG Ger t darf nicht mit geschlos sener Klappe in Betrieb genommen werden Korrekte Platzi...

Page 6: ...rausziehen Weisses Filternetz mit einer B rste oder Staubsauger entstauben alle 3 bis 4 Wochen Filterrahmen mit Filter ins Ger t einschieben Netzstecker wieder in Steckdose einstecken Warten Sie nach...

Page 7: ...t Sind die Ansaug und Ausblas ffnungen frei Ist die Raumtemperatur zu hoch oder zu niedrig s Rubrik Aufstellung Ist der Filter sauber Sollte die Kontrolle obiger Punkte zu keinem Erfolg f hren so muss...

Page 8: ...mains mouill es L appareil ne doit jamais tre d plac en le tirant par le c ble Le c ble ne doit pas tre en contact avec des ar tes vives ou tre cras Seules des rallonges en parfait tat doivent tre em...

Page 9: ...200 m3 Temp ratures de service minimale 12 C maximale 30 C Mise en service Fermer les portes et les fen tres Raccorder la fiche d alimentation la lampe t moin 2 s allume Ouvrir le clapet de sortie d...

Page 10: ...filtre en fibres blanches l aide d une brosse ou d un aspirateur toutes les 3 4 semaines Replacer la grille d aspiration avec le filtre dans l appareil Ins rer la fiche d alimentation dans la prise En...

Page 11: ...e Est ce que les ouvertures d aspiration et de sortie d air sont libres Est ce que la temp rature ambiante est trop lev e ou trop basse voir sous Installation Est ce que le filtre est propre Si apr s...

Page 12: ...entazione non va mai incas trato o fatto passare su spigoli taglienti Utilizzare eventuali prolunghe solo dopo averne appurato il perfetto stato Se si usa un tamburo avvolgicavo occorre svol gere tutt...

Page 13: ...Inserire la spina nella presa di corrente la spia d esercizio 2 s illumina Aprire il deflettore di emissione d aria in alto sull apparecchio ATTENZIONE mai mettere in esercizio l apparecchio a deflet...

Page 14: ...ressivo Estrarre la griglia d aspirazione 5 afferrandola alle tacche Rimuovere la polvere dal filtro a rete bian co con una spazzola o l aspirapolvere ogni 3 4 settimane Ricollocare la griglia d aspir...

Page 15: ...locale Le aperture di aspirazione e di emissione sono libere La temperatura del locale troppo bassa o troppo alta vedi rubrica installazione Il filtro pulito Se i controlli summenzionati non sortisser...

Page 16: ...n extension cable may only be used if prior inspection has shown it to be in a satisfactory condition If use of a cable reel is planned all the cable must be re moved from the reel before the cable ca...

Page 17: ...l windows and doors Insert the mains plug into a wall socket the pilot light 2 will illuminate Open the air outlet flap at the top of the appliance IMPORTANT The appliance must not be operated with a...

Page 18: ...ilter frame 5 at the indent and pull out Remove any dust and lint from the white filter mesh with a brush or vacuum cleaner every 3 4 weeks Re insert the filter and filter frame into the appliance Re...

Page 19: ...tlet vents unob structed Is the room temperature too high or too low see the heading Installation Is the filter clean If checks of the above points do not bring about satisfactory operation the applia...

Page 20: ...Kr ger Co AG Winterhaldenstrasse 11 9113 Degersheim 0848 370 370 info krueger ch www krueger ch entfeuchten heizen k hlen sanieren Hotline 0848 370 370 06 2020...

Reviews: