

“
KRUGER”
industrial and professional ventilators KCE Series, are components to be
installed in plants or building to create ventilation systems. Correct installation is
essential for the health and safety of people during operation of the appliance.
Therefore the regulations indicated in these instructions must be observed and the
mechanical protections must be prearranged.
If not properly installed the appliance may cause the risk of contact with the rotating
fan, with consequent collision and abrasion. In addition, if it is not wired correctly, it
may present risks related to electrical material. Should the appliance be required to
operate in isolation i.e in laboratory tests; it is necessary to block it appropriately
and prearrange the protections to avoid contact with the rotating parts. Room
temperature must not exceed 55°c.
It is best to install appliance as far as possible from areas usually occupied by people
to avoid accessibility and to reduce exposure to noise.
Transport
This appliance must not be overturn and the packing must not be
deformed during transport. If the gross weight indicated on the
package is over 10 kg, the package must be carried manually by
more than one person. Appliance arranged on wooden-pallets must
be moved with a transpallet.
Storage
The appliance should be stored in a dry place in their original
packing. Appliances packed in cardboard boxes may be stored on
top of one another up to a maximum of 2 meters, when not
otherwise indicated on the package. Appliances on pallets which
are placed in view cannot be stacked. After removing the packing,
check the integrity of the appliance. In case of doubt, do not use
the appliance and contact us. Packing elements (plastic bags, foam
rubber, nails, etc) must be kept out of the reach of children as they
are a potential source of danger.
Installation
When installation, note the following precautions :-
- remove packing and ensure the appliance is not damaged.
- Check that your electrical voltage and frequence correspond to those marked on
the rating label.
- Do not start or operate the fan unless the protection grille are in place.
- Install the fan before building the ceiling, it shall be installed where it is durable to
support the weight of the fan.
- The adopted material for ceiling shall be strengthened and resonance-resistance
(e.g. plaster board, celotax board)
- To prevent water from flowing back to the bathroom, tilt down the pipe to outdoor
for 1° to 2°.
- Select the exhaust-hole cover properly to avoid loud noise.
- Install height not lower than 2.5m.
Do not install it near gas
stove, above cooker or in
a place of high temp. over
40°C.
To improve the fan
efficiency in a closed
room, set up a convective
windows of 400 sq.cm in
opposite size to the fan.
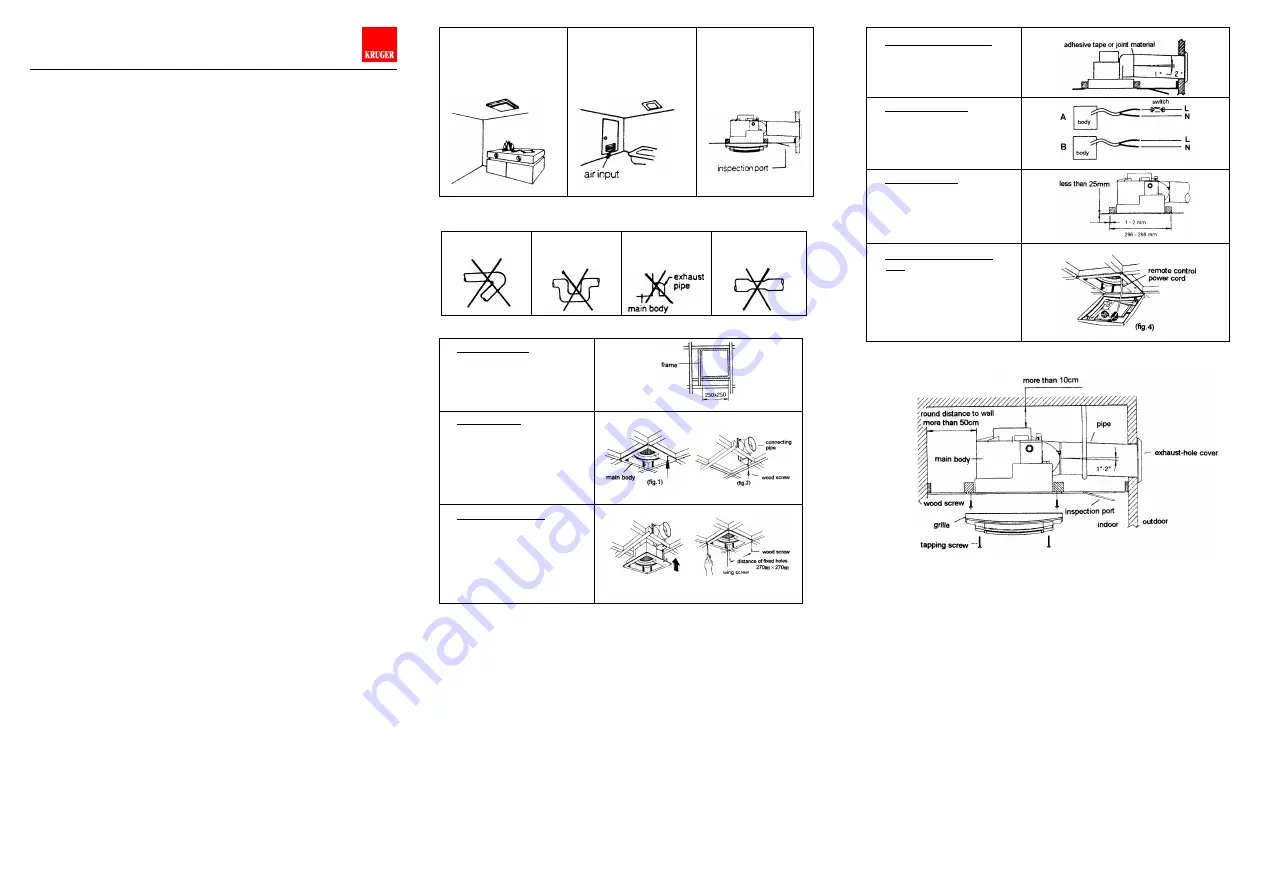
Make sure to keep the
inspection port
- Do not distribute the pipe according to the following ways or it will be wind, loud
noise and the counter flow board cannot be opened.
(1)
Overbent
(2)
Too many
bends on pipe
(3)
Exhaust bend
pipe too close to
the main body.
(4)
Connecting pipe
is shrunk
Installation Instruction
1. Frame Installation
Use strengthened frame to
support the whole weight of the
main body.
Woodframe use : 30 x 30 mm
Inner size : 250 x 250 mm
2. Connecting Pipe
Put the body into the fixing
frame, make a mark on it as per
the hole position shown in the
arrow and remove the body
(fig.1).
Tighten the wood screw at the
mark (fig.2).
3. Main Body Installation
Insert the main body aligned
with connecting pipe. Fix it
temporally by wind screw.
Connect the pipe with main
body tightly and fixed it by
additional screws #10x25 (5
pcs).
4. Connecting & Exhaust pipe
Seal up the connecting place by
adhesive tap or joint mixture.
Tilt down the exhaust pipe to
outdoor about 1° or 2°.
5. Electrical Distribution
Choose the corresponding wiring
diagram per your purchased
model.
A – normal model
B – remote control model
6. Ceiling Installation
Keep a space of 1 to 2mm
between ceiling and outer rim of
main body. Thickness of ceiling
shall be less than 25mm.
7. Test run and Installation of
grille
Switch power on and check
operation.
Remote control model – put
the plug of the remote control
power cord in the socket on IC
board in the grille (fig.4).
Illustration


