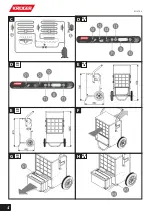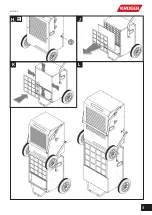
The air filter (J, K)
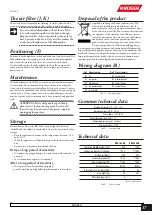
The air can be easily removed for cleaning. It can be cleaned with a
vacuum cleaner or with water: in this case dry it before assembly.
S
Do not run the dehumidifier without the air filter
to avoid accumulating dust on the heat exchanger.
Keep the air filter clean, in particular when al lot of
dust is present in the air: a dirty air filter reduces the
air flow and the efficiency of the dehumidifier.
Positioning (F)
To move the dehumidifier use the handle and run it on his wheels. The
dehumidifier must be simply placed in the room to be dehumidified
and started: the air inlet is in front, the air outlet is on the back.
It is advisable to place the dehumidifier in the coldest point of the
room, where normally the humidity level is higher, possibly near a
power socket.
Maintenance
The dehumidifiers of the KRG series need no particular maintenance.
It is advisable to dust them and keep the air intake and outlet grids
clean, check the air filter periodically and clean it if necessary. Contact
your dealer if it should function badly or breakdown. The power supply
cable has an T 13 type connection; in the event of damages, the cable
must be replaced with a similar one only by experienced and qualified
staff.
!
ATTENTION: before doing anything on the ap-
pliance select the functioning mode 0, wait until
the unit stops then disconnect the power supply by
unplugging the machine.
Storage
The machines of the series KRG have been designed to be easily
stackable and this allows to considerably reduce the spaces needed for
storage.
• Keep the appliance in a room with a temperature between –25°C
and +55°C.
• When the appliance is still packed keep to the instructions on the
box.
• Do not place other heavy material on the box.
Before a long period of inactivity
…
• Disconnect the plug and empty the condensate collection tank (if
present);
• cover the machine to protect it from dust.
After a long period of inactivity
…
• The fan must turn freely without gripping;
• put the machine working following this manual’s instructions.
Disposal of the product
Applicable in European Union countries only. The
crossed-out rubbish bin symbol indicates that the
product must be collected separately from other waste
at the end of its useful life. The user must therefore take
the appliance at the end of its useful life to a special
centre for electrical and electronic waste collection or
hand it back to the retailer on purchasing a new
product of an equivalent type, on a one-for-one basis.
Proper segregated waste collection of old appliances
for subsequent recycling, treatment and environmentally compatible
disposal helps avoid possible negative effects on the environment and
health and favours recycling of the materials the product is made of.
Improper disposal of the product by the user entails administrative
sanctions provided for in the legislation of individual countries.
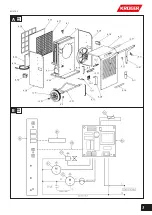
Wiring diagram (B)
Ref. Description
Ref. Description
B1 Fan
B6 Control board
B2 Compressor
B7 Humidity probe
B3 Power board
B8 Cable, 10 poles
B4 Temperature probe
B9 Solenoid valve
B5 Level switch
Tab.C – Wiring diagram
Common technical data
Working temperature [°C] +10 / +30
Working humidity [%U.R.] 40 / 95
Power supply 230 V, 50 Hz
Power absorption, stand-by [W] 1,2
Refrigerating gas charge [g] See label
Max pressure [kPa] 1500
Tab.D – Common data
Technical data
KRG 160 HE
KRG 240 HE
Indicative handling volume [m³]
860 1200
Condensate capacity [L/24hours]
(*) 19,0
(*) 34,08
Air flow [m³/hour]
600 850
Current absorption [A]
(*) 2,48
(*) 4,06
Power absorption [W]
(*) 520
(*) 890
Refrigerating gas
R410a R407c
Noise level at 1 m distance [dBa]
61 64
Dry weight [Kg]
38 59.7
Water tank capacity [L]
6
-
(*) at 20°C and 60 %R.H.
Tab.E – Technical data
ENGLISH
17
M1070-2
Summary of Contents for KRG 160 HE
Page 2: ...B KRG 160 A KRG 160 2 M1070 2...
Page 3: ...B KRG 240 A KRG 240 3 M1070 2...
Page 4: ...C E E F H G D D KRG 240 KRG 160 KRG 160 KRG 160 KRG 160 KRG 240 4 M1070 2...
Page 5: ...K H J KRG 240 L 5 M1070 2...
Page 18: ...Notizen Note Notes 18 M1070 2...
Page 19: ...Notizen Note Notes 19 M1070 2...
Page 20: ......

