background image

2

1

EN

9

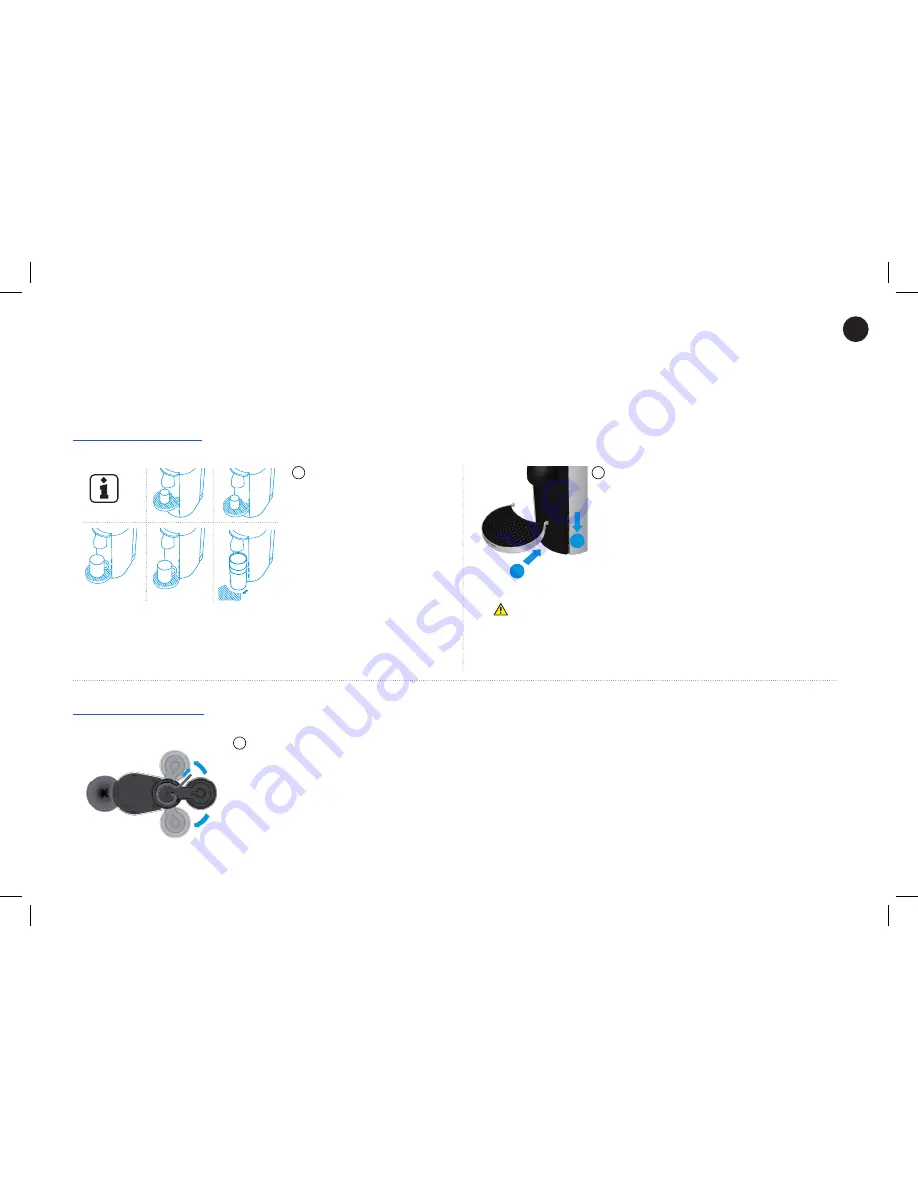
 CAUTION: 

Be careful 

when removing the cup support since 

it may contain warm liquid.  

Make sure the cup support is properly 

placed before putting the cup.

2   

To place the cup support, slide cup support straight into 

the holes and gently push down until the hooks are well  

in place.To remove it, gently lift straight up and then pull 

the cup support out.

CUP SUPPORT

POWER CABLE

1

  The cup support has 4 positions 

and can be temporarily removed 

to accommodate various cup 

sizes. 

1

  The power cable can be adjusted under the machine. Insert 

the remaining cable in the guide on the left or on the right 

side socket, depending on the position chosen for the water 

tank. Ensure machine is in the upright position.    

11065_UM_ARES_C_Krups.indd   9

16.05.17   14:03

Summary of Contents for Nespresso Vertuo Plus

Page 1: ...My Machine 11065_UM_ARES_C_Krups indd 1 16 05 17 14 03 ...

Page 2: ...ach Grand Cru can be extracted to give the coffee body and create an exceptionally rich and generous crema These instructions are part of the appliance Read all instructions and safety instructions before operating the appliance SAFETY PRECAUTIONS 3 OVERVIEW 7 PACKAGING CONTENT 7 SPECIFICATIONS 7 MACHINE HANDLING 8 FIRST USE OR AFTER A LONG PERIOD OF NON USE 10 COFFEE PREPARATION 12 ENERGY SAVING ...

Page 3: ...ronments This appliance may be used by children of at least 8 years of age as long as they are supervised and have been given instructions about using the appliance safely and are fully aware of the dangers involved Cleaning and user maintenance shall not be carried out by children unless they are older than 8 years of age and they are supervised by an adult Keep the appliance and its cord out of ...

Page 4: ...sentative If an extension cord is required use only an earthed cord with a conductor cross section of at least 1 0 mm2 or matching input power To avoid hazardous damage never place the appliance on or beside hot surfaces such as radiators stoves ovens gas burners open flame or similar Always place it on a horizontal stable and even surface The surface must be resistant to heat and fluids like wate...

Page 5: ... with fresh drinking water Empty water tank if the appliance will not be used for an extended time holidays etc Do not use any other liquid such as cow s milk soya milk enriched milks flavoured liquids etc Replace water in water tank when the appliance is not operated for a weekend or a similar period of time Do not use the appliance without a cup placed at the suitable cup support level and ensur...

Page 6: ...wn before putting on or taking off parts and before cleaning Descaling Nespresso descaling agent when used correctly helps ensure the proper functioning of your machine over its lifetime and that your coffee experience is as perfect as the first day For coffee and coffee milk machines descale according to user manual recommendations or specific alerts SAVE THESE INSTRUCTIONS Pass them on to any su...

Page 7: ...mm 325 mm 419 mm 411 mm EN 7 PACKAGING CONTENT SPECIFICATIONS OVERVIEW Coffee Machine User Manual Nespresso Welcome Material Nespresso Capsules Box Coffee Outlet Adjustable Cup Support Water Tank Adjustable Water Tank Arm Lid OFF Open and Close Lever ON Coffee Button Capsule Container 11065_UM_ARES_C_Krups indd 7 16 05 17 14 03 ...

Page 8: ...ly onto its arm until there is a click sound MACHINE HANDLING WATER TANK CAPSULE CONTAINER 2 Place the capsule container in the back of the machine by sliding it sideways into position It is held in place by a magnet Place the water tank back 1 Remove the water tank then remove the capsule container by sliding it sideways WARNING Be careful when removing the water tank since the machine may tilt d...

Page 9: ...l in place To remove it gently lift straight up and then pull the cup support out CUP SUPPORT POWER CABLE 1 The cup support has 4 positions and can be temporarily removed to accommodate various cup sizes 1 The power cable can be adjusted under the machine Insert the remaining cable in the guide on the left or on the right side socket depending on the position chosen for the water tank Ensure machi...

Page 10: ...e filling it with only fresh drinking water Place the water tank in place 2 Ensure the capsule container and the cup support are in place For your safety operate the machine only with cup support and capsule container in position 3 Plug the machine into the outlet 4 Turn the machine ON by pushing the button GREEN light will blink while the machine is heating up 11065_UM_ARES_C_Krups indd 10 16 05 ...

Page 11: ...nsists of 3 cycles of pumping water in internal cleaning and water flowing from the outlet to complete 9 This procedure may take up to 5 minutes The procedure can be stopped at any time by pushing the button The button will go to steady GREEN To restart the cleaning process follow the instructions starting at point 8 To brew a coffee insert a capsule push the lever down to close the machine and pu...

Page 12: ...es the machine is ready COFFEE PREPARATION 2 Turn the machine ON by pushing the button 3 GREEN lights will blink while the machine is heating up NOTE This machine operates with Nespresso Vertuo capsules Nespresso classic capsules cannot be used in this machine NOTE The factory settings and recommended cup sizes are Alto 414ml Gran Lungo 150ml Mug 230ml Espresso 40ml CAUTION Be careful not to injur...

Page 13: ...ate quickly during brewing Steady GREEN light indicates that coffee brewing is ready NOTE You can do this even when the machine is still heating up The coffee will then flow automatically when the machine is ready The machine will automatically recognize the inserted capsule and select the coffee preparation parameters and cup length defined by Nespresso coffee experts to extract the coffee blend ...

Page 14: ...en desired volume is reached NOTE The machine head should be in closed position when the machine is turned off NOTE It is recommended to eject the capsule directly at the end of the brewing ENERGY SAVING CONCEPT The machine can be turned OFF at any time by closing the machine head and then pushing the lever down for 3 seconds Automatic OFF Mode The machine will turn off automatically after 9 minut...

Page 15: ...programmed from 10 ml to 500 ml 2 Open the machine head by pressing the lever upwards Insert the capsule blend you want to program Close the head by pushing the lever down NOTE Once a customer specific volume is programmed by the user every time that capsule size is inserted in the machine the preparation will stop at the user programmed cup size It is possible to restore cup size volumes refer to...

Page 16: ...cleaner Do not put in a dishwasher Never immerse the appliance or part of it in water Clean the coffee outlet regularly with a damp cloth Please use only clean cloths for cleaning the machine 3 Open the machine head by pushing the lever up and let the used capsule be ejected then close the machine Empty and rinse the capsule container 4 Push the button 3 times in 2 seconds to start the cleaning cy...

Page 17: ...TE Choose special function by pressing the lever down 1 time for Descaling 2 times for Emptying the system 3 times for Reset to factory settings RESET TO FACTORY SETTINGS 3 Choose function by pressing the lever down 3 times for Reset to factory settings 1 Turn the machine OFF by pushing the lever down for 3 seconds 2 To enter Factory settings mode push the button and the lever down at the same tim...

Page 18: ... under the coffee outlet To enter Emptying the system mode push the button and the lever down at the same time for 3 seconds ORANGE steady light indicates entry into the Special functions menu EMPTYING THE SYSTEM BEFORE A PERIOD OF NON USE FOR FROST PROTECTION OR BEFORE A REPAIR 6 Push the button The ORANGE light will blink during the entire procedure The machine turns OFF automatically when machi...

Page 19: ... VIDEOS ARE AVAILABLE ON WWW NESPRESSO COM VISIT MACHINES SECTION 3 Turn the machine OFF by pushing the lever down for 3 seconds 2 Open the machine head by pushing the lever upwards and let the used capsule be ejected Close the machine by pushing the lever down 1 Turn the machine ON by pushing the button 4 Empty the cup support and the used capsule container 5 Fill the water tank with 1 unit of Ne...

Page 20: ...e the water tank and cup support thoroughly NOTE Choose function within 2 minutes or else the machine will go back to Ready mode ORANGE light will blink 1 time every 2 seconds indicating the Descaling function NOTE the machine will blink once every 2 seconds until the button will be pressed 11 Fill the water tank with fresh drinking water and put it back in place on the machine DESCALING ASSISTANC...

Page 21: ... Allow the machine to dry for 10 minutes before using it 16 The machine is now ready for use NOTE This machine is equipped with a descaling alert GREEN and RED steady light Machine can only be operated to make coffee a few more times once the alert appears before descaling becomes mandatory If the machine is completely scaled the descaling program may not function and the machine will stop and bli...

Page 22: ...k three times Programming is confirmed RED LIGHT WARNING OR ERROR Steady light Device error see point 17 Pulse down Fade to OFF then ON Cooling down after overheating see point 18 Regular blinking Once second Error see point 14 Blink two times and then back to steady GREEN Water tank is empty or capsule missing see point 15 Blink two times and then back to steady ORANGE Error in special function s...

Page 23: ...ling alarm see point 13 ORANGE LIGHT SPECIAL FUNCTIONS Steady light Entering special functions menu Regular blinking Once second Special function is running Blink once every 2 seconds Descaling see points 21 22 Blink twice every 2 seconds Emptying the system see points 21 22 Blink three times every 2 seconds Reset to factory settings see points 21 22 Blink three times within 3 seconds and then bac...

Page 24: ...he grid Clean the metallic clamps with precaution Be careful of the sharp edges in the machine head If problem persists call the Nespresso Club 7 Coffee leakage Open the machine head and let the capsule be ejected Then perform a cleaning Empty and clean the cup support Descale if necessary If problem persists call the Nespresso Club 8 Machine turns to OFF mode To save energy the machine will turn ...

Page 25: ...he machine head 17 RED steady light and the machine is NOT running Turn the machine OFF unplug the power cord wait for 15 minutes for the machine to cool down Plug the power cord and turn the machine ON by pressing the lever down Machine is heating up and will go to steady GREEN when ready If problem persists call the Nespresso Club 18 RED light fading out Machine is cooling down and will go to st...

Page 26: ... the appliance at a collection point You can obtain information on disposal from your local authorities To know more about Nespresso sustainability strategy go to www nespresso com positive DISPOSAL AND ENVIRONMENTAL PROTECTION Should you need any additional information in case of problems or simply to seek advice call the Nespresso Club Contact details for your nearest Nespresso Club can be found...

Page 27: ... of the original guarantee or six months whichever is greater This limited guarantee does not apply to any defect resulting from accident misuse improper maintenance or normal wear and tear Except to the extent allowed by applicable law the terms of this limited guarantee do not exclude restrict or modify and are in addition to the mandatory statutory rights applicable to the sale of the product t...

Page 28: ...www nespresso com Version 1 Released on 2017 05 8020000035 11065_UM_ARES_C_Krups indd 28 16 05 17 14 03 ...

Reviews: