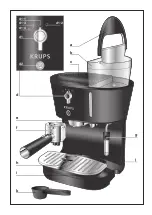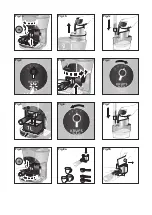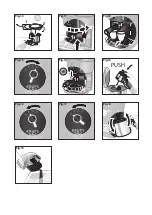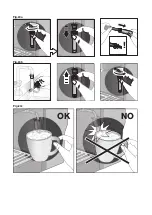
■
Do not fill your filter holder to the top, use the measuring spoon (1 spoonful for 1 cup, 2 spoonfuls for
2 cups). Remove any excess ground coffee from the edge of the filter holder
(fig. 9b)
.
■
If the appliance is not used for more than 5 days, empty and rinse the water tank.
■
Before removing the tank to fill or empty it, always remember to switch off the appliance.
■
Always ensure that the appliance is placed on a flat, stable, heat-resistant surface.
5. FIRST USE
Rinsing before first use
Before using your coffee machine, clean all of the accessories in water and washing up liquid then dry
them.
■
Fill the tank with cold water and fit it onto the appliance, ensuring that it is fitted correctly
(fig. 1c)
.
■
Switch on the appliance by pressing the ON/OFF button d2
■
The temperature light flashes then remains lit. The appliance is ready for use
(fig. 2)
.
■
Insert the filter holder (without ground coffee) into the appliance: turn it towards the right as far as
possible
(fig. 3)
.
■
Place a container with a volume of over ½ litre under the filter holder. Turn the switch d1 to the “coffee”
position
(fig. 4, 5)
, then press on the two cup position
several times if necessary.
■
If the water doesn’t run off (pump priming), repeat the process from the beginning.
■
Let the water run from the tank. To stop the flow of water, turn the selector d1 to the position
(fig. 6)
and unplug the appliance.
■
Remove the tank, empty it and rinse it carefully and fit it back onto the appliance
(fig. 1b and 7)
.
6. PREPARING AN ESPRESSO
IMPORTANT!
If the espresso machine is being used for the first time, the appliance must be
cleaned as described in paragraph 5 “FIRST USE”.
With ground coffee
The type of ground coffee that you use will determine the strength and taste of your
espresso: the finer your coffee is ground, the stronger the espresso.
■
Before removing the removable tank, place the selector d1 in the
position
(fig. 6)
.
■
Fill the tank with cold water and fit it back onto the appliance
(fig. 7)
.
■
Switch on the appliance by pressing the ON/OFF button d2
■
The LED flashes while the machine is warming up, then remains lit. The appliance is then ready for use.
■
Release the filter holder by pressing the
button lightly and turning it towards the left
(fig. 8)
. Using
the measuring spoon, place the ground coffee into the filter holder: one measuring spoon (filled to the
top) per cup for a good espresso
(fig. 9a)
.
■
Remove the excess ground coffee from the edge of the filter holder
(fig. 9b)
.
■
Insert the filter holder into the appliance tightening it by turning it towards the right as far as possible
(fig. 11)
.
■
Place a cup on the grill of the drip tray under the filter holder
(fig. 12
).
■
Turn the selector d1 to the position
(coffee)
(fig. 4)
.
■
After a few moments, the coffee stars to flow.
■
When the cups are full. Move the selector d1 back to the
position
(fig. 6)
.
■
Remove the cup.
English
9
Summary of Contents for PERFECTO XP4200
Page 1: ...WWW KRUPS COM PERFECTO XP4200 EN DE FR NL DA NO SV FI IT PT ES EL ...
Page 2: ...j f h g e i k d1 3 d d1 2 d1 1 d1 4 d1 b c a d2 ...
Page 3: ...3 3 1L Fig 1a Fig 1b Fig 1c Fig 2 Fig 3 Fig 4 Fig 5 Fig 6 Fig 7 Fig 8 Fig 9a Fig 9b ...
Page 4: ...1 2 3 Fig 10 Fig 11 Fig 12 PUSH Fig 13 Fig 14 Fig 15 Fig 16 Fig 17 Fig 18 Fig 19 ...
Page 5: ... Fig 20a Fig 20b OK NO Fig 20c ...
Page 6: ......
Page 56: ...56 ...
Page 66: ...66 ...
Page 76: ...Svenska 76 ...
Page 86: ...Suomi 86 ...
Page 127: ... www krups com 127 ...
Page 128: ... www krups com 128 ...
Page 129: ... www krups com 129 ...
Page 130: ... www krups com 130 ...
Page 132: ......
Page 133: ......


