Section 1: Assembly & Set-Up
4/13/21
AP-PFL4648, AP-PFL5648, & AP-PFL5660 Loader Mounted Pallet Forks 319-227MK
9
Fork Installation
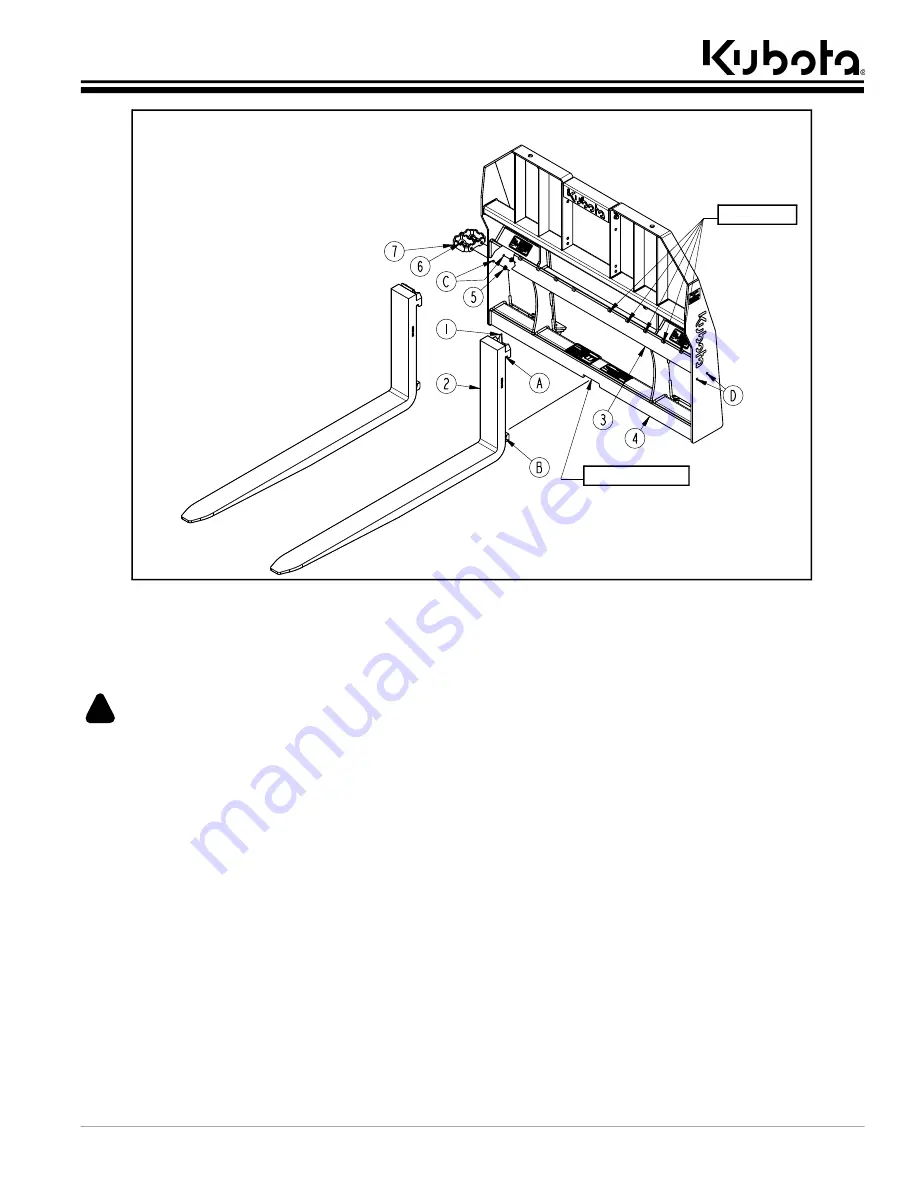
Figure 1-1
Notched Opening
Pin Notches
74598
Section 1: Assembly & Set-Up
Fork Installation
Refer to Figure 1-1:
CAUTION
!
To avoid minor or moderate injury:
A pinching hazard exists when installing forks. Do not place
hands or fingers between carrying bars and forks.
1. Raise handle of fork locking pin (#1) straight up.
2. Center upper end of fork (#2) on upper carrying
bar (#3). Make sure retaining hook (A) is caught
behind upper carrying bar (#3) and retaining
hook (B) fits in notched opening in lower carrying
bar (#4).
3. Slide fork to the right by pushing on the fork near
carrying bars (#3 & #4) until locking pin (#1) is
positioned over one of the pin notches.
4. Lower locking pin handle (#1) to seat pin in the
selected notch. Make sure locking pin is seated and
retaining hooks “A” & “B” are secured behind the
carrying bars.
5. Repeat steps 1-4 for the second fork, but slide the
second fork to the left.
Step Relocation
Refer to Figure 1-1:
The pallet fork is shipped from the factory with step (#7)
mounted on the right-hand side of the frame as shown. If
preferred, the step can be moved from the right-hand
side to the left-hand side.
1. Remove flange locknuts (#5), carriage bolts (#6) and
step (#7) from mounting holes “C”.
2. Attach step (#7) to mounting holes “D” with existing
carriage bolts (#6) and flange locknuts (#5). Make
sure the surface with 12 grip points on the step are
facing up.
3. Tighten flange locknuts (#5) to the correct torque for
5/16"-18 GR5 bolts.


