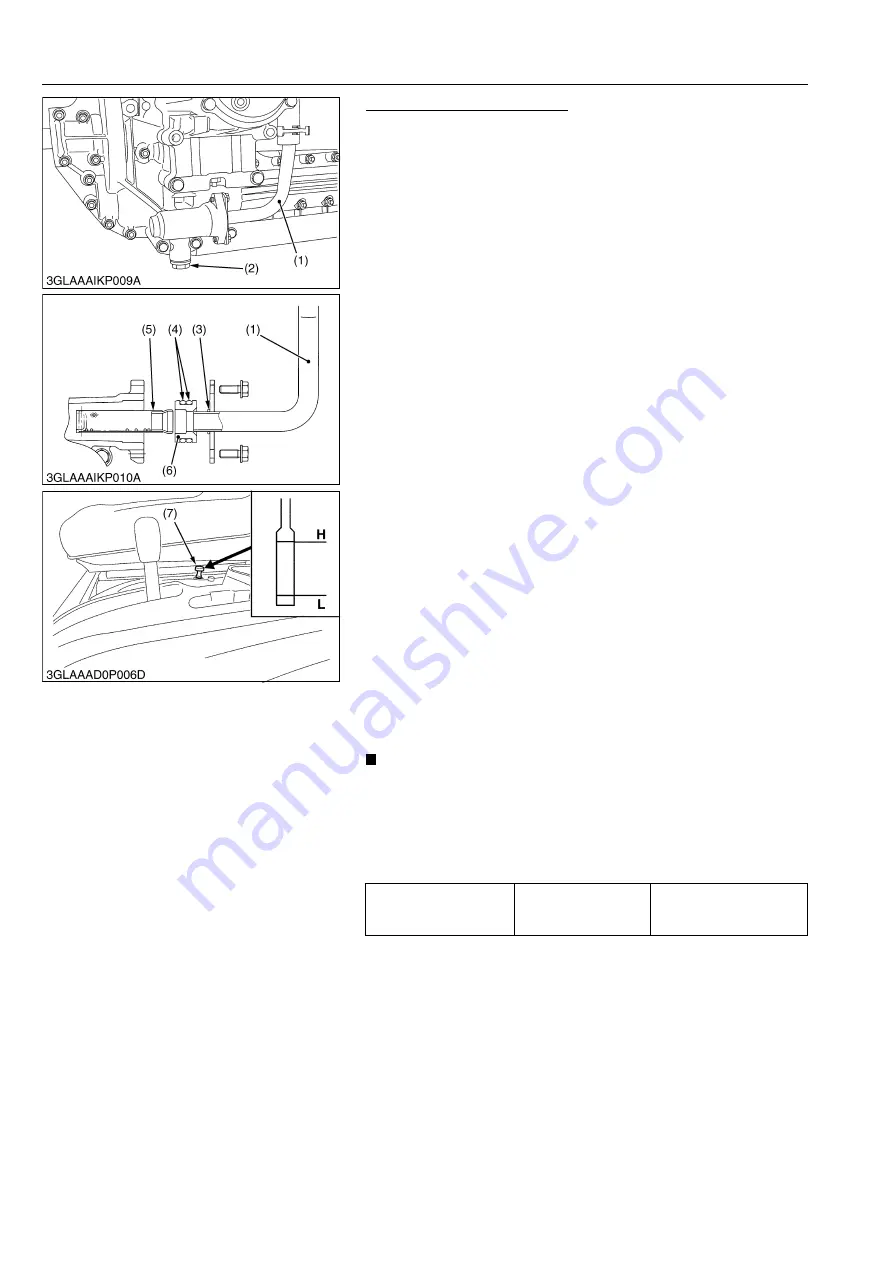
TRANSAXLE
GR1600EU, WSM
2-S12
Draining Transmission Fluid
1. Start the engine. Push the mower lift lever and lower the mower
link.
2. Place an oil pan under the transaxle.
3. Remove the drain plug (2).
4. Remove the stainer (5) to completely drain the transmission
fluid.
5. After draining, clean the strainer (5) and reinstall it.
(When refilling)
• Remove the filling plug with the dipstick and fill the new
transmission fluid to
"H"
level on the dipstick.
• Start the engine and perform the following operations, However,
absolutely avoid engaging the PTO lever during this operation.
a) Depress the speed change pedal alternately to the forward
side and reverse side in order to move the machine forward
and backward.
b) Rotate the steering wheel to the right and left to turn the
front wheels right and left.
c) Operate the mower lift lever in order to make the mower
deck go up and down.
d) During the operation described above, check to see if no oil
leakage from the transaxle assembly and each hydraulic
pipe is found.
• At least 5 minutes after stopping the engine, check the oil level
again, using the dipstick.
• If the oil level is lower than the
"H"
level indicated on the
dipstick, fill the oil tank with transmission fluid additionally up to
the
"H"
level.
• Perform the above-mentioned operation again. And make sure
that the oil level is not low level.
• Disconnect the universal joint of mower deck from the PTO
shaft. Shift the PTO lever to
"Engage"
position and check to
see if the PTO shaft rotates quickly without abnormal noise.
Next, shift the PTO lever to the
"Disengage"
position and
check to see if the PTO shaft stops operation quickly without
abnormal noise.
IMPORTANT
• Park the machine on lever ground.
• Use the KUBOTA UDT or SUPER UDT fluid. Use of other
oils may damage the transmission or hydraulic system.
Refer to "4. LUBRICANTS, FUEL AND COOLANT" on page
G-9.
• Do not mix different brand oil together.
9Y1210595TXS0080US0
Transmission fluid
Capacity
2.8 L
0.74 U.S.gals
0.62 lmp.gals
(1) Suction Pipe
(2) Drain Plug
(3) O-ring (Small)
(4) O-ring (Large)
(5) Strainer
(6) Boss
(7) Filling Plug with Dipstick
H: Highest Level
L:
Lowest Level
KiSC issued 11, 2013 A
Summary of Contents for GR1600EU
Page 1: ...GR1600EU WORKSHOP MANUAL KiSC issued 11 2013 A ...
Page 4: ...I INFORMATION KiSC issued 11 2013 A ...
Page 10: ...INFORMATION GR1600EU WSM I 5 9Y1210595INI0002US0 KiSC issued 11 2013 A ...
Page 11: ...INFORMATION GR1600EU WSM I 6 9Y1210595INI0003US0 KiSC issued 11 2013 A ...
Page 12: ...INFORMATION GR1600EU WSM I 7 9Y1210595INI0007US0 KiSC issued 11 2013 A ...
Page 16: ...INFORMATION GR1600EU WSM I 11 2 GR1600ID 9Y1210595INI0009US0 KiSC issued 11 2013 A ...
Page 17: ...G GENERAL KiSC issued 11 2013 A ...
Page 80: ...1 ENGINE KiSC issued 11 2013 A ...
Page 138: ...2 TRANSAXLE KiSC issued 11 2013 A ...
Page 194: ...3 BRAKES KiSC issued 11 2013 A ...
Page 195: ...CONTENTS 1 BRAKE MECHANISM 3 M1 MECHANISM KiSC issued 11 2013 A ...
Page 205: ...4 FRONT AXLE KiSC issued 11 2013 A ...
Page 213: ...5 STEERING KiSC issued 11 2013 A ...
Page 221: ...6 ELECTRICAL SYSTEM KiSC issued 11 2013 A ...
Page 223: ...ELECTRICAL SYSTEM GR1600EU WSM 6 M1 1 WIRING DIAGRAM 1 GR1600EU GR1600F KiSC issued 11 2013 A ...
Page 224: ...ELECTRICAL SYSTEM GR1600EU WSM 6 M2 2 GR1600ID KiSC issued 11 2013 A ...
Page 257: ...7 MOWER KiSC issued 11 2013 A ...


