background image

31

MAINTENANCE

ENGLISH

EVERY 500 HOURS

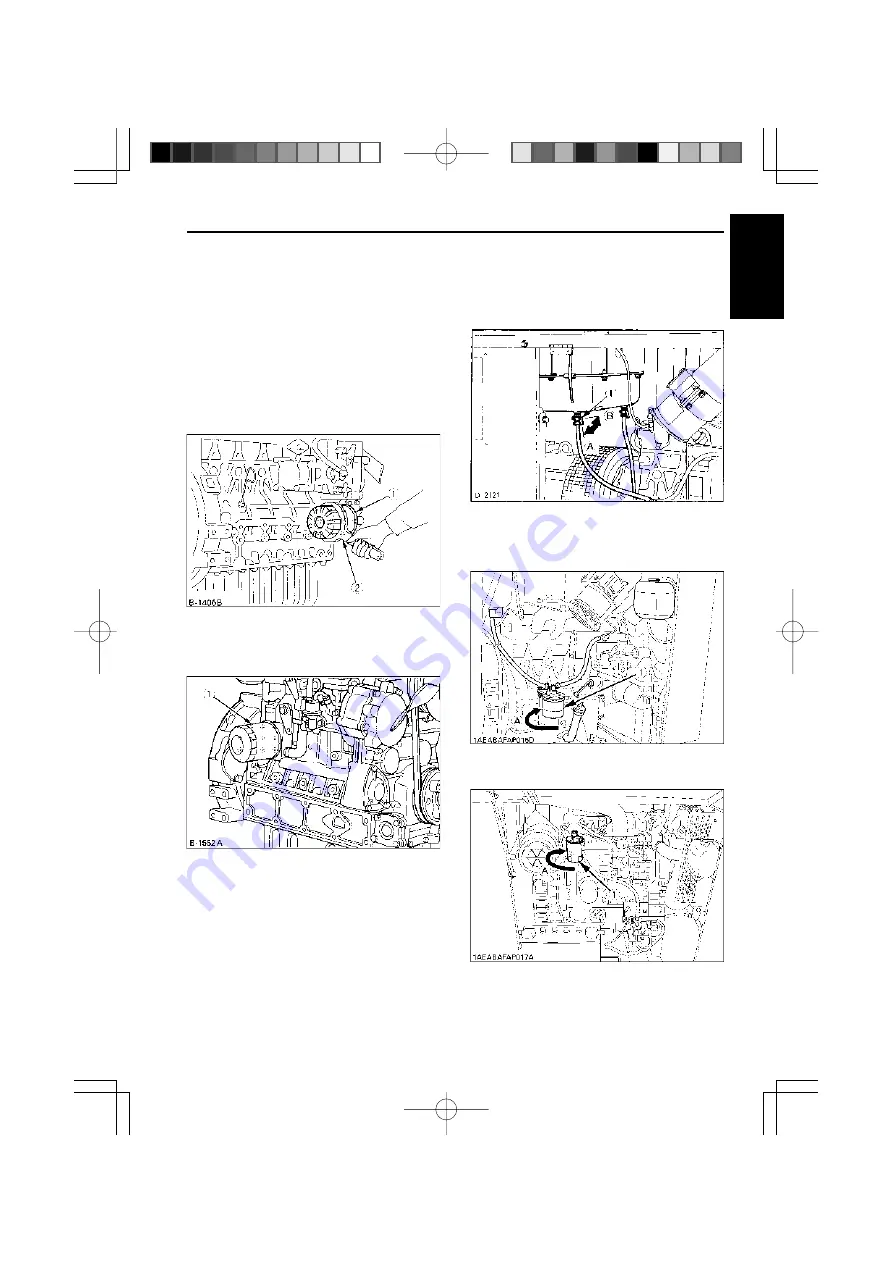
Replacing Oil Filter Cartridge

1.

Replace the oil filter cartridge every 500 hours of
use. (Every second oil change.)

2.

Coat the new filter gasket lightly with clean oil.

3.

Tighten it securely by hand.

4.

When the filter is replaced, the engine oil level will
drop. Run the engine for a few minutes, and check
for oil leaks. Re-check the oil level. If the oil level is
too low, add engine oil up to the specified level.

z

zz

z

z

Engine model : D1703-EBG, V2203-EBG

x

xx

x

x

(1) Oil filter cartridge
(2) Remove with a filter wrench

(Tighten with your hand)

z

zz

z

z

Engine model : V3300-EBG

x

xx

x

x

(1) Oil filter cartridge

Replacing Fuel Filter Cartridge

Replace the fuel filter cartridge every 500 hours of
use, using the following procedure.

1.

Close the fuel tank tap.

(1) Fuel tank tap

(A) “OPEN”
(B) “CLOSE”

2.

Remove the fuel filter by using ring spanner.

z

zz

z

z

Engine model : D1703-EBG, V2203-EBG

x

xx

x

x

(1) Fuel filter cartridge

(A) “REMOVE”

z

zz

z

z

Engine model : V3300-EBG

x

xx

x

x

(1) Fuel filter cartridge

(A) “REMOVE”

3.

Tighten it securely by hand.

Summary of Contents for KJ-S130VX

Page 1: ...G3601 8911 8 ...

Page 2: ...power and allows selection of generator or main line power to the building This will prevent the generator from charging the main power line backfeeding when the main power supply has failed or has been turned off for line repair Backfeeding can electrocute or injure line maintenance personnel Also generator and building electrical system damage can occur when normal operating power returns if uni...

Page 3: ...stributors and dealers will have the most up to date information Please do not hesitate to consult with them 3 SAFETY FIRST This symbol the industry s Safety Alert Symbol is used throughout this manual and on labels on the machine itself to warn of the possibility of personal injury Read these instructions carefully It is essential that you read the instruc tions and safety regulations before you ...

Page 4: ...RE OPERATION CHECK 12 DAILY CHECK 12 OPERATING THE ENGINE 13 STARTING THE ENGINE 14 COLD WEATHER STARTING 15 PRECAUTION OVERHEATING 15 STOPPING THE ENGINE 15 Stop Knob AUS type 15 Stop Switch AUS type 16 Stop Lever General type 16 WARMING UP 17 Warm up in the Low Temperature Range 17 PREPARATION TO SUPPLY THE ELECTRIC POWER 17 Connection Notes 17 Connecting the Load General type 17 Connecting the ...

Page 5: ...cking Fuel Line 28 Draining Water in the Fuel Tank 28 Fuel Line Air Bleeding 29 Checking Battery Electrolyte 29 EVERY 250 HOURS 29 Changing Engine Oil 29 Radiator Hose Inspection 30 If Coolant Leaks 30 Checking Fan Belt Tension 30 EVERY 500 HOURS 31 Replacing Oil Filter Cartridge 32 Replacing Fuel Filter Cartridge 32 Cleaning the Water Separator Sedimenter 32 EVERY 1000 HOURS 32 Replacing Air Clea...

Page 6: ...e 37 When Starter does not Start 37 When Output is Insufficient 38 When Engine Suddenly Stops 38 When Color of Exhaust Smoke is Black and Excessive 38 When Engine must be Stopped Immediately 39 When Engine Overheats 39 WIRING DIAGRAM 41 OPERATION AND INSPECTION OF THE EMERGENCY RELAY 51 CONTENTS ...

Page 7: ...perate and work safely Know your equipment and its limitations Always keep the generator in good condition Before allowing other people to use your generator explain to them how to operate and have them read this manual before operation DO NOT modify the engine by yourself UNAUTHORIZED MODIFICATIONS to the engine may impair the function and or safety and affect engine life WEAR SAFETY CLOTHING DO ...

Page 8: ...an electric shock that can cause burns or death DO NOT connect this generator to any building s electrical system unless an isolation switch has been installed by a licensed electrician DO NOT run other generators in parallel Always turn off the circuit breaker and all switches for the electrical devices before starting the generator Check the wiring and connections of the electrical devices befor...

Page 9: ...ING OF FUEL AND LUBRICANTS Always stop the engine before refueling and or lubricating DO NOT smoke or allow flames or sparks in the working area Fuel is extremely flammable and explosive under certain conditions Refuel only when the engine has cooled off Refuel in a well ventilated and open place When fuel and lubricantsarespilled cleanthemupbeforestartingthe engine DO NOT mix gasoline or alcohol ...

Page 10: ... generator in a closed area such as inside houses warehouses tunnels wells ship holds tanks etc or places without proper ventilation DO NOT operate the generator where the building or other obstructions block off air circulation or where exhaust gas can accumulate The exhaust gas from the muffler is very hot To prevent a fire DO NOT expose to dry grass papers oil and any other combustible material...

Page 11: ...s with your hand High pressure oil or fuel can cause serious personal injury Escaping fluid under pressure has sufficient force to penetrate skin causing serious personal injury Fluid escaping from pinholes may be invisible Use a piece of cardboard or wood to search for suspected leaks DO NOT use hands or body Use safety goggles or other eye protection when checking for leaks If injured by escapin...

Page 12: ...ry can result The battery presents an explosive hazard When the battery is being activated hydrogen and oxygen gases are extremely explosive Keep sparks and open flames away from the battery especially when charging the battery DO NOT strike a match near the battery DO NOT check battery charge by placing a metal object across the terminals Use a voltmeter or hydrometer DO NOT charge battery if fro...

Page 13: ... yourself flush with water and get medical attention immediately Be sure to stop the engine and remove the key when conducting daily and periodic maintenance servicing and cleaning Check or conduct maintenance after the engine coolant muffler or muffler cover have cooled off completely Always use the appropriate lifting equipment and make sure safety stands are in good condition when performing an...

Page 14: ...er to following representations for labels used on the KJ Series Generator Labels are available individually from your KUBOTA Dealer 1 Part No G3341 8851 0 2 Part No G3341 8824 0 3 Part No 18620 8806 0 4 Part No 18901 5090 0 5 Part No G3907 8832 0 6 Part No G3352 8836 0 7 Part No G3341 8830 0 8 Part No G3341 8831 0 ...

Page 15: ...9 ENGLISH SAFE OPERATION 9 Part No G3781 8825 0 10 Part No G3102 8806 0 zFor General Typex zFor AUS Typex 11 Part No G3341 8895 0 12 Part No G3341 8822 0 ...

Page 16: ... a soft cloth 3 Replace damaged or missing danger warning and caution labels with new labels from your local KUBOTA Dealer 4 If a component with danger warning and caution label s affixed is replaced with new part make sure new label s is are attached in the same location s as the replaced component 5 Mount new danger warning and caution labels by applying on a clean dry surface and pressing any b...

Page 17: ...ealer For service contact the KUBOTA Dealership from which you purchased your generator or your local KUBOTA dealer When in need of parts be prepared to give your dealer the generator and engine serial numbers Locate the serial numbers now and record them in the space provided below model Serial No generator Engine Date of Purchase Name of Dealer To be filled in by purchaser z z z z zEngine model ...

Page 18: ...speed 1500 Ambient temperature range 15 to 40 Length x Width x Height 1488 x 650 x 971 1393 x 650 x 971 1488 x 650 x 971 Mass 505 450 505 Engine Model V2203 D1703 V2203 V3300 Type Vertical water cooled 4 cycle diesel Cylinders Bore x Stroke 4 87 x 92 4 3 87 x 92 4 4 87 x 92 4 Displacement 2197 1647 2197 Rated output 16 9 23 0 12 7 17 2 16 9 23 0 Fuel Diesel fuel No 2 D ASTM D975 Fuel consumption 5...

Page 19: ...y Emergency stop system KJ S150VX KJ T160DX KJ T210VX PX 316KU1 PX 312KU3 PX 316KU3 Revolving field self excited brushless AC generator 15 0 15 6 21 0 15 0 12 5 16 8 1 Phase 4 wires 3 Phases 12 wires 100 80 Continuous 110 220 120 240 220 380 220 380 68 2 62 5 40 9 23 7 55 1 31 9 60 H Self excitation 4 Direct drive 1800 15 to 40 1488 x 650 x 971 1393 x 650 x 971 1488 x 650 x 971 505 450 505 V2203 D...

Page 20: ...X 316KU1 PX 312KU3 PX 316KU3 Revolving field self excited brushless AC generator 12 5 12 5 18 0 12 5 10 0 14 4 1 Phase 4 wires 3 Phases 12 wires PX 322KE1 PX 322KE3 24 30 24 3 Phases 12 wires 1 Phase 4 wires 100 100 80 80 Continuous 240 240 415 240 240 415 52 1 17 4 25 0 100 41 7 50 H Self excitation 4 Direct drive 1500 15 to 40 1518 x 650 x 971 1423 x 650 x 971 1518 x 650 x 971 505 470 505 1735 x...

Page 21: ...er 3 A C Ammeter 4 Pilot lamp 5 Glow plug lamp 6 A C Ammeter 7 Water temperature lamp 8 Oil pressure lamp 9 Battery charge lamp 3 Phases Type KJ T130DX KJ T180VX KJ T300 KJ T160DX KJ T210VX KJ T300 AUS 10 Main switch key 11 Circuit breaker 12 Voltage adjuster 13 Terminals 14 Hour meter 15 Ground terminal 16 Voltmeter change over switch 17 Ammeter change over switch ...

Page 22: ...r handle 8 Stop knob for KJ S130VX KJ T130VX KJ T180VX 9 Load center cover 10 Stop switch for KJ S240 KJ T300 1 Muffler 2 Alternator 3 Radiator 4 Oil dipstick 5 Engine oil drain plug 6 Fuel tank drain tap 7 Fuel tank 8 Fuel tank tap 9 Fuel filter cartridge 10 Stop lever 11 Battery 12 Oil filter cartridge 13 Reserve tank 14 Fan 15 Air cleaner 16 Engine oil port ...

Page 23: ... oxygen gases which can explode and cause serious personal injury 1 Remove the vent plugs 2 Fill cells up to the upper level with electrolyte Specific gravity of sulfuric acid 1 270 to 1 290 at 20 C 68 F 3 Allow the battery to sit for about one hour after filling 4 If the electrolyte level is dropped refill with electrolyte up to the upper level 5 Charge the battery at the normal charging current ...

Page 24: ...ter add water only to the reserve tank Always use antifreeze and anti boil to prevent cooling system damage from freezing or overheating Pre mix antifreeze before adding to the radiator Use permanent type 50 50 mix anti freeze Do not intermix different brands 1 Radiator top cover 2 Radiator cap 3 Coolant filling port Coolant capacity liters Including the reserve tank 쎱 Engine Oil The generator has...

Page 25: ...le 5 The fuel level can be checked on the fuel gauge 1 Fuel gauge Fuel tank capacity liters Model Capacity 37 KJ S130VX KJ T130DX KJ T180VX KJ S150VX KJ T160DX KJ T210VX KJ S130VX AUS KJ T130DX AUS KJ T180VX AUS KJ T300 KJ S240 AUS KJ T300 AUS 60 NOTE No 2 D is a distillate fuel of lower volatility for engines in industrial and heavy mobile service SAE J313 JUN87 Grade of Diesel Fuel Oil According...

Page 26: ...ock A OPEN 2 Fuel filter cartridge B CLOSE 5 Rotate the engine for about 30 seconds and then stop the engine 6 Wipe up any spilled fuel immediately PREPARATION TO SUPPLY THE ELECTRIC POWER 1 Generator Grounding The end user equipment owner or operator must contact his local state county or municipal electric code department to determine the approved generator grounding method to be used in his app...

Page 27: ...diately The circuit may be opened if an electromagnetic switch is connected to the same circuit When connecting two motors or more make sure the total current capacity of the motors does not exceed the total rated current Connecting to lights and electric heaters When connecting to lights or electric heaters the generator can be used up to the rated capacity When using a single phase it can be use...

Page 28: ...g or servicing the generator make sure it is on a level surface with the engine shut off 쏆 Check items Check for oil and water leakage Check cooling air inlet and outlet for obstructions or clogging Check radiator fins for clogging Check fan belt tension Check engine oil level Check coolant level Check generator grounding Refuel See DAILY CHECK in periodic service section Care of danger warning an...

Page 29: ...ices before starting the machine DO NOT touch the charging section during operation IMPORTANT Do not use ether or any starting fluid for starting the engine or a severe damage will occur To protect the battery and the starter make sure that the starter is not continuously turned for more than 10 seconds STARTING THE ENGINE 1 Turn OFF the circuit breaker on the control panel KJ S130VX KJ S150VX 1 C...

Page 30: ...perature lamp 3 Oil pressure lamp 7 Check the warning lamps If engine oil pressure drops below 78 to 108 kPa 11 38 to 15 65 psi 0 8 to 1 1 kgf cm2 or the coolant temperature rises above 112 to 118 C 234 to 244 F the emergency relay activates the fuel controller to cut fuel flow to the pump stopping the engine and illuminating the warning lamp Whenever the engine stops automatically during operatio...

Page 31: ... the engine stops within about 5 minutes of running under no load immediately leave and keep yourself away from the machine Do not open the hood and any other part 4 Keep yourself and others well away from the engine for an additional 10 minutes or while the steam continues to blow out 5 Checking that there is no danger of being burned eliminate the causes of overheating according to the manual se...

Page 32: ...Stop Lever General type 3CAUTION To avoid personal injury Turn the stop lever to the left and hold it until the engine stops in case of emergency The engine stops when the key is turned off counterclockwise If the engine does not stop turn the stop lever to the left and hold it until the engine stops NOTE If the main switch key can not stop the engine consult your local KUBOTA dealer z z z z zEngi...

Page 33: ...an be connected to a building s electrical system a licensed electrician must install an isolation transfer switch in the building s main fuse box The switch is the connection point for generator power and allows selection of generator or main line power to the building This will prevent the generator from charging the main power line backfeeding when the main power supply has failed or has been t...

Page 34: ...300 50Hz 380 415V Use W V U KJ T160DX KJ T210VX 60Hz 220 380V Use W V U 1 Motor For single phase Power Source KJ T130DX KJ T180VX KJ T300 Use O U 50Hz 220 240V O V O W KJ T160DX KJ T210VX Use O U 60Hz 127 220V O V O W 1 Light 2 Television 3 Air conditioner Connecting 3 phase Power Source to Single Phase Load KJ T130DX KJ T180VX KJ T300 Use U O 50Hz 220 240V single phase V O W O 50Hz 220 380 415V 3...

Page 35: ...c Drill 2 Motor Pump 3 Air conditioner Connecting the Load AUS type 3 WARNING To avoid personal injury Connect or disconnect the load to the AC receptacles or terminals only when the engine is stopped 1 Turn OFF all circuit breakers on the control panel 1 Circuit breaker 2 Circuit breakers for sockets 1 Circuit breaker 2 Circuit breakers for sockets KJ S240 AUS 1 Circuit breaker KJ T300 AUS 1 Circ...

Page 36: ... load to the A C output terminals 1 Terminals output 3 Finally be sure to close the cover and tighten up the lock screws KJ S240 Use U V 1 Light 4 Electric Drill 2 Television 5 Motor Pump 3 Air conditioner KJ T300 For 3 phase power source Use U V W 1 Motor For single phase power source Use O U O V O W 1 Electric Drill 2 Motor pump 3 Air conditioner ...

Page 37: ...cuit breaker OFF and eliminate the cause then turn the circuit breaker ON again When there is a severe overload or short circuit in the wiring of the single phase generator the thermal relay turns the circuit breaker to OFF If this happens eliminate the cause and turn the circuit breaker ON again NOTE The thermal relay dose not work if the battery voltage falls below the prescribed level Be aware ...

Page 38: ...ice switches for connected loads 2 Turn OFF the circuit breaker 1 Circuit breaker A STOP 3 Allow the engine to run with no load for about 5 minutes before stopping the engine completely 4 Turn the main switch key to the OFF position 1 Main switch Key A OFF 5 Turn the fuel tank tap to the OFF position 1 Fuel tank tap A OFF ...

Page 39: ...short out Severe burns or fire could result Detach the battery from the engine before maintenance DO NOT touch muffler or exhaust pipes while they are hot severe burns could result ANTI FREEZE DISPOSAL OF FLUIDS DO NOT run the engine with installed safety guards detached Anti freeze contains poison Wear rubber gloves to avoid personal injury In case of contact with skin wash it off immediately DO ...

Page 40: ... be done after the first 50 hours of operation 1 Air cleaner should be cleaned more often in dusty conditions than in normal conditions 2 After 6 times of cleaning 3 Consult your local KUBOTA Dealer for this service 4 Replace earlier if necessary The items listed above marked are registered as emission related critical parts by KUBOTA in the U S EPA non road emission regulation As the engine owner...

Page 41: ...tarting the engine or 5 minutes or more after the engine has stopped 3 To check the oil level draw out the dipstick wipe it clean replace it and draw it out again Check to see that the oil level lies between the two notches If the level is too low add new oil to the prescribed level See Adding Engine Oil in PREPARATION FOR FIRST OPERATION Section IMPORTANT When using an oil of different maker or v...

Page 42: ... system If any fuel overflows wipe it up immediately starting operation When refueling keep all flames sparks and cigarettes away from generator DO NOT refuel when engine is running or hot IMPORTANT Do not permit dirt or trash to get into the fuel system Be careful not to let the fuel tank become empty or air can enter the fuel system necessitating bleeding before next engine start Be careful not ...

Page 43: ...linder liner and piston ring earlier and thereby resulting in poor power output and need for engine repair z z z z zEngine model V3300 EBGx x x x x If the air cleaner is equipped with the secondary element start it in the following manner Take steps 1 through 4 foregoing 5 Replace the primary element every year or every 6 cleanings If the primary element is heavily stained replace it sooner At thi...

Page 44: ...ction Inspection Fuel Line Check and retighten the fuel line clamps Every 100 hours Replace the fuel filter Every 500 hours Replace the fuel line Every two years IMPORTANT After bleeding the air make sure that the fuel injection pump cock is closed Wipe any spilled fuel off generator Always shut off the engine and allow it to cool before inspecting the fuel system Checking Fuel Line Check the fuel...

Page 45: ...es somewhere between the UPPER and LOWER levels 1 Keep the battery clean and dry Keep terminals and holes of vent plugs free from corrosion and dirt 2 Check the electrolyte level frequently when the battery is in service Add distilled water only to the upper level when electrolyte diminishes Do not add diluted sulfuric acid 3 Make sure to charge the battery once a month because the capacity is dec...

Page 46: ...ing inspection and maintenance procedure 3 CAUTION Stop the engine and wait until it becomes cool to touch Then remove the radiator cap carefully 1 Check for the leakage and coolant levels 2 Check the cooling air inlet and outlet for obstructions 3 Check the radiator fins for clogging When cleaning the radiator never use a scraper Blow air through or clean with a water spray 4 Check the radiator w...

Page 47: ...o the specified level z z z z zEngine model D1703 EBG V2203 EBGx x x x x 1 Oil filter cartridge 2 Remove with a filter wrench Tighten with your hand z z z z zEngine model V3300 EBGx x x x x 1 Oil filter cartridge Replacing Fuel Filter Cartridge Replace the fuel filter cartridge every 500 hours of use using the following procedure 1 Close the fuel tank tap 1 Fuel tank tap A OPEN B CLOSE 2 Remove th...

Page 48: ...and the injection nozzle Wash the fuel filter cup periodically 1 O ring 2 Filter element 3 Spring 4 Marker 5 Filter bowl 6 Screw ring EVERY 1000 HOURS 쎱 Replacing Air Cleaner Element See Cleaning Air Cleaner Element in every 100 hours maintenance 쎱 To drain coolant Coolant to be changed at 1000 hour intervals IMPORTANT Let the engine cool before draining the radiator coolant 1 Remove radiator cap ...

Page 49: ...ed water until the battery s fluid level comes somewhere between the UPPER and LOWER levels When the battery is being activated hydrogen and oxygen gases in the battery are extremely explosive Keep open sparks and flames away from the battery at all times especially when charging the battery When charging the battery ensure the vent caps are securely in place if equipped When disconnecting the cab...

Page 50: ...ery When battery boost starting engine follow the instructions below to safely start the engine 1 Bring helper battery of the same voltage as disabled generator within easy cable reach 2 Put on safety goggles and rubber gloves 3 Ensure the vent caps are securely in place if equipped 4 Cover vent caps with damp rags Do not allow the rag to touch the battery terminals 5 Attach the red clamp to the p...

Page 51: ...until it is cool to touch 1 Remove the negative 1 cable of the battery 2 Close the fuel tank tap 3 Drain the coolant from the radiator or change antifreeze solution 4 Cover the generator with a sheet and store in a dry and clean area 쎱 Lifting Procedure 3 CAUTION To avoid personal injury Use hangers and wire ropes which are strong enough to withstand the weight of the machine The apex of the wire ...

Page 52: ...e load Voltage failure to rise Voltage maladjusted Readjust using the voltage control AVR excitation output cable broken Repair the cable AVR itself in trouble Replace the AVR Exciter s winding short circuited or broken Replace the generator AVR excitation input cable broken Repair the cable Generator s winding broken Replace the generator AVR excitation output fuse blown out Replace the fuse Volt...

Page 53: ...ump to eliminate all the air in the fuel system Thick carbon deposits on orifice of injection nozzle This is caused when water or dirt is mixed in the fuel Clean the nozzle injection piece being careful not to damage the orifice Check to see if nozzle is working properly or not If not install a new nozzle Valve clearance is wrong zEngine model D1703 EBG V2203 EBGx Adjust valve clearance to 0 18 to...

Page 54: ...mpression etc Check for the cause Cause Countermeasures Carbon stuck around orifice of nozzle piece Clean orifice and needle valve being very careful not to damage the nozzle orifice Check nozzle to see if good If not replace with new parts Compression is insufficient Leaking valves Bad valve and excessive wear of rings pistons and liners cause insufficient compression Replace with new parts Grind...

Page 55: ...39 ENGLISH TROUBLESHOOTING 쎱 When Engine must be Stopped Immediately 쎱 When Engine Overheats ...

Page 56: ...40 ENGLISH TROUBLESHOOTING ...

Page 57: ...41 ENGLISH WIRING DIAGRAM Engine Circuit Diagram for D1703 V2203 ...

Page 58: ...42 ENGLISH WIRING DIAGRAM Engine Circuit Diagram for V3300 ...

Page 59: ...43 ENGLISH WIRING DIAGRAM Generator Circuit Diagram KJ S130VX 220 110V 50Hz KJ S150VX 240 120V 60Hz KJ S150VX 220 110V 60Hz ...

Page 60: ...44 ENGLISH WIRING DIAGRAM Generator Circuit Diagram KJ T130DX 380 220V 50Hz KJ T160DX 380 220V 60Hz KJ T180VX 380 220V 50Hz KJ T210VX 380 220V 60Hz KJ T300 380 220V 50Hz ...

Page 61: ...45 ENGLISH WIRING DIAGRAM Generator Circuit Diagram KJ T160DX 220 127V 60Hz KJ T210VX 220 127V 60Hz ...

Page 62: ...46 ENGLISH WIRING DIAGRAM Generator Circuit Diagram KJ T130DX 415 240V 50Hz KJ T180VX 415 240V 50Hz ...

Page 63: ...47 ENGLISH WIRING DIAGRAM Generator Circuit Diagram KJ S130VX AUS 240V 50Hz ...

Page 64: ...48 ENGLISH WIRING DIAGRAM Generator Circuit Diagram KJ T130DX AUS 415 240V 50Hz KJ T180VX AUS 415 240V 50Hz ...

Page 65: ...49 ENGLISH WIRING DIAGRAM Generator Circuit Diagram KJ S240 AUS 240V 50Hz ...

Page 66: ...50 ENGLISH WIRING DIAGRAM Generator Circuit Diagram KJ T300 AUS 415 240V 50Hz ...

Page 67: ... a perfectly safe device Check unit prior to re starting Alarms and Corrective Measures If a trouble occurs during operation a corresponding indicator lamp lights up and the engine stops Determine at which lamp is ON and pinpoint and correct the cause of trouble 1 Water temperature lamp Lights up if the engine is overheating 2 Oil pressure lamp Lights up if engine oil pressure is too low 3 Battery...

Reviews: