background image

MAINTENANCE 

OM 0341SB74-A 

28


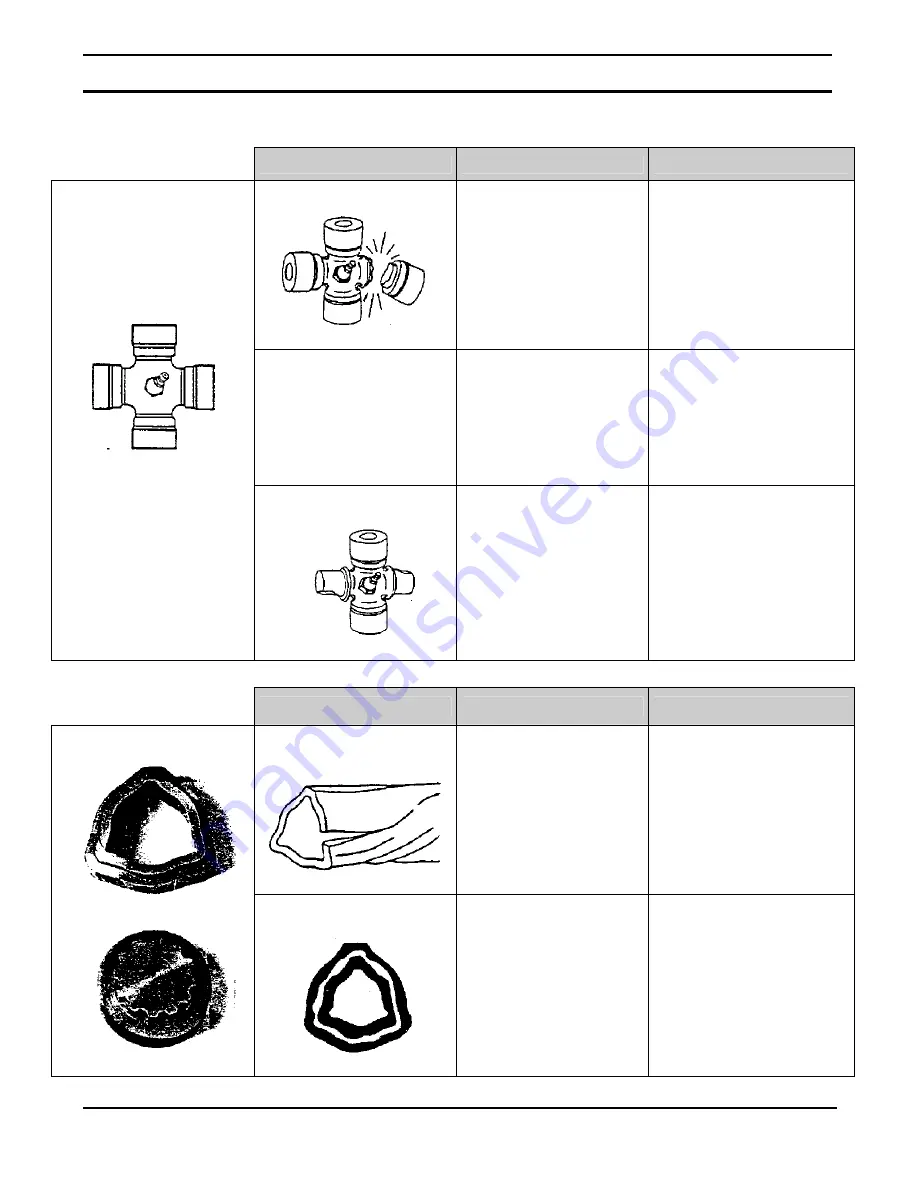
AVOIDABLE DAMAGES 

POSSIBLE CAUSES 

CORRECTIVE ACTIONS 

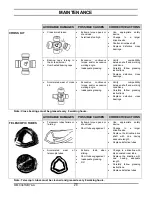
CROSS KIT


• 

Cross arms broken. 


• 

Extreme torque peak or 
shock load. 

• 

Axial loads too high. 


• 

Use appropriate safety 
device. 

• 

Change to a larger 
driveline size. 

• 

Shorten driveline shaft. 

• 

Replace defective cross 
bearings. 


• 

Bearing caps turning in 
their cross journal. 

• 

Overheated bearing caps. 


• 

Excessive continuous 
torque and/or excessive 
working angle. 

• 

Inadequate greasing. 

• 

Verify compatibility 
between shaft and working 
conditions. 

• 

Carefully follow greasing 
instructions. 

• 

Replace defective cross 
bearings. 


• 

Accelerated wear of cross 
kit. 


• 

Excessive continuous 
torque and/or excessive 
working angle. 

• 

Inadequate greasing. 

• 

Verify compatibility 
between shaft and working 
conditions. 

• 

Carefully follow greasing 
instructions. 

• 

Replace defective cross 
bearings. 

Note: Cross bearings must be greased every 8 working hours. 


AVOIDABLE DAMAGES 

POSSIBLE CAUSES 

CORRECTIVE ACTIONS 

TELESCOPIC TUBES


• 

Telescopic tubes failure or 
twisting. 


• 

Extreme torque peak or 
shock load. 

• 

Short tube engagement. 


• 

Use appropriate safety 
device. 

• 

Change to a larger 
driveline size. 

• 

Replace the driveline drive 
shaft with one having 
adequate length. 

• 

Replace defective tubes. 


• 

Accelerated wear of 
telescopic tubes. 

• 

Extreme load when 
sliding. 

• 

Short tube engagement. 

• 

Inadequate greasing. 

• 

Dirt 

• 

Change to a driveline with 
rilsan coated inner tube. 

• 

Replace the driveline with 
one having adequate 
length. 

• 

Carefully follow greasing 
instructions. 

• 

Replace defective tubes. 

Note: Telescopic tubes must be cleaned and greased every 8 working hours. 

Summary of Contents for L2674

Page 1: ...CONTENTS OPERATORS AND PARTS MANUAL FOR L2674 Table Of Contet Part Number 7006002784 700600278400000 ...

Page 2: ......

Page 3: ...CONTENTS INTRODUCTION TO THE PURCHASER OPERATOR S AND PARTS MANUAL FOR L2674 SAFETY PRECAUTIONS DECALS ASSEMBLY OPERATION MAINTENANCE PARTS AVAILABLE OPTIONS TORQUE SPECIFICATION TABLE ...

Page 4: ......

Page 5: ...tion 12 Chute Manual Rotation 13 Snowblower Installation 17 How to determine Driveline Angles 18 Determining Driveline Length 19 Driveline Installation 21 Detaching Snowblower from the Tractor 21 OPERATION 22 General Preparation 22 Operating Controls 22 Manual Chute Rotation 22 Raising and Lowering the Snowblower 22 Drive Shaft Operation 22 Work and Travel Speed 22 Adjustments 23 Chain Tension Adj...

Page 6: ...hear bolts 25 Driveline 25 Drive shaft 25 Lubrication 26 Driveline Troubleshooting 27 PARTS 30 Introduction 30 Snowblower Assembly L2674 31 Chute 33 Gearbox 70060 04431 34 Manual Rotation 35 Driveline 70060 02548 36 AVAILABLE OPTIONS 37 TORQUE SPECIFICATION TABLE 38 ...

Page 7: ...recommendations contained in this manual and those labeled on the snowblower and on the tractor Follow the safety recommendations and make sure that those with whom you work follow them Illustrations The illustrations may not necessarily reproduce the full detail and the exact shape of the parts or depict the actual models but are intended for reference only Direction Reference All references to r...

Page 8: ...It is the owner s responsibility to be certain anyone operating this product reads this manual and all other applicable manuals to become familiar with this snowblower and all safety precautions Failure to do so could result in serious personal injury or snowblower damage If you have any questions consult your dealer BEFORE OPERATION Children Tragic accidents can occur if the operator is not alert...

Page 9: ... be thrown or cause damage to the snowblower 4 Set transmission to neutral and disengage clutch if equipped before starting the engine 5 Do not operate snowblower in wintertime without wearing adequate winter garments Always wear protective clothing 6 Never attempt to make any adjustments while engine is running Read this manual carefully to acquaint yourself with the snowblower as well as the tra...

Page 10: ...ion key and allow the rotating parts to stop BEFORE unclogging the housing or the chute and making any repairs adjustments or inspections Use only a 36 long stick of wood to unclog the snowblower 10 If the snowblower starts to vibrate abnormally disengage the PTO stop the engine immediately and check for cause Excessive vibration is generally a sign of trouble 11 Do not run the engine indoors exce...

Page 11: ...ion and steering 23 Always make sure all snowblower components are properly installed and securely fastened BEFORE operation 24 Adjust housing height to clear gravel or crushed rocks surface 25 Keep away from chute discharge This chute has the capacity to throw debris at far distances 26 Never direct chute discharge towards people or animals A thrown debris can cause serious injury ...

Page 12: ...n settle suddenly leak down or be accidentally lowered 7 Do not attempt to service machine clear obstructions or unclog the snowblower with the engine running Always shut off engine and allow all motion to cease 8 The manufacturer will not claim responsibility for fitment of unapproved parts and or accessories and any damages as a result of their use 9 Make sure all shields and guards are securely...

Page 13: ...part to be replaced has a sign on it obtain a new safety sign from your dealer and install it in the same place as on the removed part 4 Repaint all parts from which paint has worn or peeled 5 Perform maintenance of the snowblower as instructed under Maintenance section 6 When the snowblower are dry oil all moving parts Apply oil liberally to all surfaces to protect against rust 7 Store in a dry p...

Page 14: ...0 02232 2500484 KUBOTA 70060 02591 2500545 L2674 70060 03763 660988 70060 01211 657761 70060 04325 2500329 Located on Driveline 70060 01213 657763 70060 01040 655683 70060 01212 657762 Replace immediately if damaged for KUBOTA USA ...

Page 15: ... Situé sur l arbre à cardan 70060 01206 656779 70060 03764 660989 70060 01207 656780 70060 02232 2500484 KUBOTA 70060 02591 2500545 L2674 70060 01041 655834 70060 03763 660988 70060 04326 2500330 Replace immediately if damaged for KUBOTA Canada ...

Page 16: ...t two 1 2 NC x 1 carriage bolts in the skid shoe and attach with two 1 2 lockwashers and two 1 2 nuts items 2 3 4 Tighten firmly 4 Remove the board 5 Repeat same steps with the other skid shoe IMPORTANT Clearance between cutting edge and surface Level paved surface Adjust to upper holes Uneven or gravel surface Adjust to lower holes Cat 1 Hitch Pins Installation Fig 2 1 Remove the nut item 5 and t...

Page 17: ...plate item 6 following the others 3 FIGURE 3 Insert four 1 2 spacers item 5 under the retaining plates Secure using six 1 2 x 1 1 2 carriage bolts and serrated flange nuts items 7 8 Tighten securely NOTE For manual rotation only If it is difficult to turn the chute manually it might be necessary to use the 1 16 spacers item 4 to allow chute play adjustment NOTE Apply grease under the retaining pla...

Page 18: ...7 Do not tighten 7 FIGURE 5 Install the bracket item 1 on the right side of the snowblower 3 point hitch using two 3 8 NC x 1 1 4 bolts 3 8 lockwashers and 3 8 nuts items 2 3 4 Tighten securely 8 FIGURE 5 Install handle support bracket item 5 on the bracket item 1 using a 3 4 NC x 1 1 2 bolt lockwasher and nut items 6 7 8 making sure the tube leans toward the tractor but keeps parallel to the thre...

Page 19: ...h engaged between the gear teeth remove a little the rotation worm from the gear teeth and redo the steps b If the chute rotate with difficulty because the teeth do not engage or engage incorrectly adjust the rotation handle support toward the chute and redo the steps 17 FIGURE 6A Make sure the worm engages completely when it reaches the end of the chute gear The handle is well adjusted when the c...

Page 20: ...ASSEMBLY OM 0341SB74 A 16 Figure 6 Figure 7 Figure 6A ...

Page 21: ... 3 Install the tractor upper link item 4 Cat 1 In the bottom hole Cat 2 In the upper hole of the snowblower upper hitch point item 5 using tractor pins and linchpins item 6 4 Adjust the snowblower level using the upper link item 4 Make sure the snowblower operates parallel to the ground 5 Adjust the telescopic stabilizers item 7 so that snowblower does not sway Make sure there is not contact with ...

Page 22: ... universal joints will be very vulnerable and the life of the driveline will be dramatically reduced Before connecting snowblower driveline to tractor drive shaft make sure the driveline is not too long in the raised lowered and middle positions Refer to the following sections How to Determine Driveline Angles and Driveline Length to avoid damage to tractor If the driveline is too long it must be ...

Page 23: ... IMPORTANT Before using the equipment make sure the driveline is not too long At working position the two half drivelines must intersect each other sufficiently to insure maximum efficiency but there must not be any interference 1 To determine the L length for your tractor model first find the X factor by measuring the horizontal distance between the end of the tractor s drive shaft and the end of...

Page 24: ...h halves opposite each half shaft guard as shown on Figure B 4 Cut off inner and outer guard tubes as well as the inner and outer telescopic sections 5 Cut the guard a second time leaving the same distance between the end of the guard and the end of the shaft as existed before To obtain the proper distance A shown on Figure C cut the guard according to the following table DISTANCE A Male PTO Femal...

Page 25: ...eps 5 Connect driveline to tractor drive P T O make sure that the driveline yoke pin is properly engaged CAUTION Make sure that the quick coupler is securely locked in place A click must be heard 6 Secure driveline safety chain to tractor master shield to prevent driveline shield from rotating Detaching Snowblower from Tractor Figure 8 1 Lower the snowblower completely to the ground to release all...

Page 26: ...n level 7 Wear adequate winter outer garments while operating equipment OPERATING CONTROLS Manual Chute Rotation Turning the handle in a clockwise direction turns the chute in the clockwise direction too Raising and Lowering the Snowblower Refer to your tractor operator s manual Rear Power Take Off Operation Refer to your tractor operator s manual WARNING To avoid personal injury be sure the tract...

Page 27: ...vel and according to the surface conditions so that stones are not thrown with the snow Adjust both skid shoes to the same height to keep the cutting edge level and adjust upwards for smooth surfaces Loosen skid shoe bolts item 2 and adjust according to instructions below and securely tighten bolts Clearance between cutting edge and surface Level paved surface Adjust to lower holes Uneven or grave...

Page 28: ...ive shaft shut off the tractor engine remove the ignition key wait for all movement to stop and then clear the snow from the chute A definite pattern of operation is required to thoroughly clean the snow area These patterns will avoid throwing snow in unwanted places as well as eliminating a second removal of snow Where it is possible to throw the snow to the left and right above as on a long driv...

Page 29: ...the following parts only Driveline Bolt M10 x 1 50 x 55mm long gr 8 8 PTD Part 70060 02622 Drive shaft Shear bolt hex 5 16 NC x 1 3 4 gr 5 incl nut PTD Part 70060 04440 WARNING Provide adequate blocking before working under the snowblower when in the raised position Driveline IMPORTANT When the snowblower is not used for more than two weeks perform driveline maintenance and always store it in a dr...

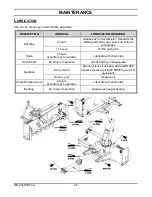
Page 30: ...riveline 16 hours Oil the push pins Chain 4 hours and after each operation Lubricate with chain lube Drive Shaft 24 hours of operation Grease fitting on shear plate Every month Check oil level If needed add AGMA 5EP extreme pressure oil SAE 80W90 gear oil or equivalent Gearbox Once a year Replace oil Chute Rotation worm 4 hours and after each operation Lubricate with chain lube Bearing 24 hours of...

Page 31: ...nect pins must be cleaned and greased every 16 hours AVOIDABLE DAMAGES POSSIBLE CAUSES CORRECTIVE ACTIONS YOKE Yoke ears deformation Excessive shaft length Axial loads too high Excessive working angle and torque Shorten shaft length cut both telescopic tubes as well as shields and remove burrs Replace defective yokes Clean and grease telescopic tubes and replace both tubes if necessary Replace def...

Page 32: ...greasing Verify compatibility between shaft and working conditions Carefully follow greasing instructions Replace defective cross bearings Note Cross bearings must be greased every 8 working hours AVOIDABLE DAMAGES POSSIBLE CAUSES CORRECTIVE ACTIONS TELESCOPIC TUBES Telescopic tubes failure or twisting Extreme torque peak or shock load Short tube engagement Use appropriate safety device Change to ...

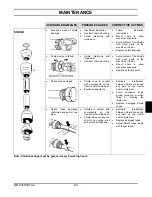
Page 33: ... parts of the machine or tractor Mount chain to allow maximum angularity Replace defective parts Shield cone damaged Shield cone in contact with components on the tractor and or implement Excessive angularity Eliminate interference between Shield cones and any part on the tractor and or implement Avoid excessive angle during cornering or when lifting or lowering the implement Replace damaged Shiel...

Page 34: ...mn indicates common hardware that is available at your local hardware supply All reference to right and left forward or rearward are from the operator seat looking at the machine while operating Orders must give the complete description correct part number the total amount required the serial number the method of shipment and the shipping address The manufacturer reserves the rights to change modi...

Page 35: ...PARTS OM 0341SB74 A 31 SNOWBLOWER ASSEMBLY L2674 ...

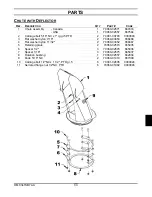
Page 36: ...22 Bolt hex 5 8 NC x 4 1 2 gr 5 PTD 1 O L O L 23 Idler spacer 1 19 32 1 70060 02549 666263 24 Chain 60 x 78 links incl connecting link 1 70001 02633 654009 25 Washer for fan 1 70001 00620 661554 26 Flange with grease groove 1 70060 02559 4300014 27 Self lubricating bushing 1 70060 02758 4300056 28 Hose clamp 1 70060 03718 660440 29 Driveline 50 series 1 70060 02548 662194 30 Hitch PinCat 1 2 70060...

Page 37: ...00003 3 Flat washer nylon 7 16 2 70060 03053 658468 4 Flat washer nylon 11 32 2 70060 03052 658467 5 Retaining plate 2 70060 02573 665935 6 Spacer 1 2 3 70060 02576 665936 7 Spacer 1 16 3 70060 02575 665937 8 Rotation bushing 1 70060 02557 662834 9 Knob 5 16 NC 2 70060 01419 657309 10 Carriage bolt 1 2 NC x 1 1 2 PTD gr 5 6 70001 02635 0300024 11 Serrated flange nut 1 2 NC PTD 6 70060 01992 090004...

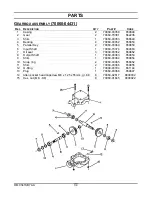
Page 38: ...Parallel Key 2 70060 03360 659850 6 Input Shaft 1 70060 70374 664663 7 Oil seal 3 70060 03362 659852 8 Output Shaft 1 70060 03363 659853 9 Shim 1 70060 03364 659854 10 Snap ring 2 70060 03365 656652 11 Shim 2 70060 03366 659855 12 O Ring 1 70060 03794 661144 13 Plug 1 70060 03368 659847 14 Allen socket head capscrew M8 x 1 25 x 55mm gr 8 8 8 70060 02617 0800032 15 Hex nut M8 8 8 8 70060 01845 0900...

Page 39: ...335 11 Bushing 1 11 16 lg 1 70060 01351 657336 12 Capscrew 10 24NC x 1 1 70060 02583 0800009 13 Nylon insert locknut 10 24 1 O L O L 14 Handle support 1 70060 03413 660187 15 Handle support bracket 1 70060 03414 660269 16 Hex bolt 3 8 NC x 1 1 4 2 O L O L 17 Hex nut 3 8 NC 2 O L O L 18 Lockwasher 3 8 2 O L O L 19 Setscrew 3 8 x 1 2 square head 1 70060 02583 0600006 20 Plastic Grommet 1 70060 01352...

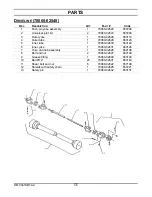
Page 40: ...8 663119 4 Outer tube 1 70060 02629 663123 5 Inner tube 1 70060 02630 663124 6 Inner yoke 1 70060 02631 663126 7 Yoke and hub assembly 1 70060 02626 662198 8 Bolt and nut 2 70060 02627 662199 9 Grease fitting 1 70060 02600 663129 10 Ball Ø14 23 70060 02601 663163 11 Shear bolt and nut 6 70060 02622 657199 12 Shields with safety chain 1 70060 02625 657221 13 Safety pin 1 70060 02632 663151 ...

Page 41: ...AVAILABLE OPTIONS OM 0341SB74 A 37 DRIFT CUTTER L2177 HYDRAULIC CHUTE ROTATION B2784A MANUAL ROTATION BL2665 HYDRAULIC DEFLECTOR BFL2518 HYDRAULIC DEFLECTOR WITH DIVERTER VALVE BL2666 ...

Page 42: ...hese values do not apply if lubricants are used BOLT SIZES SAE TORQUE INCHES Pounds Foot Newtons Meter 5 7 5 16 10 14 3 8 20 27 7 16 25 41 88 119 9 16 121 164 5 8 165 224 297 403 7 8 440 597 1 638 865 1 1 8 840 1139 1 1180 1600 1 3 8 1570 2129 1 2070 2807 BOLT SIZES METRIC TORQUE MILLIMETERS Pounds Foot Newtons Meter M6 10 13 M8 22 30 M10 40 54 M12 59 80 M14 93 126 M16 130 176 M18 168 228 M20 205 ...

Reviews: