background image

INFORMATION

LA525, LA765, WSM

I-12

[4] OPERATIONAL SPECIFICATIONS

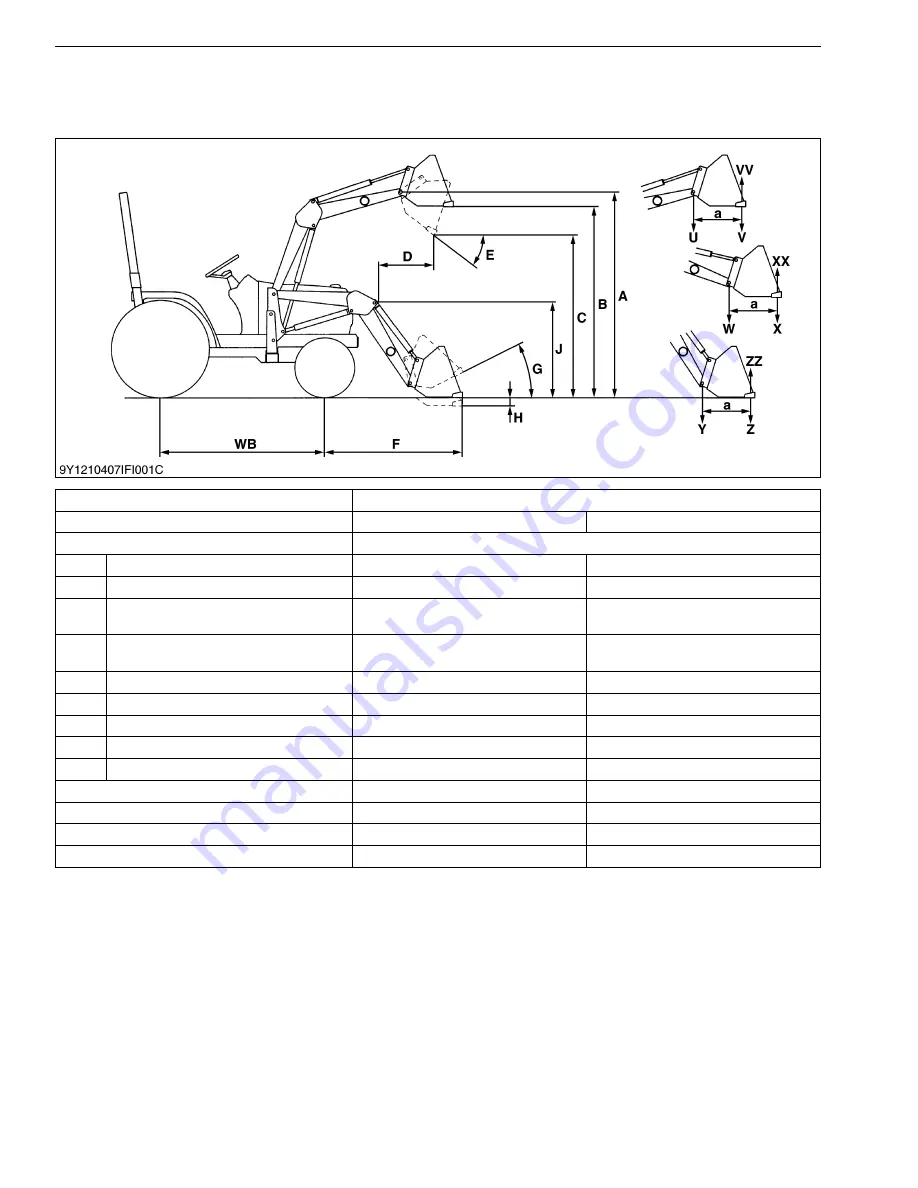
(1) Specifications Table

[A] LA525

9Y1211014INI0011US0

Loader Model

LA525

Tractor Model

L2501

L3301, L3901

Bucket Type

Rigid

U

Lift capacity (Bucket pivot pin, max. height)

491 kg (1082 lbs)

513 kg (1131 lbs)

V

Lift capacity (500 mm forward, max. height)

372 kg (820 lbs)

388 kg (855 lbs)

W

Lift capacity 
(Bucket pivot pin, 1500 mm height)

649 kg (1431 lbs)

676 kg (1490 lbs)

X

Lift capacity 
(500 mm forward, 1500 mm height)

515 kg (1135 lbs)

536 kg (1182 lbs)

Y

Breakout force (Bucket pivot pin)

10554 N (2373 lbf)

10951 N (2462 lbf)

Z

Breakout force (500 mm forward)

8033 N (1806 lbf)

8335 N (1874 lbf)

VV

Bucket roll-back force at maximum height

9403 N (2114 lbf)

9685 N (2177 lbf)

XX

Bucket roll-back force at 1500 mm

11646 N (2618 lbf)

11998 N (2697 lbf)

ZZ

Bucket roll-back force at ground level

9545 N (2146 lbf)

9855 N (2215 lbf)

Raising time (Rated flow)

4.1 sec.

3.5 sec.

Lowering time (Rated flow)

2.4 sec.

2.3 sec.

Bucket dumping time (Rated flow)

2.0 sec.

1.7 sec.

Bucket roll-back time (Rated flow)

2.6 sec.

2.2 sec.

KiSC issued 06, 2017 A

Summary of Contents for LA525

Page 1: ...LA525 LA765 WORKSHOP MANUAL FRONT LOADER KiSC issued 06 2017 A ...

Page 2: ...ns information on the structure and the function of the unit Before you continue with the subsequent sections make sure that you read this section Servicing This section primarily contains information below Troubleshooting Servicing Specifications Tightening Torques Removing Front Loader from Tractor Checking Disassembling and Servicing All illustrations photographs and specifications contained in...

Page 3: ...to find all the revised locations Last digit of the Code No Issue month Main Revised Point and Corrective Measures Search word Reference Page 1 2014 08 Add new adaptable tractor L2501 I 9 2 2017 06 Revised the contents of safety decals I 7 KiSC issued 06 2017 A ...

Page 4: ...I INFORMATION KiSC issued 06 2017 A ...

Page 5: ...OGY I 8 4 SPECIFICATIONS I 9 1 LOADER SPECIFICATIONS I 9 2 BUCKET SPECIFICATIONS I 9 3 DIMENSIONAL SPECIFICATIONS I 10 1 LA525 I 10 2 LA765 I 11 4 OPERATIONAL SPECIFICATIONS I 12 1 Specifications Table I 12 2 Performance Curves I 14 INFORMATION KiSC issued 06 2017 A ...

Page 6: ...in disengaged positions Do not start the engine when you stay on the ground Start the engine only from operator s seat WSM000001INI0015US0 SAFETY FIRST This symbol the industry s Safety Alert Symbol is used throughout this manual and on labels on the machine itself to warn of the possibility of personal injury Read these instructions carefully It is essential that you read the instructions and saf...

Page 7: ... you disconnect hydraulic or fuel lines Tighten all connections before you apply the pressure Do not open a fuel system under high pressure The fluid under high pressure that stays in fuel lines can cause serious injury Do not disconnect or repair the fuel lines sensors or any other components between the fuel pump and injectors on engines with a common rail fuel system under high pressure Put on ...

Page 8: ...tions when you discard oil fuel coolant electrolyte and other dangerous waste WSM000001INI0007US0 PREVENT ACID BURNS Keep electrolyte away from your eyes hands and clothing Sulfuric acid in battery electrolyte is poisonous and it can burn your skin and clothing and cause blindness If you spill electrolyte on yourself clean yourself with water and get medical aid immediately WSM000001INI0008US0 PRE...

Page 9: ...ALS The following safety decals are installed on the machine If a decal becomes damaged illegible or is not on the machine replace it The decal part number is listed in the parts list WSM000001INI0013US0 9Y1211014INI0015US0 KiSC issued 06 2017 A ...

Page 10: ...INFORMATION LA525 LA765 WSM I 5 9Y1211014INI0001US0 KiSC issued 06 2017 A ...

Page 11: ...INFORMATION LA525 LA765 WSM I 6 9Y1211014INI0002US0 KiSC issued 06 2017 A ...

Page 12: ...h a soft cloth 3 Replace damaged or missing danger warning and caution labels with new labels from your local KUBOTA dealer 4 If a component with danger warning and caution label s affixed is replaced with new part make sure new label s is are attached in the same location s as the replaced component 5 Attach new danger warning and caution labels on a clean dry surface Push any bubbles to outside ...

Page 13: ...ORMATION LA525 LA765 WSM I 8 3 LOADER TERMINOLOGY 9Y1211014INI0005US0 1 Loader Control Lever 2 Side Frame 3 Mounting Pin 4 Main Frame 5 Boom Cylinder 6 Boom 7 Bucket Cylinder 8 Bucket KiSC issued 06 2017 A ...

Page 14: ...uit Rated Flow 23 9 min 6 3 GPM 29 4 min 7 8 GPM Maximum Pressure 15 7 MPa 160 kgf cm2 2275 psi 16 2 MPa 165 kgf cm2 2347 psi 17 7 MPa 180 kgf cm2 2560 psi Net Weight Approximate 365 kg 805 lbs 524 kg 1155 lbs Loader Model LA525 LA765 Model SQUARE 60 SQUARE 66 SQUARE 72 ROUND 72 HD SQUARE 72 LIGHT MATERIAL Type Rigid Quick Attach Quick Attach Quick Attach Quick Attach Width 1525 mm 60 in 1675 mm 6...

Page 15: ... 3 in B Maximum lift height under level bucket 2224 mm 87 6 in C Clearance with bucket dumped 1936 mm 76 2 in D Reach at maximum lift height Dumping Reach 645 mm 25 4 in E Maximum dump angle 0 70 rad 40 F Reach with bucket on ground 1618 mm 63 7 in G Bucket roll back angle 0 54 rad 31 H Digging depth 176 mm 6 9 in J Overall height in carry position 1302 mm 51 3 in a Length 500 mm 19 7 in KiSC issu...

Page 16: ...der level bucket 2431 mm 95 7 in C Clearance with bucket dumped 2063 mm 81 2 in D Reach at maximum lift height Dumping Reach 537 mm 21 1 in E Maximum dump angle 0 72 rad 41 F Reach with bucket on ground 1783 mm 70 2 in G Bucket roll back angle 0 47 rad 27 H Digging depth 156 mm 6 1 in J Overall height in carrying position 1387 mm 54 6 in a Length 500 mm 19 7 in KiSC issued 06 2017 A ...

Page 17: ...pacity 500 mm forward 1500 mm height 515 kg 1135 lbs 536 kg 1182 lbs Y Breakout force Bucket pivot pin 10554 N 2373 lbf 10951 N 2462 lbf Z Breakout force 500 mm forward 8033 N 1806 lbf 8335 N 1874 lbf VV Bucket roll back force at maximum height 9403 N 2114 lbf 9685 N 2177 lbf XX Bucket roll back force at 1500 mm 11646 N 2618 lbf 11998 N 2697 lbf ZZ Bucket roll back force at ground level 9545 N 214...

Page 18: ...pacity 500 mm forward 1500 mm height 783 kg 1726 lbs Y Breakout force Bucket pivot pin 14023 N 3153 lbf Z Breakout force 500 mm forward 10865 N 2443 lbf VV Bucket roll back force at maximum height 12763 N 2869 lbf XX Bucket roll back force at 1500 mm 16429 N 3673 lbf ZZ Bucket roll back force at ground level 13345 N 3000 lbf Lifting time Rated flow 4 0 sec Lowering time Rated flow 2 5 sec Bucket d...

Page 19: ... 9Y1211014INI0014US0 B LA765 9Y1211014INI0013US0 1 At Pivot Pin 2 500 mm Forward of Pivot Pin a Height mm b Lift Capacity kg c Rollback Force kN 1 At Pivot Pin 2 500 mm Forward of Pivot Pin a Height mm b Lift Capacity kg c Rollback Force kN KiSC issued 06 2017 A ...

Page 20: ...G GENERAL KiSC issued 06 2017 A ...

Page 21: ...UTS WITH UNC OR UNF THREADS G 5 4 PLUGS AND GREASE FITTINGS G 5 5 HYDRAULIC FITTINGS G 6 1 Adapters Elbows and Others G 6 5 MAINTENANCE CHECK LIST G 7 6 CHECK AND MAINTENANCE G 8 1 CHECK POINTS OF EACH USE OR DAILY G 8 2 CHECK POINT OF EVERY 10 HOURS G 9 3 CHECK POINT OF INITIAL 20 TO 30 HOURS G 10 4 CHECK POINT OF EVERY 50 HOURS G 10 7 SPECIAL TOOLS G 12 1 SPECIAL TOOL FOR TRACTOR G 12 GENERAL Ki...

Page 22: ...65 WSM G 1 1 LOADER IDENTIFICATION When you get contact to your local KUBOTA distributor always show the model and front loader s serial number 1 9Y1211014GEG0002US0 1 Serial Number A LA525 B LA765 KiSC issued 06 2017 A ...

Page 23: ...ins their splits must face the direction from which a force is applied See the figure on the left side To prevent damage to the hydraulic system use only specified fluid or equivalent Clean the parts before you measure them Tighten the fittings to the specified torque Too much torque can cause damage to the hydraulic units or the fittings Not sufficient torque can cause oil leakage When you use a ...

Page 24: ... 2WD 4WD 4WD 2WD 4WD 4WD Transmission case Front loader is not attached 28 0 L 7 4 U S gals 6 1 Imp gals 28 5 L 7 5 U S gals 6 3 Imp gals 23 5 L 6 2 U S gals 5 2 Imp gals 40 0 L 10 6 U S gals 8 80 Imp gals KUBOTA SUPER UDT 2 fluid Grease fitting Until grease overflows Moly Ep type grease Place Capacity Lubricants type of grease L2501 Manual Transmission HST 2WD 4WD 4WD Transmission case Front load...

Page 25: ... 4 9 to 5 7 36 to 41 40 to 44 4 0 to 4 5 29 to 32 61 to 70 6 2 to 7 2 45 to 52 M12 12 mm 0 47 in 63 to 72 6 4 to 7 4 47 to 53 78 to 90 7 9 to 9 2 58 to 66 63 to 72 6 4 to 7 4 47 to 53 103 to 117 10 5 to 12 0 76 0 to 86 7 M14 14 mm 0 55 in 108 to 125 11 0 to 12 8 79 6 to 92 5 124 to 147 12 6 to 15 0 91 2 to 108 167 to 196 17 0 to 20 0 123 to 144 M16 16 mm 0 63 in 167 to 191 17 0 to 19 5 123 to 141 ...

Page 26: ...to 178 15 3 to 18 1 111 to 131 9 16 150 to 178 15 3 to 18 1 111 to 131 217 to 260 22 2 to 26 5 160 to 191 5 8 204 to 244 20 8 to 24 8 151 to 179 299 to 357 30 5 to 36 4 221 to 263 Shape Size Material of opponent part Ordinariness Aluminum N m kgf m lbf ft N m kgf m lbf ft Tapered screw R1 8 13 to 21 1 3 to 2 2 9 4 to 15 13 to 19 1 3 to 2 0 9 4 to 14 R1 4 25 to 44 2 5 to 4 5 18 to 32 25 to 34 2 5 t...

Page 27: ...ng 7 16 18 0 to 20 0 1 84 to 2 03 13 3 to 14 7 9 16 37 0 to 44 0 3 78 to 4 48 27 3 to 32 4 3 4 48 0 to 54 0 4 90 to 5 50 35 4 to 39 8 7 8 77 0 to 85 0 7 86 to 8 66 56 8 to 62 6 Hose fitting Flare nut UNF 9 16 22 0 to 25 0 2 2 to 2 5 16 0 to 19 0 3 4 36 0 to 40 0 3 67 to 4 07 26 6 to 29 5 7 8 43 0 to 50 0 4 39 to 5 09 31 8 to 36 8 1 1 16 107 to 119 11 0 to 12 1 79 0 to 87 7 Adapter NPT 1 4 30 0 to ...

Page 28: ...ng points before use 9Y1211014GEG0004US0 Service Interval Check Points Reference page Daily Each use Check the transmission fluid level G 8 Check the hardware Main and sub frame G 9 Check the hydraulic hoses G 9 Every 10 hours Grease all grease fittings G 9 Initial 20 to 30 hours Re tightening of hardware G 10 Every 50 hours Check the main frame and sub frame bolt torques G 10 KiSC issued 06 2017 ...

Page 29: ...ngine 2 To check the oil level pull out the dipstick clean it replace it and pull it out again Check to see that the oil level is between the two notches If the level is too low add new oil to the prescribed level at the oil inlet Refer to 3 LUBRICANTS on page G 3 IMPORTANT If oil level is low do not operate engine 9Y1211014GEG0006US0 1 Dipstick 2 Oil Inlet 3 Gauge A Oil level is acceptable within...

Page 30: ...t once Serious infection or allergic reaction will occur if you do not get proper medical treatment immediately When removing the engine side covers be careful not to touch hot loader cylinders Allow all surfaces to cool before maintenance Before servicing the loader or the tractor be sure to lower the loader boom in contact with the ground If the loader boom must be lifted during service or maint...

Page 31: ...tighten to specified torque Check all bolts frequently and keep them tight 1 Check main frame bolts and nuts regularly especially when new If they are loose tighten them as follows 9Y1211014GEG0010US0 Tightening torque Main frame bolts M16 226 N m 23 0 kgf m 166 lbf ft 1 18 M16 40 Bolt 8 M16 Spring Lock Washer 8 5 8 Hardened Plain Washers 2 8 M16 40 Bolt 8 M16 Spring Lock Washer 3 10 M16 45 Bolt 1...

Page 32: ...nd keep them tight 1 Check main frame bolts and sub frame bolts 1 regularly especially when new If they are loose tighten them as follows 9Y1211014GEG0011US0 Tightening torque Main frame bolts M16 226 N m 23 0 kgf m 166 lbf ft Sub frame mounting bolt and nut M16 226 N m 23 0 kgf m 166 lbf ft Sub frame mounting bolt and nut M12 90 2 N m 9 20 kgf m 66 5 lbf ft 1 Main Frame Bolt 2 Sub Frame 3 Sub Fra...

Page 33: ...urement of relief set pressure WSM000001GEG0027US0 1 Gauge 07916 50322 2 Cable 07916 50331 3 Threaded Joint 07916 50401 4 Threaded Joint 07916 50341 5 Adaptor B M18 P1 5 07916 50361 6 Adaptor C PS3 8 07916 50371 7 Adaptor D PT1 8 07916 50381 8 Adaptor E PS3 8 07916 50392 9 Adaptor F PF1 2 07916 62601 10 Adaptor 58 PT1 4 07916 52391 KiSC issued 06 2017 A ...

Page 34: ...1 FRONT LOADER KiSC issued 06 2017 A ...

Page 35: ...UIT 1 M1 2 HYDRAULIC BLOCK 1 M2 1 STRUCTURE 1 M3 3 CONTROL VALVE ASSEMBLY 1 M4 1 STRUCTURE 1 M4 2 OPERATION 1 M5 1 Neutral 1 M5 2 Up 1 M6 3 Down 1 M7 4 Floating 1 M8 5 Roll back 1 M9 6 Dump 1 M10 MECHANISM KiSC issued 06 2017 A ...

Page 36: ... Hydraulic Block 2 Control Valve Assembly 3 Boom Cylinder 4 Bucket Cylinder 5 Boom Control Valve 6 Bucket Control Valve 3 Position Type 7 Relief Valve P P Port T T Port A1 A1 Port B1 B1 Port A2 A2 Port B2 B2 Port P B Power Beyond Port a From Pump b To 3 Point Hydraulic System 7 L2501 15 2 to 16 2 MPa 155 to 165 kgf cm2 2210 to 2340 psi L3301 L3901 15 7 to 16 6 MPa 160 to 170 kgf cm2 2280 to 2410 p...

Page 37: ...e hydraulic pump is sent into the P port of the control valve through the hydraulic block 1 2 Oil from the PB power beyond port of loader control valve is sent into the three point hydraulic system through the B port of the hydraulic block 3 Oil from the T tank port of the loader control valve is sent into the transmission case through the tank port of the hydraulic block 1 9Y1211014FLM0002US0 1 H...

Page 38: ...draulic cylinders on the implement such as front loader front blade and so on 9Y1211014FLM0003US0 1 Block Cover 2 Hydraulic Block 3 Relief Valve A To Implement Control Valve B From Implement Control Valve C To Position Control Valve P From Hydraulic Pump T1 To Transmission Case T2 From Implement Control Valve KiSC issued 06 2017 A ...

Page 39: ...o block valve housing load check valve etc This valve connects to A1 and B1 ports and controls oil flow to the boom cylinder 3 Bucket Control Section The bucket control valve has 3 position 6 connection no detent spring center type spool a mono block valve housing load check valve etc This valve connects to A2 and B2 ports and controls oil flow to the bucket cylinder 4 Power Beyond This section in...

Page 40: ...ents are shown in the above figure 9Y1211014FLM0005US0 1 Boom Control Section 2 Bucket Control Section 3 Spool 4 Spool 5 PB Passage 1 6 PB Passage 2 7 Load Check Valve T T Port P P Port A1 A1 Port A2 A2 Port B1 B1 Port B2 B2 Port PB PB Port a Low Pressure KiSC issued 06 2017 A ...

Page 41: ... the P port opens the load check valve 6 and flows through the notched section of the spool 3 and B1 port to extend the boom cylinder 8 3 Return oil from the boom cylinder 8 flows from the A1 port through the passage in the spool 3 and PB passage 1 4 to the bucket control section 2 9Y1211014FLM0006US0 1 Boom Control Section 2 Bucket Control Section 3 Spool 4 PB Passage 1 5 Neutral Passage 1 6 Load...

Page 42: ...pens the load check valve 6 and flows through the notched section of the spool 3 and A1 port to retract the boom cylinder 8 3 Return oil from the boom cylinder 8 flows from the B1 port through the passage in the spool 3 and PB passage 1 4 to the bucket control section 2 9Y1211014FLM0007US0 1 Boom Control Section 2 Bucket Control Section 3 Spool 4 PB Passage 1 5 Neutral Passage 1 6 Load Check Valve...

Page 43: ...t As a result oil in the boom cylinder 7 flows freely from the A1 port and B1 port through the T port to the transmission case 3 Oil entering the P port flows to the bucket control section 2 through the neutral passage 1 6 and PB passage 1 4 9Y1211014FLM0008US0 1 Boom Control Section 2 Bucket Control Section 3 Spool 4 PB Passage 1 5 Detent Mechanism 6 Neutral Passage 1 7 Boom Cylinder P P Port T T...

Page 44: ...utral passage 2 5 to the PB passage 2 6 is closed by the spool 4 this oil opens the load check valve 7 and flows through the notched section of the spool 4 and B2 port to retract the bucket cylinder 9 3 Return oil from the bucket cylinder 9 flows to the transmission case through the A2 port and T port 9Y1211014FLM0009US0 1 Boom Control Section 2 Bucket Control Section 3 PB Passage 1 4 Spool 5 Neut...

Page 45: ...ol Section 2 Bucket Control Section 3 PB Passage 1 4 Spool 5 Neutral Passage 2 6 PB Passage 2 7 Load Check Valve 8 Passage 2 9 Bucket Cylinder P P Port T T Port PB PB Port A2 A2 Port To Bucket Cylinder B1 B2 Port From Bucket Cylinder b High Pressure KiSC issued 06 2017 A ...

Page 46: ...d check valve 7 and flows through the notched section of the spool and A2 port to the bucket cylinder to extend the cylinder 3 Return oil from the bucket cylinder 9 flows from the B2 port to the passage 2 8 and flows to the A2 port together with the pressure fed oil from the P port As a result the dump speed is increased Reference The oil pressure of the A2 port and B2 port is identical but the bu...

Page 47: ...ASSEMBLING AND SERVICING 1 S17 1 CHECKING AND ADJUSTING 1 S17 1 Relief Valve 1 S17 2 DISASSEMBLING AND ASSEMBLING 1 S18 1 Separating Control Valve Assembly 1 S18 2 Disassembling Control Valve 1 S19 3 Bucket 1 S20 4 Boom and Hydraulic Cylinder 1 S23 5 Side Frame Main Frame and Others LA525 1 S27 6 Side Frame Main Frame and Others LA765 1 S30 3 SERVICING 1 S32 SERVICING KiSC issued 06 2017 A ...

Page 48: ...ace the hydraulic hose 1 S28 1 S31 3 Oil is leaking from the boom cylinder Solution order 1 Check the piston ring and o ring are not worn or damaged 1 S25 2 Check the piston rod is not bent or scratched 1 S32 3 Replace the piston ring and or o ring 1 S25 4 Replace the piston rod 1 S24 5 Replace the boom cylinder assembly 1 S23 4 Control lever linkage is damaged Solution order 1 Check the length of...

Page 49: ...irty 1 S17 7 Clean the relief valve 1 S17 8 Replace the relief valve assembly if the pressure is not sufficient 1 S17 6 Hydraulic pump is malfunctioning Solution order 1 Check the pump delivery oil flow rate Tractor WSM 2 Replace the hydraulic pump if oil flow rate does not reach to allowable limit Tractor WSM 7 Control valve is damaged Solution order 1 Check the movement of control valve 2 Repair...

Page 50: ...djust the length of the control lever linkages 1 S18 3 Replace the control lever linkages 1 S18 2 Control valve is damaged Solution order 1 Check the movement of control valve 2 Repair the control valve 1 S19 3 Replace the control valve assembly if symptom persists 1 S18 Symptom Probable Cause and Checking Procedure Solution Reference Page KiSC issued 06 2017 A ...

Page 51: ...olution order 1 Check the piston ring and o ring are not worn or damaged 1 S25 2 Check the piston rod is not bent or scratched 1 S32 3 Replace the piston ring and or o ring 1 S25 4 Replace the piston rod 1 S24 5 Replace the boom cylinder assembly 1 S23 4 Control lever linkage is damaged Solution order 1 Check the length of the control lever linkages 1 S18 2 Adjust the length of the control lever l...

Page 52: ...t dirty 1 S17 7 Clean the relief valve 1 S17 8 Replace the relief valve assembly if the pressure is not sufficient 1 S17 6 Hydraulic pump is malfunctioning Solution order 1 Check the pump delivery oil flow rate Tractor WSM 2 Replace the hydraulic pump if oil flow rate does not reach to allowable limit Tractor WSM 7 Control valve is damaged Solution order 1 Check the movement of control valve 2 Rep...

Page 53: ...ution order 1 Check the piston ring and o ring are not worn or damaged 1 S25 2 Check the piston rod is not bent or scratched 1 S32 3 Replace the piston ring and or o ring 1 S25 4 Replace the piston rod 1 S24 5 Replace the bucket cylinder assembly 1 S23 4 Control lever linkage is damaged Solution order 1 Check the length of the control lever linkages 1 S18 2 Adjust the length of the control lever l...

Page 54: ...dirty 1 S17 7 Clean the relief valve 1 S17 8 Replace the relief valve assembly if the pressure is not sufficient 1 S17 6 Hydraulic pump is malfunctioning Solution order 1 Check the pump delivery oil flow rate Tractor WSM 2 Replace the hydraulic pump if oil flow rate does not reach to allowable limit Tractor WSM 7 Control valve is damaged Solution order 1 Check the movement of control valve 2 Repai...

Page 55: ...Solution order 1 Check the piston ring and o ring are not worn or damaged 1 S25 2 Check the piston rod is not bent or scratched 1 S32 3 Replace the piston ring and or o ring 1 S25 4 Replace the piston rod 1 S24 5 Replace the bucket cylinder assembly 1 S23 4 Control lever linkage is damaged Solution order 1 Check the length of the control lever linkages 1 S18 2 Adjust the length of the control leve...

Page 56: ...malfunctioning Solution order 1 Check the pump delivery oil flow rate Tractor WSM 2 Replace the hydraulic pump if oil flow rate does not reach to allowable limit Tractor WSM 7 Control valve is damaged Solution order 1 Check the movement of control valve 2 Repair the control valve 1 S19 3 Replace the control valve assembly if symptom persists 1 S18 Front End Loader Falls by Its Weight 1 Transmissio...

Page 57: ...g pressure of relief valve 1 S17 2 Adjust the relief valve operating pressure 1 S17 3 Check the oil filter cartridge condition Tractor WSM 4 Clean the oil filter cartridge Tractor WSM 5 Replace the oil filter cartridge Tractor WSM 6 Check the relief valve is not dirty 1 S17 7 Clean the relief valve 1 S17 8 Replace the relief valve assembly if the pressure is not sufficient 1 S17 5 Control valve is...

Page 58: ...Engine speed Maximum Oil temperature 40 to 60 C 104 to 140 F Setting Pressure L2501 15 2 to 16 2 MPa 155 to 165 kgf cm2 2210 to 2340 psi Setting Pressure L3301 L3901 15 7 to 16 6 MPa 160 to 170 kgf cm2 2280 to 2410 psi Setting Pressure L4701 17 1 to 18 1 MPa 174 to 185 kgf cm2 2480 to 2630 psi Piston Rod Bend 0 25 mm 0 0098 in KiSC issued 06 2017 A ...

Page 59: ...e mounting bolt 24 to 27 2 4 to 2 8 18 to 20 Adapter and elbow 48 to 54 4 9 to 5 5 35 to 40 Fitting 39 to 60 4 0 to 6 1 29 to 44 Cylinder head 200 to 230 20 4 to 23 5 145 to 169 Boom and bucket cylinder piston mounting nut LA525 150 to 180 15 3 to 18 3 111 to 132 Boom and bucket cylinder piston mounting nut LA765 200 to 230 20 4 to 23 5 147 to 170 Front guard mounting bolt 124 to 147 12 6 to 15 0 ...

Page 60: ...g the stands to the boom 4 Move the stands outward and turn them until the hole in the stand and pin on the boom are aligned Then move the stands inward and put the spring pin as shown 5 Start the engine 6 Dump the bucket approximately 20 degrees 7 Lower the boom and lift the front wheels slightly IMPORTANT Lift the front wheels with the bucket Do not try to lift them with the stands 8 Stop the en...

Page 61: ...tions 2 Disconnect the four hoses with quick couplers at the control valve and place them to the hose guide as shown 3 Put the protective caps 1 and plugs on the quick coupler ends 4 Start the engine and slowly move back the tractor away from the loader 9Y1211014FLS0007US0 1 Hose 2 Hose Guide 3 Protective Cap KiSC issued 06 2017 A ...

Page 62: ...n the loader side frames 1 until the rear portion of both side frames touches the main frames 2 as shown 2 Stop the engine 3 Connect the four hoses 3 with couplers to the fittings on the control valve as shown with color marks Then connect the protective caps and plugs to each other NOTE Adjust the route of the hoses as shown To be continued 1 Loader Side Frame 2 Main Frame 3 Hose 4 Hose Guide KiS...

Page 63: ... wheels off the ground IMPORTANT Do not try to lift the front wheels with the stands 6 Stop the engine Install the mounting pins 7 and put the slide bar of the mounting pins to the hole of the side frame 7 Start the engine 8 Lift the boom until the stands can turn 9 Stop the engine 10 Set the stands 8 to their original positions and set them with the spring pins 9 as shown 11 Start the engine 12 L...

Page 64: ...ulic block 3 and adjust with the adjusting shims 4 7 After the relief valve setting pressure test reset the position control lever stopper firmly Condition Engine speed Maximum Oil temperature 40 to 60 C 104 to 140 F Reference Thickness of shims 4 0 1 mm 0 004 in 0 2 mm 0 008 in 0 4 mm 0 02 in Pressure change per 0 1 mm 0 004 in shim Approx 260 kPa 2 7 kgf cm2 38 psi When shims are added the press...

Page 65: ...trol valve spools 2 Remove the bolt 4 and remove the control lever 1 3 Remove the control valve 6 from the valve stay 7 When reassembling Apply LOCK TITE 242 Blue to the male thread of the joint 8 The length A of the rod 1 3 must be 115 3 to 116 3 mm 4 54 to 4 58 in 9Y1211014FLS0011US0 Tightening torque Control valve cover mounting bolt 9 8 to 10 N m 1 0 to 1 1 kgf m 7 3 to 7 9 lbf ft 1 Hydraulic ...

Page 66: ...Pull out the spool 3 22 with other component parts from valve body 2 9Y1211014FLS0013US0 Tightening torque Adapter and elbow 48 to 54 N m 4 9 to 5 5 kgf m 35 to 40 lbf ft Fitting 39 to 60 N m 4 0 to 6 1 kgf m 29 to 44 lbf ft 1 A1 Port Adapter and Fitting 2 P Port Elbow 3 B1 Port Adapter and Fitting 4 B2 Port Adapter and Fitting 5 PB Port Elbow 6 A2 Port Adapter and Fitting 7 Dust Cap A 1 4 rad 80 ...

Page 67: ...outside hoses 5 damage to the hoses will occur 9Y1211014FLS0014US0 A LA525FL Rigid Type Bucket 1 Remove the pins 1 and remove the bucket 2 When reassembling When fixing the pin with the bolt 3 and nut 4 do not tighten the nut 4 completely The clearance A between the boss and the nut 4 should be 2 to 3 mm 0 08 to 0 12 in 9Y1211014FLS0015US0 1 Indicator Assembly 2 Split Pin 3 Level Rod Rock Bolt 4 L...

Page 68: ...may result in detachment of the attachment or deformation causing loss of performance personal injury or death CAUTION To avoid personal injury or machine damage Lift the boom only enough to latch the attachment The attachment could swing off the quick attach coupler DANGER To avoid serious personal injury or death The following engagement points are critical a The lock pins of the quick attach co...

Page 69: ...r Damage may occur to bucket cylinders without these conditions being set 1 Attach the quick attach coupler frame to the boom and bucket links as shown IMPORTANT Install M6 bolt and nut as shown in the figure to prevent damage to the bolt threads When fixing the pin with the bolt and nut do not tighten the nut completely The clearance between the boss and the nut should be 2 to 3 mm 0 08 to 0 12 i...

Page 70: ...5 Remove the hydraulic tubes from the boom 2 When reassembling Assemble the hydraulic tubes 5 6 7 8 to the boom as shown in figure NOTE To attach the hydraulic hose with tube fitting use two wrenches Hold the fitting with a wrench turn the hose with another wrench to prevent damage at welded area 9Y1211014FLS0018US0 1 Side Frame 2 Boom 3 Bucket Cylinder 4 Boom Cylinder 5 Hydraulic Tube with Yellow...

Page 71: ...S0 Cylinder Head Piston and Nut 1 Hold the rod end in a vise 2 Remove the nut 4 and remove the piston 3 and cylinder head 2 from the piston rod 1 When reassembling Visually examine all parts for signs of scoring or damage Put the piston rod to the cylinder head Be careful not to damage the wiper seal 5 and oil seal 6 9Y1211014FLS0020US0 Tightening torque Cylinder head 200 to 230 N m 20 4 to 23 5 k...

Page 72: ...m dia 1 78 in dia D 46 18 mm dia 1 82 in dia E 42 0 mm 1 65 in F 10 0 mm 0 4 in G 58 5 mm 2 30 in H 14 0 mm 0 55 in I 35 0 mm 1 38 in J 0 122 rad 7 K 45 2 mm dia 1 78 in dia L 53 9 mm dia 2 12 in dia Boom and Bucket A 80 µm 0 0031 in B 0 157 rad 9 C 50 18 mm dia 1 976 in dia D 51 18 mm dia 2 015 in dia E 42 0 mm 1 65 in F 10 0 mm 0 4 in G 58 5 mm 2 30 in H 14 0 mm 0 55 in I 35 0 mm 1 38 in J 0 122...

Page 73: ...ton with the slide jig 3 Install the piston seal 1 over the expander with the slide jig 4 Compress the piston seal to the correct size by installing the piston into the correcting jig 5 NOTE Do not turn roll the piston seal as you install it 9Y1211014FLS0022US0 1 Piston Seal 2 Slide Jig 3 Expander 4 Piston 5 Correcting Jig KiSC issued 06 2017 A ...

Page 74: ...per 4 together from the front axle frame 5 When reassembling Assemble the pivot bolts 7 plain whashers 6 and plate splings 8 as shown in the figure Make sure the plate springs 8 are in the specified direction as shown in the figure Set the space A to the specified calue 9Y1211014FLS0024US0 1 Pin 2 Side Frame Tightening torque Front guard mounting bolt 124 to 147 N m 12 6 to 15 0 kgf m 91 2 to 108 ...

Page 75: ...ened to ease installation of hoses to hydraulic block Be sure to securely tighten all hose fittings after installing Turn the hose fittings so the hoses clear the tractor and tractor parts Clamp three hoses and sleeve in the middle with plastic tie 9Y1211014FLS0025US0 1 Hydraulic Hose Power Beyond Line 2 Hydraulic Hose Pump Line 3 Hydraulic Hose Tank Line 4 Hydraulic Block 5 Control Valve Stay Mou...

Page 76: ...install main frame bolts 2 while hoisting to prevent falling 2 Tighten the correct torque of main frame bolts 1 2 NOTE Do not firmly tighten any bolts until most components are attached onto the tractor 9Y1211014FLS0026US0 Tightening torque Main frame mounting bolt M16 226 N m 23 0 kgf m 166 lbf ft 1 Mounting Bolt with Spring Washer and Plain Washer 2 Mounting Bolt with Spring Washer 3 Main Frame ...

Page 77: ...front guard 3 from front axle frame When reassembling Assemble the pivot bolts 5 Plain washers 4 and plate springs 6 as shown in the figure Make sure the plate springs 6 are in the specified direction as shown in the figure Set the space A to the specified value 9Y1211014FLS0027US0 1 Pin 2 Side Frame Tightening torque Front guard mounting bolt and nut 124 to 147 N m 12 6 to 15 0 kgf m 91 2 to 108 ...

Page 78: ... connect hoses easily to hydraulic block Be sure to securely tighten all hose fittings after installing Turn the hose fittings so the hoses clear the tractor and tractor parts Tighten three hoses and sleeve in the middle with plastic tie 9Y1211014FLS0028US0 1 Hydraulic Hose Power Beyond Line 2 Hydraulic Hose Pump Line 3 Hydraulic Hose Tank Line 4 Hydraulic Block 5 Control Valve Stay Mounting Bolt ...

Page 79: ...29US0 3 SERVICING Piston Rod Bend 1 Set the piston rod on V blocks 2 Set a dial indicator on the center of the rod 3 Turn the piston rod and read the dial indicator 4 If the measurement is more than the allowable limit replace it 9Y1211014FLS0030US0 Tightening torque Sub frame mounting bolt and nut M16 226 N m 23 0 kgf m 166 lbf ft M12 90 2 N m 9 20 kgf m 66 5 lbf ft Main frame mounting bolt M16 2...

Page 80: ...ational Service Department 64 Ishizu Kitamachi Sakai Ku Sakai City Osaka 590 0823 Japan Phone Address 72 241 1129 Fax 81 81 72 245 2484 E mail kbt_g ag sv kubota com 2014 02 S EI EI engusa Printed in Japan 2017 06 S EI EI engusa Code No 9Y111 10142 ...

Reviews: