73
THREE-POINT HITCH & DRAWBAR
C
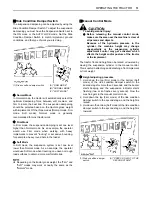
Adjusting Lower Link Width
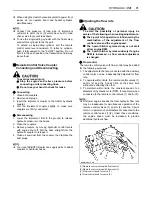
Set the width (W1) of lower links to be the same as width
(W2) of the implement.
(See "Telescopic Stabilizers" in this section to adjust the
width (W1) of lower links.
C
Attaching implement to Tractor
1. Set the release lever on the quick hitches to "LOCK"
position, if its lever is in "UNLOCK" position.
(Self-locking latches are closed)
2. With the lower links fully lowered, reverse the tractor
until the quick hitches are beneath the implement ball-
joints.
3. Raise the lower links using the hydraulic control lever
until the quick hitches engage the ball-joints.
A
An audible click will be heard as the self-locking
latches engage the implement ball-joint.
4. Lower the top link hook onto the upper implement ball-
joint and press down until the latch is engaged. If
necessary, adjust the top link length.
A
The hook of a top link is attached in a downward
direction.
C
Detaching Implement from Tractor
1. Fully lower the implement to the ground.
Support the implement with parking stand. (if
equipped) If necessary, adjust the top link and or lifting
rod length so that the implement may stabilize on the
ground.
2. Pull the release lever on the top link to release the
hook from implement ball-joint.
Hook the top link in the top link support.
3. Pull the release lever on both lower links to the
unlocked position to release the quick hitches from
implement ball-joints.
The latches will disengage and allow the lower links to
lower and detaching the implement.
(1) Lower link
(2) Telescopic stabilizer
(3) Implement
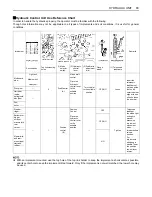
(1) Top link
(2) Lower link
(3) Latch
(4) Release lever
(A) "LOCK" position
(B) "UNLOCK" position
Summary of Contents for M100GX
Page 17: ... 7 SAFE OPERATION 7 DANGER WARNING AND CAUTION LABELS ...
Page 18: ...SAFE OPERATION 8 ...
Page 19: ... 9 SAFE OPERATION ...
Page 20: ...SAFE OPERATION 10 ...
Page 21: ... 11 SAFE OPERATION ...


