background image

SAFE OPERATION

-

8

Summary of Contents for M96SDTM

Page 1: ...NUAL The first part of this manual covers the features of the common M series tractor The second part covers the special features of the M96SDTM tractor Please read both parts before operation PRINTED IN JAPAN KUBOTA Corporation 2010 English U S A Code No 3N470 9971 2 ...

Page 2: ... r s SAE SMV Two Wheel Drive Four Wheel Drive American Petroleum Institute American Society of Agricultural and Biological Engineers USA American Society for Testing and Materials USA Deutsches Institut für Normung GERMANY Dual Traction 4WD Feet Per Minute Glide Shift Transmission High Speed Low Speed Hydrostatic Transmission Meters Per Second Power Take Off Right hand and left hand sides are dete...

Page 3: ... Engine Start Engine Stop Power Take Off Clutch Control Off Disengaged Position Power Take Off Clutch Control On Engaged Position Differential Lock Position Control Raised Position Position Control Lowered Position Draft Control Shallow Position Draft Control Deep Position 3 Point Lowering Speed Control Remote Cylinder Retract Remote Cylinder Extend Hazard Warning Lights Headlight Low Beam Headlig...

Page 4: ...em It will give you long satisfactory service To obtain the best use of your tractor please read this manual carefully It will help you become familiar with the operation of the tractor and contains many helpful hints about tractor maintenance It is KUBOTA s policy to utilize as quickly as possible every advance in our research The immediate use of new techniques in the manufacture of products may...

Page 5: ... not Operate the Tractor at Full Speed for the First 50 Hours 17 Changing Lubricating Oil for New Tractors 17 BOARDING AND LEAVING THE TRACTOR 17 OPERATING FOLDABLE ROPS 17 To Fold the ROPS 17 To Raise the ROPS to Upright Position 18 Adjustment of Foldable ROPS 19 STARTING 19 Operator s Seat 19 Seat Belt 20 Tilt Steering Adjustment 20 Light Switch 21 Turn Signal Hazard Light Switch 21 Front Work L...

Page 6: ...Safely 37 Directions for Use of Power Steering 37 Trailer Electrical Outlet 37 Electrical Outlet 38 PTO 39 PTO OPERATION 39 PTO Clutch Control Lever 39 1000 rpm PTO Shaft 40 LCD Monitor Message 40 PTO Shaft Cover and Shaft Cap 41 THREE POINT HITCH DRAWBAR 42 3 POINT HITCH 43 Selecting the holes of Lower Links 43 Adjusting Lateral Float 43 Selecting the Top Link Mounting Holes 43 Draft Stopper 43 D...

Page 7: ... Ballast 58 MAINTENANCE 59 SERVICE INTERVALS 59 LUBRICANTS 62 PERIODIC SERVICE 64 HOW TO OPEN THE HOOD 64 Hood 64 DAILY CHECK 65 Walk Around Inspection 65 Checking and Refueling 65 Checking Water Separator 66 Checking Engine Oil Level 66 Checking Transmission Fluid Level 67 Checking Coolant Level 67 Checking Brake Oil Level 68 Cleaning Evacuator Valve 68 Cleaning Grill Radiator Screen Intercooler ...

Page 8: ...sting King pin Pivot 86 Changing Brake Oil 86 EVERY 800 HOURS 86 Adjusting Engine Valve Clearance 86 EVERY 1500 HOURS 86 Checking Fuel Injection Nozzle Injection Pressure 86 Checking Fuel Injection Nozzle Active Test 86 EVERY 3000 HOURS 86 Checking Turbocharger 86 Checking Injection Pump 86 Checking Supply Pump 86 Checking Fuel Injection Timer 86 Checking Intake Air Heater 86 EVERY 1 YEAR 86 Repla...

Page 9: ...ing Brake System 91 Draining Clutch Housing Water 91 Replacing Fuse 91 Replacing Light Bulb 92 Replacing Head Lamp 92 STORAGE 93 TRACTOR STORAGE 93 REMOVING THE TRACTOR FROM STORAGE 93 TROUBLESHOOTING 94 ENGINE TROUBLESHOOTING 94 OPTIONS 96 APPENDICES 97 INDEX 97 ...

Page 10: ......

Page 11: ...or any implement attached to it while under the influence of alcohol medication controlled substances or while fatigued 6 Carefully check the vicinity before operating tractor or any implement attached to it Check for overhead clearance which may interfere with a CAB or ROPS Do not allow any bystanders around or near tractor during operation 7 Before allowing other people to use your tractor expla...

Page 12: ...area Carbon monoxide gas is colorless odorless and deadly 5 Check before each use that operator presence controls are functioning correctly Test safety systems See Checking Engine Start System in EVERY 50 HOURS in PERIODIC SERVICE section Do not operate unless they are functioning correctly C Working 1 Pull only from the drawbar Never hitch to axle housing or any other point except drawbar such ar...

Page 13: ...3 Keep all movement on slopes slow and gradual Do not make sudden changes in speed direction or apply brake and make sudden motions of the steering wheel 4 Avoid disengaging the clutch or changing gears speed when climbing or going down a slope If on a slope disengaging the clutch or changing gears to neutral could cause loss of control 5 Special attention should be made to the weight and location...

Page 14: ...w the tractor to move and could cause injury or death 1 Wait until all moving components have completely stopped before getting off the tractor connecting disconnecting adjusting cleaning or servicing any PTO driven equipment 2 Keep the PTO shaft cover in place at all times Replace the PTO shaft cap when the shaft is not in use 3 Before installing or using PTO driven equipment read the manufacture...

Page 15: ...JUMP STARTING in OPERATING THE ENGINE section 6 Keep first aid kit and fire extinguisher handy at all times 7 Disconnect the battery s ground cable before working on or near electric components 8 To avoid the possibility of battery explosion do not use or charge the refillable type battery if the fluid level is below the LOWER lower limit level mark Check the fluid level regularly and add distille...

Page 16: ...ke sure that all connections are tight and that all lines pipes and hoses are free of damage 16 Fluid escaping from pinholes may be invisible Do not use hands to search for suspected leaks use a piece of cardboard or wood Use of safety goggles or other eye protection is also highly recommended If injured by escaping fluid see a medical doctor at once This fluid will produce gangrene or severe alle...

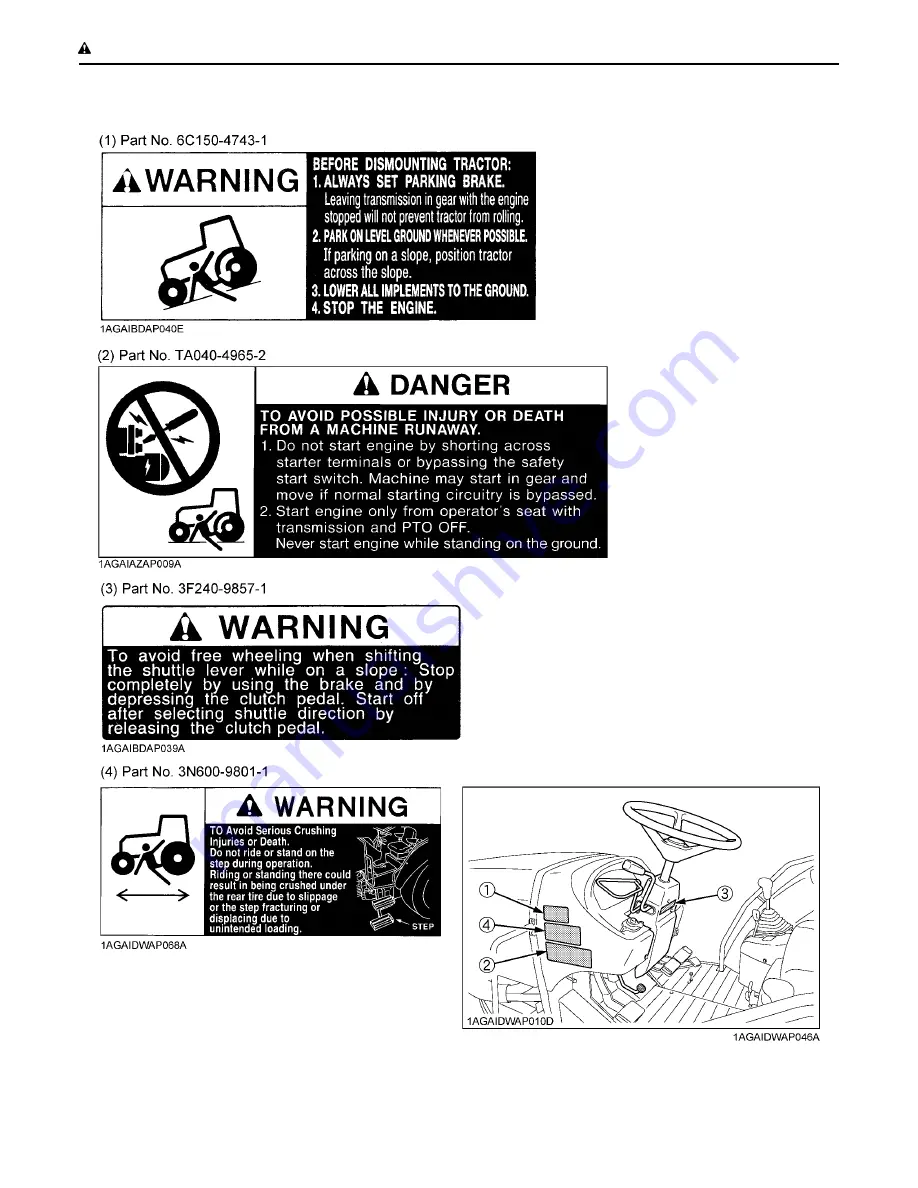
Page 17: ... 7 SAFE OPERATION 7 DANGER WARNING AND CAUTION LABELS ...

Page 18: ...SAFE OPERATION 8 ...

Page 19: ... 9 SAFE OPERATION ...

Page 20: ...SAFE OPERATION 10 ...

Page 21: ... 11 SAFE OPERATION ...

Page 22: ...er warning and caution labels with new labels from your local KUBOTA Dealer 4 If a component with danger warning and caution label s affixed is replaced with new part make sure new label s is are attached in the same location s as the replaced component 5 Mount new danger warning and caution labels by applying on a clean dry surface and pressing any bubbles to outside edge 8 CARE OF DANGER WARNING...

Page 23: ...ecord them in the space provided C Warranty This tractor is warranted under the KUBOTA Limited Express Warranty a copy of which may be obtained from your selling dealer No warranty shall however apply if the tractor has not been handled according to the instruction given in the Operator s Manual even it is within the warranty period C Scrapping the tractor and its procedure To put the tractor out ...

Page 24: ... 270 2 1400 to 1600 Battery capacity 12V RC 160 min CCA 900A Fuel tank capacity L U S gals 175 46 2 Engine oil capacity L U S qts 10 7 11 3 Coolant capacity L U S qts 9 6 10 1 Dimensions Overall length mm in 4145 163 2 Overall width minimum tread mm in 2200 86 2195 86 2220 87 Overall height mm in 2620 103 2670 105 Wheel base mm in 2435 95 9 Tread Front mm in 1540 to 2040 60 6 to 80 3 1580 1680 62 ...

Page 25: ... hitch Category 2 Max lifting force At lifting points 3 kg lbs 2500 5510 3900 8600 with 2 assist cylinders option 24 in behind lifting point kg lbs 2100 4630 3400 7490 with 2 assist cylinders option Remote hydraulic control 1 standard 2nd 3rd flow control valve optional System pressure MPa kgf cm 19 6 200 Traction system Swinging drawbar adjustable in direction PTO Live PTO Indepen dent Direction ...

Page 26: ... 08 2 2 48 1 54 2 48 1 54 2 05 1 27 2 67 1 66 2 67 1 66 2 20 1 37 3 3 05 1 90 3 05 1 90 2 52 1 57 3 28 2 04 3 28 2 04 2 71 1 69 4 3 74 2 33 3 74 2 33 3 09 1 92 4 02 2 50 4 02 2 50 3 33 2 07 1 4 79 2 98 4 79 2 98 3 96 2 46 5 15 3 20 5 15 3 20 4 26 2 65 2 6 10 3 79 6 10 3 79 5 04 3 13 6 56 4 08 6 56 4 08 5 42 3 37 3 7 51 4 67 7 51 4 67 6 21 3 86 8 08 5 02 8 08 5 02 6 68 4 15 4 9 21 5 72 9 21 5 72 7 ...

Page 27: ...50 1 55 2 50 1 55 2 07 1 28 2 69 1 67 2 69 1 67 2 22 1 38 3 3 08 1 91 3 08 1 91 2 55 1 58 3 31 2 06 3 31 2 06 2 74 1 70 4 3 77 2 35 3 77 2 35 3 12 1 94 4 06 2 52 4 06 2 52 3 36 2 09 1 4 83 3 00 4 83 3 00 3 99 2 48 5 19 3 23 5 19 3 23 4 29 2 67 2 6 15 3 82 6 15 3 82 5 08 3 16 6 61 4 11 6 61 4 11 5 47 3 40 3 7 58 4 71 7 58 4 71 6 26 3 89 8 15 5 06 8 15 5 06 6 74 4 19 4 9 29 5 77 9 29 5 77 7 68 4 77 ...

Page 28: ... of the tractor b penetrating objects in the operator s enclosure primarily in case a winch is mounted at the rear of the tractor Optional equipments such as OPS Operator Protective Structure FOPS Falling Object Protective Structure etc to deal with these hazards and other related hazards are not available for this tractor Without such optional equipment use is limited to tractor specific applicat...

Page 29: ...50 5 Rotary Tiller Max Tilling Width mm in 2700 108 Max Weight kg lbs 1200 2645 6 Bottom Plow Max Size 14 in x 4 16 in x 4 18 in x 3 20 in x 2 22 in x 2 24 in x 1 14 in x 5 16 in x 4 18 in x 4 20 in x 3 22 in x 2 24 in x 1 Max Weight kg lbs 3P Type 900 1980 7 Disk harrow 3P Type Max Size 24 in x 28 Max Harrowing Width mm in 3300 130 Max Weight kg lbs 900 1980 Drawbar Type Max Harrowing Width mm in...

Page 30: ...t Panel Switches and Hand Controls ILLUSTRATED CONTENTS 1 Hydraulic shuttle shift lever 25 2 Turn signal switch 21 3 Head light switch 21 4 Clutch pedal 23 5 Tilt pedal 20 6 Front work light switch 22 7 Hazard light switch 21 8 Key switch 9 Brake pedal 22 10 Foot throttle 28 ...

Page 31: ...indicator 39 12 Pilot lamp HIGH 24 4 Liquid crystal display 31 13 Parking brake Brake oil indicator 29 5 Electrical charge indicator 29 14 Fuel level indicator 29 6 Engine oil pressure indicator 29 15 Fuel gauge 30 7 Engine warning indicator M108S model 29 16 Coolant temperature gauge 30 8 Tachometer 30 17 PTO Hour meter select switch 31 9 4WD indicator 27 18 Travel speed select switch 31 ...

Page 32: ...ont wheel drive lever 27 6 Creep lever if equipped 26 7 Operator s seat 19 8 Tool box 9 Hand throttle lever 28 10 Main gear shift lever 24 11 Position control lever 47 12 Remote control valve lever 49 13 Draft control lever 48 14 Cup holder 15 PTO clutch control lever 39 16 Seat belt 20 17 Dual speed shift switch with indicator DS model 25 18 Remote control valve coupler 50 19 Trailer electrical o...

Page 33: ... item Walk around inspection Check engine oil level Check transmission oil level Check brake oil level Check coolant level Check water separator Clean grill and radiator screen Clean oil cooler Clean fuel cooler M108S Check air cleaner evacuator valve When used in a dusty place Check brake pedal Check parking brake lever Check indicators gauges and meter Check lights Check seat belt and ROPS Refue...

Page 34: ...hift levers to the NEUTRAL positions and to place PTO lever in OFF position before starting the engine A Do not use starting fluid or ether A To protect the battery and the starter make sure that the starter is not continuously turned for more than 10 seconds STARTING THE ENGINE Pull the parking brake lever up to park The parking brake indicator light on the Easy Checker TM will come on while the ...

Page 35: ... shift lever 2 Main gear shift lever 3 Range gear shift lever N NEUTRAL POSITION 4 Place the PTO clutch control lever in OFF position and hydraulic control levers in LOWEST position 1 PTO clutch control lever 2 Position control lever 3 Draft control lever ON OFF A DOWN 5 Set the throttle lever to about 1 2 way 1 Hand throttle lever 2 Foot throttle INCREASE DECREASE ...

Page 36: ...plied and goes off when it is released A Daily checks with the Easy Checker TM only are not sufficient Never fail to conduct daily checks carefully by referring to Daily Check See DAILY CHECK in PERIODIC SERVICE section A Because of the safety devices the engine will not start except when the PTO clutch control lever is placed in the OFF position and main gear shift lever is placed in the NEUTRAL ...

Page 37: ...up allow engine to warm up without applying any load this is to allow oil to reach every engine part If load should be applied to the engine without this warm up period trouble such as seizure breakage or premature wear may develop BWarm up and Transmission Oil at Low Temperature Range Hydraulic oil serves as transmission fluid In cold weather the oil may be cold with increased viscosity This can ...

Page 38: ...6 Attach the red clamp to the positive red or pos terminal of the dead battery and clamp the other end of the same cable to the positive red or pos terminal of the helper battery 7 Clamp the other cable to the negative black or neg terminal of the helper battery 8 Clamp the other end to the engine block or frame of the disabled tractor as far from the dead battery as possible 9 Start the helper ve...

Page 39: ...it should be especially observed in the case of new tractors BChanging Lubricating Oil for New Tractors The lubricating oil is especially important in the case of a new tractor The various parts are not broken in and are not accustomed to each other small metal grit may develop during the operation of the tractor and this may wear out or damage the parts Therefore care should be taken to change th...

Page 40: ...hair pin cotters BTo Raise the ROPS to Upright Position 1 Remove both hair pin cotters and set bolts 2 Raise ROPS to the upright position To avoid personal injury A Raise the ROPS slowly and carefully 3 Align set bolt holes and insert both set bolts Slightly tighten the set bolts and secure them with the hair pin cotters To avoid personal injury A Make sure that both set bolts are properly install...

Page 41: ...the operator to ride on the tractor C Travel adjustment Unlock the travel adjust lever and slide the seat backward or forward as required The seat will lock in position when the lever is released C Weight adjustment Turn the weight adjust lever to achieve the optimum suspension setting C Height adjustment Pull up with your hands the seat pan to the desired height of the three available positions O...

Page 42: ...onnect the buckle This seat belt is auto locking retractable type BTilt Steering Adjustment To avoid personal injury A Do not adjust the steering wheel while the tractor is in motion Press down the steering wheel tilt pedal to release the lock so the steering wheel can be adjusted to one of six desired positions 1 Seat belt 1 Steering wheel tilt pedal A PRESS DOWN ...

Page 43: ...ing light will flash and the other will stay on C Turn Signal without Hazard Light 1 To indicate a right turn without hazard lights turn the switch clockwise 2 To indicate a left turn without hazard lights turn the switch counterclockwise 3 When the left or right turn signal is activated without the hazard lights the indicated turning light will flash and the other will stay on A The hazard light ...

Page 44: ...not make sudden braking An accident may occur such as by heavy towed load shifting forward or loss of control A To avoid skidding and less of steering control when driving on icy wet or loose surfaces make sure the tractor is correctly ballasted operated at reduced speed operated with front wheel drive engaged If equipped A The braking characteristics are different between two and four wheel drive...

Page 45: ...edal is fully pressed down To help prevent premature clutch wear A The clutch pedal must be quickly disengaged and be slowly engaged A Avoid operating the tractor with your foot resting on the clutch pedal A Select proper gear and engine speed depending on the type of job 4 Raise the Implement see HYDRAULIC UNIT section 1 Position control lever A UP 5 Depress the Clutch Pedal 1 Clutch pedal ...

Page 46: ...l way The shifting may fail Be sure to do the shifting before going downhill 1 8 speeds can be selected by the main gear shift lever 2 The main gear shift is fully synchronized to shift without stopping 6 Selecting the Travel Speed 1 Hydraulic shuttle shift lever 2 Main gear shift lever 3 Range gear shift lever 4 Pilot lamp LOW 5 Pilot lamp HIGH F FORWARD N NEUTRAL POSITION R REVERSE LOW HIGH A PU...

Page 47: ...on damage depress clutch pedal and stop the tractor before shifting between ranges BHydraulic Shuttle Shift Lever Raise up and shift the shuttle shift lever forward to obtain forward speeds and shift back to obtain reverse speeds This shifting does not require clutch operation A The hydraulic shuttle shift lever may be shifted while the tractor is moving slowly BDual Speed Shift Switch Dual speed ...

Page 48: ...on 4 Earth moving 5 Entering and leaving a field 6 Loading onto and unloading from a truck To avoid personal injury A When you leave the tractor be sure to apply the parking brake and stop the engine A IN APPLYING THE BRAKES A The torque of the wheel axle is extremely high while creep speed is being used Be sure to step down on the clutch pedal completely before applying the brakes or the torque w...

Page 49: ...ve lever is in ON 4WD position The 4WD indicator goes off when the front wheel drive lever is in OFF 2WD position A Even when the front wheel drive lever is moved the 4WD indicator may fail to light up or go out immediately Just keep on running the tractor and the indicator will light up or go out accordingly If the indicator fails to come on or off with the tractor at a stop turn the steering whe...

Page 50: ...e parking brake indicator light on the Easy Checker TM will turn off when the parking brake is unlocked A Do not attempt to put the tractor in motion before the parking brake indicator light turns off If the tractor is operated with the parking brake set the warning buzzer sounds and the parking brake indicator light starts flashing A If the tractor is operated with the parking brake set the parki...

Page 51: ... indicator lights up the following phenomena may appear depending on the engine s trouble spot A The engine stops unexpectedly A The engine fails to start or gets interrupted just after start A The engine output is not enough A The engine output is enough but the warning indicator stays on If the engine output is not enough immediately interrupt the operation and move the tractor to a safe place a...

Page 52: ...the electrical charging system or consult your local KUBOTA Dealer A For checking and servicing of your tractor consult your local KUBOTA Dealer for instructions BFuel Gauge When the key switch is on the fuel gauge indicates the fuel level Be careful not to empty the fuel tank Otherwise air may enter the fuel system Should this happen the system should be bled See Bleeding Fuel System in SERVICE A...

Page 53: ...ed to the changing display 2 To switch between mph and km h for the traveling speed use the Traveling speed select switch 3 The PTO clutch control lever works for the following automatic display modes 1 PTO clutch control lever ON Traveling speed and PTO speed are displayed 2 PTO clutch control lever OFF Traveling speed and Hour meter are displayed 1 LCD monitor 2 Hour Meter indication 3 PTO Indic...

Page 54: ...played A When the PTO clutch control lever is in OFF position OFF is displayed A See PTO Speed Display Mode Switching in PTO RPM TRAVEL SPEED MONITOR in OPERATING THE TRACTOR section 2 Display mode switching km h and mph mph Traveling speed km h Traveling speed 3 PTO clutch control lever PTO OFF Hour meter mode A Traveling speed and total operating hours are displayed A The hour meter indicates in...

Page 55: ...e other speed it is necessary to switch the PTO speed display mode Otherwise the PTO speed will not get correctly displayed in the LCD monitor When the PTO speed is changed from 540 rpm to 1000 rpm or from 1000 rpm to 540 rpm it is necessary to switch the PTO speed display mode C Switching procedure ...

Page 56: ...meter tires are fitted on the machine the travel speed display mode must be changed Otherwise the travel speed will not get correctly displayed Such mode switching is also needed when the original tires are back on the machine C How to enter the tire circumference Example Entering 179 0 inch ...

Page 57: ...UES BDifferential Lock To avoid personal injury due to loss of steering control A Do not operate the tractor at high speed with any differential lock engaged A Do not attempt to turn with the rear wheel or 4 wheel differential lock engaged A Be sure to release the rear wheel or 4 wheel differential locks before making a turn in field conditions 2WD If one of the rear wheels should slip step on the...

Page 58: ...annot be released A 4 wheel differential lock pedal Step lightly on the brake pedals alternately A Front wheel differential lock pedal Turn the steering wheel alternately BOperating the Tractor on a Road To avoid personal injury A To help assure straight line stops when driving at transport speeds lock the brake pedals together Uneven braking at road speeds could cause the tractor to roll over A W...

Page 59: ...g the tractor Otherwise the tractor s powertrain may get damaged A Set the all shift levers to NEUTRAL position A If possible start engine and select 2WD if creep speed is fitted ensure that it is disengaged A Tow the tractor using its front hitch or drawbar A Never tow faster than 10 km h 6 2 mph BDirections for Use of Power Steering 1 Power steering is activated only while the engine is running ...

Page 60: ...OPERATING THE TRACTOR 38 BElectrical Outlet Two electrical outlets are supplied for use with work light 1 Accessory electrical outlet for work light 7 5A 1 Accessory electrical outlet for work light 11A ...

Page 61: ...to the recommended speed A To avoid damage of PTO clutch and implement shift the PTO clutch control lever slowly when engaging the PTO clutch Do not keep the PTO clutch control lever half way Proper warm up is strongly recommended in cold weather Do not continuously shift the PTO clutch control lever A Tractor engine will not start if PTO clutch control lever is in the engaged ON position A If the...

Page 62: ...nce from drawbar pin hole to the rear end of PTO shaft according to the following instructions A For maximum PTO shaft speeds of various implements see the implement Operator s Manual BLCD Monitor Message 1 The PTO rpm can be checked in the LCD monitor See PTO RPM TRAVEL SPEED MONITOR in OPERATING THE TRACTOR section 2 When the PTO system gets engaged ON the indicator lights up A When the PTO spee...

Page 63: ...cting a drive shaft to PTO shaft be sure engine is OFF Raise up the PTO shaft cover Afterward be sure to return the PTO shaft cover to the NORMAL POSITION A The universal joint of the PTO drive shaft is technically limited in its moving angle Refer to the PTO Drive Shaft Instructions for proper use 1 PTO shaft cover 2 PTO shaft cap A NORMAL POSITION B RAISED POSITION ...

Page 64: ...42 THREE POINT HITCH DRAWBAR THREE POINT HITCH DRAWBAR 1 Top link 2 Lifting rod Left 3 Telescopic stabilizers 4 Lower link 5 Lifting rod Right 6 Drawbar ...

Page 65: ...is is suited for operation with implements wider than the tractor BSelecting the Top Link Mounting Holes Select the proper set of holes by referring to the Hydraulic Control Unit Use Reference Chart in Hydraulic Unit section If the hydraulic unit is set for draft control draft response is more sensitive when an implement is connected to the lower set of top link mounting holes If draft control is ...

Page 66: ...he rod itself the lifting rod varies its length When extending the rod do not exceed the groove on the rod thread BLifting Rod Right To avoid personal injury A Do not extend lifting rod beyond the groove on the thread rod 1 To adjust the length of the lifting rod lift the adjusting handle and turn to desired length 2 After adjusting lower the lifting rod adjusting handle to the lock position 3 Whe...

Page 67: ...r a limited degree of sway will be permitted BTelescopic Lower Links To attach an implement follow the instructions below 1 Push the levers pull out the lower link ends and attach to the implement 2 Back up the tractor slightly to make sure the lower links are pushed in securely DRAWBAR To avoid personal injury A Never pull from the top link the rear axle or any point above the drawbar Doing so co...

Page 68: ...REE POINT HITCH DRAWBAR 46 BSwing Drawbar The drawbar can be used in three different ways as illustrated below Assemble it correctly with locating pins 1 Drawbar 2 Locating pin 3 Looseness preventing bolt ...

Page 69: ...perly Unless corrected the unit will be damaged Contact your KUBOTA Dealer for adjustment 3 POINT HITCH CONTROL SYSTEM To avoid personal injury A Before using the 3 point hitch controls ensure that no person or object is in the area of the implement or 3 point hitch Do not stand on or near the implement or between the implement and tractor when operating the 3 point hitch controls BDraft Stopper T...

Page 70: ...ng depth desired for the implement Lower the draft control lever to the point where the implement is at the desired depth This stops the implement from going too deep and causing loss of traction and ground speed BFloat Control Place both the draft control lever and the position control lever in the float position to make the lower links move freely along with the ground conditions B3 point Hitch ...

Page 71: ...ld the lever in the pull or push position once the remote cylinder has reached the end of the stroke as this will cause oil to flow through the relief valve Forcing oil through the relief valve for extended periods will overheat the oil A When using the tractor hydraulic system to power front loader do not operate boom and bucket cylinders simultaneously A Connect the pressure of load side of impl...

Page 72: ...ation of the remote control valves 2 or 3 and the 3 point hitch or the remote control valve 1 or operation of an attachment connected to the remote control valves 1 2 3 Under these conditions the engine speed must be increased to provide additional hydraulic flow A The remote control valves 2 and 3 above the flow control valve 4 can not be operated at the same time BAdjusting the flow rate To avoi...

Page 73: ...example of the remote control valve 2 can be maintained at a constant level 2 The remote control valve 2 and the 3 point hitch can be operated at the same time with the speed of the 3 point being influenced by the adjustment range of the flow control valve 3 Remote control valves 1 and 2 can be operated at the same time with operation of the 3 point hitch being interrupted by activation of valve 1...

Page 74: ...itable position and set the implement pull with the position control lever YES NO Loose Inserttheset pin through the slot on the outer tube that align with one of the holes on the inner bar For implements with gauge wheels lower the position control lever all way Disc plow 2 or 3 Harrower spike springtooth disc type 2 Sub soiler Weeder ridger 1 Position control Hold the draft control lever at the ...

Page 75: ...cidentally lowered If necessary to work under tractor or any machine elements for servicing or adjustment securely support them with stands or suitable blocking beforehand A Never operate tractor with a loose rim wheel or axle BFront Wheels with two wheel drive Front tread width can be adjusted as shown with the standard equipped tires To change the tread width 1 Remove the front axle mounting bol...

Page 76: ...djusting Toe in in EVERY 200 HOURS in PERIODIC SERVICE section A Always attach wheels as shown in the drawing A If not attached as illustrated transmission parts may be damaged A When re fitting or adjusting a wheel tighten the bolts to the following torques then recheck after driving the tractor 200m 200 yards and thereafter according to service interval See MAINTENANCE section A Wheels with beve...

Page 77: ...tand the machine weight and set them up as shown below BAdjusting Front Wheel Turning Stopper Bolt A Always check if tires contact with tractor or loader frame assemblies A Adjust turning angle with provided stoppers if necessary Need to limit turning angle at 1580 mm 62 2 in width setting to 42 degrees Refer to the chart provided for additional instructions 1 Jack point 1 Stopper bolts A FRONT A ...

Page 78: ...he bolts A Always attach wheels as shown in the drawing A If not attached as illustrated transmission parts may be damaged A When re fitting or adjusting a wheel tighten the bolts to the following torques then recheck after driving the tractor 200m 200 yards and thereafter according to service interval See MAINTENANCE section 1 343 to 401 N m 35 0 to 41 0 kgf m 254 to 297 ft lbs 2 Steel disc 244 N...

Page 79: ...t fill the front wheels with liquid to maintain steering control BFront Ballast Add weights if needed for stability 2WD 4WD models and improve traction 4WD model Heavy pulling and heavy rear mounted implements tend to lift front wheels Add enough ballast to maintain steering control and prevent tip over Remove weight when no longer needed C Front End Weights option The front end weights can be att...

Page 80: ...ended to prevent the water from freezing Use of this method of weighting the wheels has the full approval of the tire companies See your tire dealer for this service Liquid weight per tire 75 Percent filled A Do not fill tires with water or solution more than 75 of full capacity to the valve stem level 1 Rear wheel weights Maximum weight per wheel 34 in Cast iron disk 72 5 kg x 2 pieces 320 lbs St...

Page 81: ...3000 Hr 86 4 COMMON ITEMS 1 Engine start system Check every 50 Hr 71 2 Wheel bolt torque Check every 50 Hr 72 3 Battery condition Check every 100 Hr 73 5 4 Greasing every 100 Hr 72 5 Fan belt Adjust every 100 Hr 76 6 Brake Pedal Adjust every 100 Hr 76 7 Parking Brake Lever Adjust every 100 Hr 28 8 Air cleaner element Primary element Clean every 100 Hr 75 1 Replace every 1 year 86 2 Second ary elem...

Page 82: ...oil filter Replace every 600 Hr 84 22 Transmission fluid Change every 600 Hr 84 23 Front differential case oil Change every 600 Hr 85 24 Front axle gear case oil Change every 600 Hr 85 25 King pin pivot Adjust every 600 Hr 86 26 Brake oil Change every 600 Hr 86 4 27 Front axle pivot Adjust every 600 Hr 85 28 Engine valve clearance Adjust every 800 Hr 86 4 29 Turbo charger Check every 3000 Hr 86 4 ...

Page 83: ...A nonroad emission regulation As the engine owner you are responsible for the performance of the required maintenance on the engine according to the above instruction Please see the Warranty Statement in detail 34 Brake hose Replace every 2 years 89 4 35 Master cylinder kit Replace every 2 years 89 4 36 Equalizer kit Replace every 2 years 89 4 37 Brake seal 1 and 2 Replace every 2 years 89 4 38 Fu...

Page 84: ...to 77 SAE20 SAE10W 30 or 10W 40 Below 0 32 SAE10W SAE10W 30 or 10W 40 4 Transmission case 60 L 63 4 U S qts KUBOTA SUPER UDT 2 fluid 5 Brake oil reservoir and lines 0 3 L 0 3 U S qts KUBOTA SUPER UDT 2 fluid or Turbine oil 32 See below regular type multipurpose straight mineral oil Mobile DTE Oil 32 TEXACO Regal Oil 32 CHEVRON GST Oil 32 TERESSO OIL 32 Never use automotive brake oil 6 Front differ...

Page 85: ...r engines in industrial and heavy mobile service SAE J313 JUN87 C Transmission Oil KUBOTA Super UDT 2 For an enhanced ownership experience we highly recommend Super UDT 2 to be used instead of standard hydraulic transmission fluid Super UDT 2 is a proprietary KUBOTA formulation that deliveries superior performance and protection in all operating conditions Regular UDT is also permitted for use in ...

Page 86: ...able blocking beforehand HOW TO OPEN THE HOOD To avoid personal injury from contact with moving parts A Never open the hood while the engine is running A Do not touch muffler or exhaust pipes while they are hot Severe burns could result A Hold the hood with other hand while unlocking release lever BHood To open the hood hold the hood and pull the release lever and open the hood A To close the hood...

Page 87: ... build up oil or coolant leaks broken or worn parts BChecking and Refueling To avoid personal injury A Do not smoke while refueling A Be sure to stop the engine before refueling 1 Check the amount of fuel by fuel gauge 2 When the fuel warning indicator lights up it is time to add fuel A Do not permit dirt or trash to get into the fuel system A Be careful not to let the fuel tank become empty other...

Page 88: ...ain plug 3 Bleed the fuel system See SERVICE AS REQUIRED in PERIODIC SERVICE section A If water is drawn through to the fuel pump extensive damage will occur BChecking Engine Oil Level To avoid personal injury A Be sure to stop the engine before checking the oil level 1 Park the machine on a flat surface 2 Check engine oil before starting the engine or 5 minutes or more after the engine has stoppe...

Page 89: ...not remove radiator cap while coolant is hot When cool slowly rotate cap to the first stop and allow sufficient time for excess pressure to escape before removing the cap completely 1 Check to see that the coolant level is between the FULL and LOW marks of recovery tank 2 When the coolant level drops due to evaporation add soft water only up to the full level In case of leakage add anti freeze and...

Page 90: ...will cause brake failure A When replenishing brake oil use the same quality of oil as the one already in the tank Adding an oil of different make or type can cause damage and must be avoided 1 Check to see that the brake oil level is between the MAX and MIN marks 2 If it is below the MIN line consult your local KUBOTA Dealer BCleaning Evacuator Valve Open the evacuator valve to get rid of large pa...

Page 91: ... Lift the panel LH until pin A clears the hole 2 Pull the panel LH 3 Attaching the panel is performed vice versa C Cleaning 1 Check front grill to be sure it is clean from debris 2 Detach the radiator screen and remove all foreign materials 3 Check oil cooler and intercooler to be sure they are clean from debris A Grill and screen must be clean from debris to prevent engine from overheating and to...

Page 92: ...N position the parking brake indicator on the instrument panel lights up To release the brakes push in the button at the tip of the parking brake lever and tilt down the lever A Make sure the lamp on the instrument panel goes off when parking brake lever is down BChecking Gauges Meter and Easy Checker TM 1 Inspect the instrument panel for broken gauge s meter s and Easy Checker TM 2 Replace if bro...

Page 93: ...ranks consult your local KUBOTA Dealer for this service C Test Checking Operator Presence Control O P C System 1 Follow the instruction of PARKING THE TRACTOR See PARKING THE TRACTOR in SAFE OPERATION section 2 Sit on the operator s seat 3 Make sure the PTO drive shaft is disconnected from any attached implement 4 Start the engine 5 Engage the PTO clutch control switch or lever The PTO should begi...

Page 94: ...tings Apply a small amount of multipurpose grease to the following points every 100 hours If you operated the machine in extremely wet and muddy conditions lubricate grease fittings more often N m kgf m ft lbs 1 2 3 4 2WD 168 to 196 17 1 to 20 0 124 to 145 Steel disc 244 24 9 180 Cast iron disc 260 to 304 26 5 to 31 0 192 to 224 343 to 401 35 0 to 41 0 254 to 297 4WD 260 to 304 26 5 to 31 0 192 to...

Page 95: ...al injury A Never remove the battery cap while the engine is running A Keep electrolyte away from eyes hands and clothes If you are spattered with it wash it away completely with water immediately and get medical attention A Keep open sparks and flames away from the battery at all times Hydrogen gas mixed with oxygen becomes very explosive A Wear eye protection and rubber gloves when working aroun...

Page 96: ...standard fashion 2 A boost charge is only for emergencies It will partially charge the battery at a high rate and in a short time When using a boost charged battery it is necessary to recharge the battery as early as possible Failure to do this will shorten the battery s service life 3 The battery is charged if the indicator display turns green from black 4 When exchanging an old battery for a new...

Page 97: ...nt Once yearly or after every sixth cleaning whichever comes first A Check to see if the evacuator valve is blocked with dust A The air cleaner uses a dry element never apply oil A Do not run the engine with filter element removed A Be sure to refit the cover with the arrow on the rear of cover upright If the cover is improperly fitted evacuator valve will not function and dust will adhere to the ...

Page 98: ...chock the wheels before checking brake pedal A To prevent uneven braking the specification must be within the recommended limit If found out of the specifications contact your local KUBOTA Dealer for adjusting the brakes C Checking the brake pedal free travel 1 Release the parking brake 2 Slightly depress the brake pedals and measure free travel at the top of pedal stroke A Brake pedals should be ...

Page 99: ... step on the right hand pedal the left hand pedal slightly raises itself and measure the level difference between the pedals 3 Do the same for the left hand pedal BChecking Fuel Line 1 Check to see that all lines and hose clamps are tight and not damaged 2 If hoses and clamps are found worn or damaged replace or repair them at once Pedal stroke Less than 100 mm 3 9 in at each pedal 1 Brake pedal L...

Page 100: ...jury A Be sure to stop the engine before changing the oil filter cartridge A Allow engine to cool down sufficiently oil can be hot and can burn 1 Remove the two oil filters 2 Clean off metal filings with clean rags at the magnetic filters 3 Put a film of clean transmission oil on rubber seal of new filters 4 Tighten the filter quickly until it contacts the mounting surface Tighten filter by hand a...

Page 101: ... event the coolant temperature is nearly or more than the boiling point what is called Overheating 1 Park the tractor in a safe place and keep the engine unloaded idling 2 Don t stop the engine suddenly but stop it after about 5 minutes of unloaded idling 3 Keep yourself well away from the machine for further 10 minutes or while the steam blows out 4 Check that there are no dangers such as burns G...

Page 102: ...or repair them at once BAdjusting Toe in 1 Park tractor on a flat place 2 Turn steering wheel so front wheels are in the straight ahead position 3 Lower the implement lock the park brake and stop the engine 4 Measure distance between tire beads at front of tire at hub height 5 Measure distance between tire beads at rear of tire at hub height 6 Front distance should be shorter than rear distance If...

Page 103: ...diments impurities and water out of the tank Finally tighten up the plug A If the fuel contains poor qualities with much water in it drain the fuel tank at shorter intervals A Drain the fuel tank before operating the tractor after a long period of storage A Wheel to wheel distance at rear B Wheel to wheel distance at front C FRONT 1 Snap ring 2 Tie rod nut 167 to 196 N m 17 to 20 kgf m 123 2 to 14...

Page 104: ...aining reinstall the drain plug 3 Fill with the new oil up to the upper notch on the dipstick See LUBRICANTS in MAINTENANCE section EVERY 400 HOURS BReplacing Fuel Filter 1 Remove the fuel filter 2 Put a film of clean fuel on rubber seal of new filter 3 Tighten the filter quickly until it contacts the mounting surface Tighten filter by hand an additional 1 2 turn only 4 Bleed the fuel system See B...

Page 105: ...RVICE AS REQUIRED in PERIODIC SERVICE section M108S This job should not be done in the field but in a clean place 1 Close the fuel cock 2 Unscrew the cup and remove it then rinse the inside with kerosene 3 Take out the element and dip it in the kerosene to rinse 4 After cleaning reassemble the water separator keeping out dust and dirt 5 Bleed the fuel system See SERVICE AS REQUIRED in PERIODIC SER...

Page 106: ...al and be sure to check the oil level on the dipstick Then replenish the engine oil up to the prescribed level A To prevent serious damage to the engine use only a KUBOTA genuine filter BChanging Transmission Fluid To avoid personal injury A Allow engine to cool down sufficiently oil can be hot and can burn 1 To drain the used oil remove the drain plug at the bottom of the transmission case and dr...

Page 107: ...ase Oil 1 To drain the used oil remove the right and left drain plugs and filling plugs at the front axle gear case and drain the oil completely into the oil pan 2 After draining reinstall the drain plugs 3 Fill with the new oil up to the filling plug port See LUBRICANTS in MAINTENANCE section 4 After filling reinstall the filling plugs BAdjusting Front Axle Pivot If the front axle pivot pin adjus...

Page 108: ...ection Nozzle Active Test M108S Consult your local KUBOTA Dealer for this service EVERY 3000 HOURS BChecking Turbocharger Consult your local KUBOTA Dealer for this service BChecking Injection Pump M96S Consult your local KUBOTA Dealer for this service BChecking Supply Pump M108S Consult your local KUBOTA Dealer for this service BChecking Fuel Injection Timer M96S Consult your local KUBOTA Dealer f...

Page 109: ...r instruction 6 After flushing fill with clean soft water and anti freeze until the coolant level is just below the radiator cap Install the radiator cap securely 7 Fill with coolant up to the FULL mark of recovery tank 8 Start and operate the engine for few minutes 9 Stop the engine remove the key and let cool 10 Check coolant level of recovery tank and add coolant if necessary 11 Properly dispos...

Page 110: ...e When mixing stir it up well and then fill into the radiator 4 The procedure for the mixing of water and antifreeze differs according to the make of the antifreeze and the ambient temperature Refer to SAE J1034 standard more specifically also to SAE J814c A When the antifreeze is mixed with water the antifreeze mixing ratio must be less than 50 D At 1 013 x 10 Pa 760 mmHg pressure atmospheric A h...

Page 111: ...Dealer for this service BReplacing Equalizer Kit Consult your local KUBOTA Dealer for this service BReplacing Brake Seal 1 and 2 Consult your local KUBOTA Dealer for this service SERVICE AS REQUIRED BBleeding Fuel System M96S Air must be removed 1 When the fuel filter or lines are removed 2 When water is drained from water separator 3 When tank is completely empty 4 After the tractor has not been ...

Page 112: ... procedure is as follows 1 Fill the fuel tank with fuel and open the fuel cock 2 Disconnect the intake heater connector A Do not try air bleeding with the heater in operation Otherwise the battery may get damaged 3 Turn ON and OFF the key switch repeatedly 10 times or so at the following intervals This lets the air out of the fuel line 1 Key switch ON time 30 seconds 2 Key switch OFF time 15 secon...

Page 113: ... tractor electrical system is protected from potential damage by fuses A blown fuse indicates that there is an overload or short somewhere in the electrical system If any of the fuses should blow replace with a new one of the same capacity A Before replacing a blown fuse determine why the fuse blew and make any necessary repairs Failure to follow this procedure may result in serious damage to the ...

Page 114: ...ture and take out the bulb 4 Replace with a new bulb and reinstall the head lamp assembly in the reverse order A Be sure to use a new bulb of the specified wattage A Never touch the bulb surface glass with bare hands Fingerprints for example may break the bulb FUSE No CAPACITY A Protected circuit 1 15A Flasher Hazard 2 15A Head Light 3 10A Tail Lamp Horn 4 5A Engine PTO Alternator 5 10A T M Contro...

Page 115: ...0 HOURS in PERIODIC SERVICE section 9 Keep the tractor in a dry place where the tractor is sheltered from the elements Cover the tractor 10 Store the tractor indoors in a dry area that is protected from sunlight and excessive heat If the tractor must be stored outdoors cover it with a waterproof tarpaulin Jack the tractor up and place blocks under the front and rear axles so that all four tires ar...

Page 116: ... air heater system trouble A Check to see if the slow blow fuse of the intake air heater blows A Check to see if the intake air heater functions in cold weather Insufficient engine power A Insufficient or dirty fuel A The air cleaner is clogged A Check the fuel system A Clean or replace the element Engine stops suddenly A Insufficient fuel A Refuel A Bleed the fuel system if necessary Exhaust fume...

Page 117: ...he engine fails to restart or the indicator stays on immediately contact your local KUBOTA dealer If the warning indicator lights up the following phenomena may appear depending on the engine s trouble spot A The engine stops unexpected A The engine fails to start or gets interrupted just after start A The engine output is not enough A The engine output is enough but the warning indicator stays on...

Page 118: ...low Control Valve Kit A Double Acting Remote Hydraulic Control Valve with Detents and Self Cancelling for Flow Control Valve A Double Acting Remote Hydraulic Control Valve with Float Position A Clevis for Drawbar A Front end weights For front ballast A Rear Wheel Weights For rear ballast A Creep Speed Kit A 80A Alternator Kit A 80 Wide Axle A Dual Lift Assist Cylinder Kit A 540 1000 rpm PTO Speed ...

Page 119: ...t 89 Evacuator Valve 68 Fan Belt Tension 76 Float Control 48 Flow Control Valve option 50 Flow rate 50 Flushing Cooling System and Changing Coolant 87 Fold the ROPS 17 Foot Throttle 28 Front Axle Gear Case Oil 85 Front Axle Pivot 85 Front Ballast 57 Front Differential Case Oil 85 Front Wheel Drive Lever 27 Front Wheel Turning Stopper Bolt 55 Front Wheels with four wheel drive 54 Front Wheels with ...

Page 120: ...eed Display Mode Switching 33 Radiator Hose Water pipes 89 Radiator Hose and Clamp 79 Raise the ROPS to Upright Position 18 Range Gear Shift Lever 25 Rear Ballast 58 Rear Wheels 56 Remote Control Valve 49 Remote Control Valve Coupler Connecting and Disconnecting 50 Remote Control Valve Lever 49 Seat Belt 20 Seat Belt and ROPS 70 Stopping 29 Supply Pump 86 Swing Drawbar 46 Tachometer 30 Telescopic ...

Page 121: ...M96SDTM MUDDER TRACTOR M96SDTM ...

Page 122: ...mudder model of the M series tractor This operator s manual covers the operation inspection and preventive maintenance instructions that are specific to the M series mudder model For other information and instructions refer to the first part of this manual Please read this manual carefully to operate the machine properly and safely Proper daily inspection servicing and lubrication keeps your machi...

Page 123: ...ive 4 Adjusting Front Wheel Turning Stopper Bolt 6 Rear Wheels 6 Handrails and Auxiliary Steps 8 BALLAST 8 Front Ballast 9 Rear Ballast 9 MAINTENANCE 10 SERVICE INTERVALS 10 LUBRICANTS 13 PERIODIC SERVICE 15 EVERY 50 HOURS 15 Checking Wheel Bolt Torque 15 EVERY 600 HOURS 15 Changing Transmission Fluid 15 Changing Front Differential Case Oil 16 OPTIONS 17 APPENDICES 18 INDEX 18 M96SDTM ...

Page 124: ......

Page 125: ...y L U S gals 175 46 2 Engine oil capacity L U S qts 10 7 11 3 Coolant capacity L U S qts 9 6 10 1 Dimensions Overall length mm in 4275 168 3 Overall width minimum tread mm in 2030 79 9 2270 89 4 Overall height with ROPS mm in 2835 111 6 Wheel base mm in 2420 95 3 Tread Front mm in 1565 61 6 1665 65 6 1830 72 1925 75 8 2025 79 7 Rear mm in 1545 60 8 1645 64 8 1865 73 4 1960 77 2 2060 81 1 Minimum g...

Page 126: ... 7490 with 2 assist cylinders option Remote hydraulic control 1 standard 2nd 3rd flow control valve optional System pressure MPa kgf cm 19 6 200 Traction system Swinging drawbar adjustable in direction PTO Live PTO Independent Direction of turning Clockwise viewed from tractor rear PTO Engine speed rpm 6 spline 540 2205 The company reserves the right to change the specifications without notice NOT...

Page 127: ...37 5 20 4 10 26 6 38 1 13 13 8 16 2 16 37 10 39 3 20 60 12 80 4 27 20 16 90 The company reserves the right to change the specifications without notice Model M96SDTM Tire size Rear 13 6 38 Shuttle shift lever Range gear shift lever Main gear shift lever km h mph CREEP 1 0 19 0 12 2 0 24 0 15 3 0 30 0 19 4 0 37 0 23 1 0 47 0 29 2 0 60 0 37 3 0 74 0 46 4 0 91 0 56 L 1 1 07 0 67 2 1 36 0 85 3 1 68 1 0...

Page 128: ...owered If necessary to work under tractor or any machine elements for servicing or adjustment securely support them with stands or suitable blocking beforehand A Never operate tractor with a loose rim wheel or axle BFront Wheels with four wheel drive Front tread width can be adjusted as shown with the standard equipped tires To change the tread width 1 Remove the wheel rim and disk mounting bolts ...

Page 129: ...ed holes Use the tapered side of lug nut Standard tire Option tire 13 6 38 Front and rear Steel disk 9 5R48 12 4R46 13 6 38 Front Steel disk Rear Cast iron disk 1 260 to 304 26 5 to 31 192 to 224 2 280 to 340 28 6 to 34 7 207 to 251 200 to 278 20 2 to 28 4 146 to 205 M96SDTM ...

Page 130: ...he specified torque A The turning angle varies depending on the presence or absence of the front weight bumper as well as the tire size and tread setting Adjust the stopper bolt with these factors in mind A Make sure that the stopper bolts are always tightened to the correct torque BRear Wheels Rear tread width can be adjusted as shown with the standard or optional equipped tires To change the tre...

Page 131: ...t lbs Standard tire Option tire 13 6 38 Front and rear Steel disk 9 5R48 12 4R46 13 6 38 Front Steel disk Rear Cast iron disk 1 260 to 304 26 5 to 31 192 to 224 2 280 to 340 28 6 to 34 7 207 to 251 305 to 373 31 1 to 38 0 225 to 275 M96SDTM ...

Page 132: ... there could result in being crushed under the rear tire due to slippage or the step fracturing or displacing due to unintended loading C Auxiliary steps Reposition the auxiliary steps as required according to the tread width setting BALLAST To avoid personal injury A Additional ballast will be needed for transporting heavy implements When the implement is raised drive slowly over rough ground reg...

Page 133: ...llast in Rear Tires Water and calcium chloride solution provides safe economical ballast Used properly it will not damage tires tubes or rims The addition of calcium chloride is recommended to prevent the water from freezing Use of this method of weighting the wheels has the full approval of the tire companies See your tire dealer for this service Liquid weight per tire 75 Percent filled A Do not ...

Page 134: ...0 Hr D 7 Parking Brake Lever Adjust every 100 Hr D 8 Air cleaner element Primary element Clean every 100 Hr D 1 Replace every 1 year D 2 Second ary element Replace every 1 year D 9 Fuel line Check every 100 Hr D Replace every 2 years D 4 10 Hydraulic oil filter Replace every 200 Hr D 11 Toe in Adjust every 200 Hr D 12 Fuel tank water Drain every 200 Hr D 13 Oil cooler line Check every 200 Hr D Rep...

Page 135: ...7 Engine valve clearance Adjust every 800 Hr D 4 28 Fuel injection nozzle injection pressure Check every 1500 Hr D 4 29 Injection pump Check every 3000 Hr D 4 30 Fuel injection timer Check every 3000 Hr D 4 31 Turbo charger Check every 3000 Hr D 4 32 Intake air heater Check every 3000 Hr D 4 33 Cooling system Flush every 2 years D 34 Coolant Change every 2 years D 35 Parking brake cable Replace ev...

Page 136: ...e registered as emission related critical parts by KUBOTA in the U S EPA nonroad emission regulation As the engine owner you are responsible for the performance of the required maintenance on the engine according to the above instruction Please see the Warranty Statement in detail 40 Fuel system Bleed Service as required D 41 Brake system Bleed Service as required D 4 42 Clutch housing water Drain...

Page 137: ... 32 to 77 SAE20 SAE10W 30 or 15W 40 Below 0 32 SAE10W SAE10W 30 or 15W 40 4 Transmission case 63 L 66 6 U S qts 64 L 67 7 U S qts KUBOTA SUPER UDT 2 fluid 5 Brake oil reservoir and lines 0 3 L 0 3 U S qts KUBOTA SUPER UDT 2 fluid or Turbine oil 32 See below regular type multipurpose straight mineral oil Mobile DTE Oil 32 TEXACO Regal Oil 32 CHEVRON GST Oil 32 TERESSO OIL 32 Never use automotive br...

Page 138: ...r engines in industrial and heavy mobile service SAE J313 JUN87 C Transmission Oil KUBOTA Super UDT 2 For an enhanced ownership experience we highly recommend Super UDT 2 to be used instead of standard hydraulic transmission fluid Super UDT 2 is a proprietary KUBOTA formulation that deliveries superior performance and protection in all operating conditions Regular UDT is also permitted for use in ...

Page 139: ...oil can be hot and can burn 1 To drain the used oil remove the drain plug at the bottom of the transmission case and final gear case and drain the oil completely into the oil pan 2 After draining reinstall the drain plug 3 Fill with the new KUBOTA SUPER UDT fluid up to the upper notch on the dipstick See LUBRICANTS in MAINTENANCE section 4 After running the engine for a few minutes stop it and che...

Page 140: ...g plug at the front differential case and drain the oil completely into the oil pan 2 After draining reinstall the drain plug 3 Remove the oil level check plug 4 Fill with the new oil up to the lower rim of check plug port See LUBRICANTS in MAINTENANCE section 5 After filling reinstall the filling plug and check plug 1 Drain plug 2 Drain plugs both sides Oil capacity Standard 7 0 L 7 4 U S qts Wit...

Page 141: ...Control Valve Kit A Double Acting Remote Hydraulic Control Valve with Detents and Self Cancelling for Flow Control Valve A Double Acting Remote Hydraulic Control Valve with Float Position A Clevis for Drawbar A Front end weights For front ballast A Rear Wheel Weights For rear ballast A 80A Alternator Kit A Front and Rear 80 Wide Axle Kit A Dual Lift Assist Cylinder Kit A 540 1000 rpm PTO Speed Kit...

Page 142: ... Front Ballast 9 Front Differential Case Oil 16 Front Wheel Turning Stopper Bolt 6 Front Wheels with four wheel drive 4 Handrails and Auxiliary Steps 8 Inflation Pressure 4 Rear Ballast 9 Rear Wheels 6 Transmission Fluid 15 Wheel Bolt Torque 15 ...

Reviews: