1-S58
MX5100, WSM
ENGINE
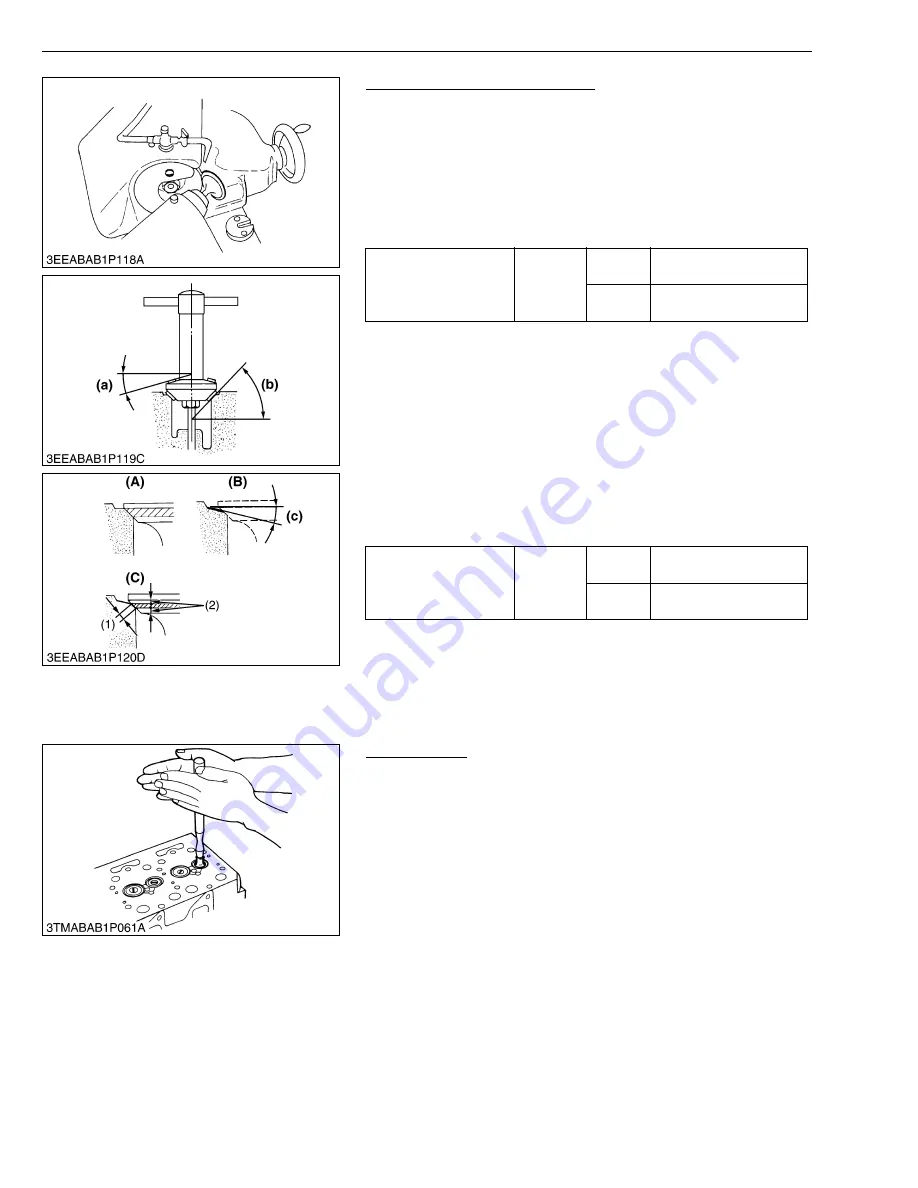
Correcting Valve and Valve Seat
NOTE
■
• Before correcting the valve and seat, check the valve stem
and the I.D. of valve guide section, and repair them if
necessary.
• After correcting the valve seat, be sure to check the valve
recessing.
1) Correcting Valve
1. Correct the valve with a valve refacer.
2) Correcting Valve Seat
1. Slightly correct the seat surface with a 1.0 rad (60 °) (intake
valve) or 0.79 rad (45 °) (exhaust valve) valve seat cutter.
2. Resurface the seat surface with a 0.52 rad (30 °) valve seat cutter
to intake valve seat and with a 0.26 rad (15 °) valve seat cutter to
exhaust valve seat so that the width is close to specified valve
seat width (2.12 mm, 0.0835 in.).
3. After resurfacing the seat, inspect for even valve seating, apply a
thin film of compound between the valve face and valve seat, and
fit them with valve lapping tool.
4. Check the valve seating with prussian blue. The valve seating
surface should show good contact all the way around.
W10283500
Valve Lapping
1. Apply compound evenly to the valve lapping surface.
2. Insert the valve into the valve guide. Lap the valve onto its seat
with a valve flapper or screwdriver.
3. After lapping the valve, wash the compound away and apply oil,
then repeat valve lapping with oil.
4. Apply prussian blue to the contact surface to check the seated
rate. If it is less than 70 %, repeat valve lapping again.
IMPORTANT
■
• When valve lapping is performed, be sure to check the valve
recessing and adjust the valve clearance after assembling
the valve.
W10288140
Valve face angle
Factory
spec.
IN.
1.0 rad
60 °
EX.
0.79 rad
45 °
Valve seat angle
Factory
spec.
IN.
1.0 rad
60 °
EX.
0.79 rad
45 °
(1) Valve Seat Width
(2) Identical Dimensions
(A) Check Contact
(B) Correct Seat Width
(C) Check Contact
(a) 0.26 rad (15 °) or 0.52 rad (30 °)
(b) 0.79 rad (45 °) or 1.0 rad (60 °)
(c) 0.52 rad (30 °) or 0.26 rad (15 °)
Summary of Contents for MX5100
Page 2: ......
Page 8: ...6 MX5100 WSM SAFETY INSTRUCTIONS...
Page 9: ...7 MX5100 WSM SAFETY INSTRUCTIONS...
Page 12: ...10 MX5100 WSM DIMENSIONS DIMENSIONS...
Page 13: ...11 MX5100 WSM DIMENSIONS...
Page 14: ...12 MX5100 WSM DIMENSIONS...
Page 15: ...G GENERAL...
Page 16: ......
Page 18: ......
Page 87: ...1 ENGINE...
Page 88: ......
Page 90: ......
Page 92: ......
Page 166: ...1 S74 MX5100 WSM ENGINE...
Page 167: ...2 CLUTCH...
Page 168: ......
Page 170: ......
Page 174: ...2 M4 MX5100 WSM CLUTCH...
Page 176: ......
Page 205: ...3 TRANSMISSION...
Page 206: ......
Page 208: ......
Page 209: ...3 M1 MX5100 WSM TRANSMISSION 1 STRUCTURE 1 2WD...
Page 210: ...3 M2 MX5100 WSM TRANSMISSION 2 4WD...
Page 218: ......
Page 265: ...4 REAR AXLE...
Page 266: ......
Page 267: ...CONTENTS MECHANISM 1 STRUCTURE 4 M1...
Page 268: ......
Page 270: ...4 M2 MX5100 WSM REAR AXLE...
Page 272: ......
Page 278: ...4 S6 MX5100 WSM REAR AXLE...
Page 279: ...5 BRAKES...
Page 280: ......
Page 281: ...CONTENTS MECHANISM 1 STRUCTURE 5 M1...
Page 282: ......
Page 286: ......
Page 296: ...5 S10 MX5100 WSM BRAKES...
Page 297: ...6 FRONT AXLE...
Page 298: ......
Page 300: ......
Page 306: ......
Page 327: ...7 STEERING...
Page 328: ......
Page 330: ......
Page 334: ...7 M4 MX5100 WSM STEERING...
Page 336: ......
Page 355: ...8 HYDRAULIC SYSTEM...
Page 356: ......
Page 358: ......
Page 374: ......
Page 402: ...8 S28 MX5100 WSM HYDRAULIC SYSTEM...
Page 403: ...9 ELECTRICAL SYSTEM...
Page 404: ......
Page 406: ......
Page 407: ...9 M1 MX5100 WSM ELECTRICAL SYSTEM 1 WIRING DIAGRAM...
Page 420: ......
Page 454: ...9 S34 MX5100 WSM ELECTRICAL SYSTEM...


