background image

15

OPERATING THE VEHICLE

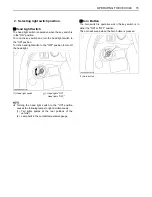
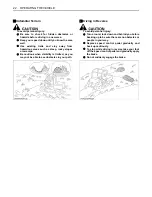
B

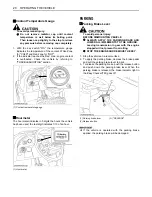
Head Light Switch

The head light switch is operative when the key switch is
in the "ON" position.
Turn on the key switch and turn the head light switch to
the "ON" position.
Turn the head light switch to the "OFF" position to turn off
the head light.

A

Turning the head light switch to the "ON" position
causes the following lamps to light simultaneously.
(1) Tail lights (lamps at the rear portions of the

vehicle)

(2) Lamp built in the coolant temperature gauge

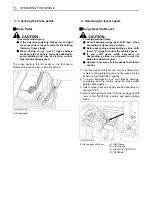
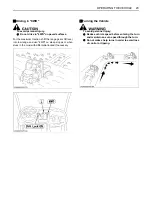
B

Horn Button

The horn switch is operative when the key switch is in
either the "ON" or "OFF" position.
The horn will sound when the horn button is pressed.

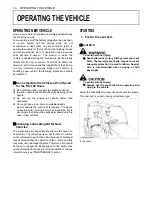
2.  Selecting light switch position.

(1) Head light switch

 Head lights "ON"

 Head lights "OFF"

(1) Horn button

Summary of Contents for RTV500

Page 1: ...1AYAAAYAP0030 READ AND SAVE THIS MANUAL OPERATOR S MANUAL UTILITY VEHICLE R T V 5 0 0 English U S A Code No K7311 7122 3 PRINTED IN U S A KUBOTA Corporation 2008...

Page 2: ...lifornia Proposition 65 WARNING IMPORTANT The engine in this machine is equipped by the manufacture with a standard spark arrester It is a violation of California Public Resource Code Section 4442 to...

Page 3: ...hown below with an indication of their meaning Safety Alert Symbol Engine Coolant Temperature Brake Parking Brake Battery Charging Condition Engine Oil Pressure Turn Signal Engine Stop Engine Run Engi...

Page 4: ...this manual carefully It will help you become familiar with the operation of the vehicle and contains many helpful hints about vehicle maintenance This manual contains instructions for minor maintenan...

Page 5: ...STARTING 13 OPERATING THE VEHICLE 14 OPERATING NEW VEHICLE 14 Do not Operate the Vehicle at Full Speed for the First 50 Hours 14 Changing Lubricating Oil for New Vehicles 14 STARTING 14 Seat Belt 14...

Page 6: ...tment 30 TOWING AND TRANSPORTING 31 TOWING AND TRANSPORTING 31 Rear Trailer Hitch 31 Front Trailer Hitch 31 Winch Mount Bracket 32 Transporting Vehicle 32 MAINTENANCE 33 SERVICE INTERVALS 33 LUBRICANT...

Page 7: ...er 57 Replacing Engine Oil Filter 57 Changing Engine Oil 58 Cleaning Radiator Cooling Fins 59 Replacing Transmission Oil Filter 60 Checking Spark Plug Condition Gap 61 Checking Brake Pedal 62 Checking...

Page 8: ...e Hose 69 SERVICE AS REQUIRED 69 Checking Brake Pad 69 Adjusting Parking Brake 69 Adjusting Alternator Drive Belt Tension 69 Replacing Fuse 70 Replacing Slow Blow Fuses 71 Replacing Light Bulb 71 STOR...

Page 9: ...ched to it Check for overhead clearance which may interfere with the CAB or ROPS Do not allow any bystanders around or near the vehicle during operation 7 Never allow anyone without a valid driver s l...

Page 10: ...t of the work area and under the watchful eye of another responsible adult 3 Be alert and shut your vehicle down if children enter the work area 4 Never carry children in the cargo bed There is no saf...

Page 11: ...at high speeds The vehicle may run out of control 6 Avoid sudden motions of the steering wheel as they can lead to a dangerous loss of stability The risk is especially great when the vehicle is travel...

Page 12: ...me for excess pressure to escape before removing the cap completely If the vehicle has a coolant recovery tank add coolant or water to the tank not the radiator See Checking Coolant Level in DAILY CHE...

Page 13: ...5 SAFE OPERATION 1 Cardboard 2 Hydraulic line 3 Magnifying glass...

Page 14: ...SAFE OPERATION 6 7 DANGER WARNING AND CAUTION LABELS...

Page 15: ...7 SAFE OPERATION...

Page 16: ...SAFE OPERATION 8...

Page 17: ...warning and caution labels with new labels from your local KUBOTA Dealer 4 If a component with danger warning and caution label s affixed is replaced with new part make sure new label s is are attach...

Page 18: ......
Page 19: ...vice contact the KUBOTA Dealership from which you purchased your vehicle or your local KUBOTA Dealer When in need of parts be prepared to give your dealer vehicle engine transmission and ROPS serial n...

Page 20: ...ard neutral reverse Brakes Front Rear Dry disk brake Parking brake Rear wheel hand lever Steering Rack Pinion Suspension Front Independent MacPherson strut type Rear Semi independent Multi link Dimens...

Page 21: ...m in 1032 40 6 Length mm in 856 33 7 Depth mm in 290 11 4 Volume m cu ft 0 25 9 Bed height unloaded mm in 810 31 9 Max cargo bed load kg lbs 200 441 Sound level operator ear dB A 83 Tires Front 24x9 1...

Page 22: ...y to the operator or others Any malfunctions or failures of the vehicle resulting from use with improper implements are not covered by the warranty A Above mentioned specifications are based on level...

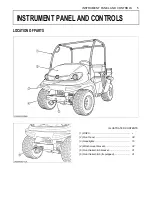
Page 23: ...L AND CONTROLS INSTRUMENT PANEL AND CONTROLS LOCATION OF PARTS ILLUSTRATED CONTENTS 1 ROPS 2 Front hood 38 3 Headlights 15 4 Winch mount bracket 32 5 Front trailer hitch bracket 31 6 Front trailer hit...

Page 24: ...t temperature gauge 20 4 Horn button 15 5 Head light switch 15 6 Key switch 7 Differential lock lever 21 8 Easy Checker TM 19 9 Range gear shift lever 16 10 4WD lever 17 11 Cup holder 12 Glove box 13...

Page 25: ...7 INSTRUMENT PANEL AND CONTROLS ILLUSTRATED CONTENTS 1 Seat belts 14 2 Seat 39 3 Parking brake lever 20 4 Fuel gauge 19 5 Battery...

Page 26: ...CONTROLS ILLUSTRATED CONTENTS ILLUSTRATED CONTENTS 1 Handgrip 5 Tailgate 27 2 Cargo bed 26 6 Tail lamp 3 Fuel tank cap 7 Rear trailer hitch bracket 31 4 Muffler 8 Rear trailer hitch if equipped 31 9...

Page 27: ...ection Check engine oil level Check transmission fluid level Check brake fluid level Check engine cooling fan For those of the engine serial number 8U0086 or later check the fan operation Check coolan...

Page 28: ...t the operator s seat A Make it a rule to set the range gear shift lever to the NEUTRAL position A Do not use starting fluid to aid engine starting A To protect the battery and the starter make sure t...

Page 29: ...ient Never fail to conduct daily checks carefully by referring to DAILY CHECK in PERIODIC SERVICE section A For further details of Easy Checker TM see Easy Checker TM in CHECK DURING DRIVING in OPERAT...

Page 30: ...oil to reach every engine part If load should be applied to the engine without this warm up period trouble such as seizure breakage or premature wear may develop BWarm Up Transmission Oil in the Low...

Page 31: ...with damp rags Do not allow the rag to touch the battery terminals 6 Attach the red clamp to the positive red or pos terminal of the dead battery and clamp the other end of the same cable to the posit...

Page 32: ...sary A On rough roads slow down to suitable speeds Do not operate the vehicle at fast speed The above precautions are not limited only to new vehicles but to all vehicles But it should be especially o...

Page 33: ...d light A Turning the head light switch to the ON position causes the following lamps to light simultaneously 1 Tail lights lamps at the rear portions of the vehicle 2 Lamp built in the coolant temper...

Page 34: ...pe shift to the L range to control the vehicle speed A If you shift gears while ascending or descending a slope be prepared to use the brake to maintain control A Operate in reverse at slow speeds to...

Page 35: ...s of control A The braking characteristics are different between two and four wheel drive Be aware of the difference and use carefully A Use the lever to engage the front wheels with the vehicle stopp...

Page 36: ...in neutral and apply the parking brake CHECK DURING DRIVING BImmediately Stop the Engine if A The engine suddenly slows down or accelerates A Unusual noises are suddenly heard A Exhaust fumes suddenly...

Page 37: ...Checker TM will come on If the light is active stop the vehicle and shut off the engine If the light is active after restart consult your local KUBOTA Dealer Engine oil pressure light If the oil press...

Page 38: ...igit indicates 1 10 of an hour PARKING BParking Brake Lever To avoid personal injury BEFORE DISMOUNTING VEHICLE A ALWAYS APPLY THE PARKING BRAKE AND LOWER ALL IMPLEMENTS TO THE GROUND Leaving transmis...

Page 39: ...ue to loss of steering control A Do not operate the vehicle at high speed with differential lock engaged A Do not attempt to turn with the differential lock engaged A Be sure to release the differenti...

Page 40: ...y slopes or swamps A Be cautious when visibility is limited as you may not be able to see obstacles in your path BDriving in Reverse To avoid personal injury A Turn around look down and behind you bef...

Page 41: ...e range gear shift lever into low range and use 4WD on steep slopes or when stuck in the mud with differential locked if necessary BTurning the Vehicle To avoid personal injury A Reduce vehicle speed...

Page 42: ...escending a hill BTraversing Hillsides To avoid personal injury A Reduce vehicles speed to prevent tipping or loss of control A Do not traverse hillsides that are slippery or covered with rocks or obs...

Page 43: ...rturn get stuck or submerged A Never operate the vehicle in fast flowing water or in excess of 6 inches 152 mm in depth Tires may float making it difficult to maintain control A Wet brakes may reduce...

Page 44: ...ful not to put any part of your body such as hands or arms between the bed and vehicle A Drive slowly when it is loaded To avoid personal injury A Do not raise the cargo bed while the engine is runnin...

Page 45: ...evel to the cargo bed floor with wire loops Do not move the vehicle with the tailgate fully lowered In a fully lowered position the tailgate may obstruct the vehicle tail lamps and damage them by swin...

Page 46: ...at surface 2 Empty the cargo bed by hand 3 Release the latches on both sides and then raise the cargo bed with the hand grip 4 Push the safety support into the latch slot to lock when the cargo is ful...

Page 47: ...manual A Do not use tires other than those approved by KUBOTA BInflation Pressure Though the tire pressure is factory set to the prescribed level it naturally drops slowly in the course of time Thus c...

Page 48: ...cause poor handling and loss of control which could lead to an accident The spring adjusting sleeves on the rear shock absorbers have 5 positions so that the springs can be adjusted for different ridi...

Page 49: ...ch load is listed in the VEHICLE LIMITATIONS section When towing other equipment use a safety chain BFront Trailer Hitch if equipped To avoid personal injury A Do not tow this vehicle unless all the f...

Page 50: ...porting Vehicle Pay attention to the points below when transporting the vehicle 1 Use a suitable truck or trailer 2 Apply the parking brake and place chocks against the front and rear tires 3 Secure t...

Page 51: ...ly 6 On every after 1000 Hr clean it if necessary A GASOLINE ENGINE EMISSION RELATED MAINTENANCE INSTRUCTIONS 1 Non warranty maintenance repair or replacement of the emission control devices and syste...

Page 52: ...Spark plug condition and gap Check every 200 hrs 61 20 Brake pedal Check every 200 hrs 62 4 21 Brake hose pipe Check every 200 hrs 62 Replace every 4 years 69 4 22 Brake light switch Check every 200 h...

Page 53: ...nner parts Replace every 2 years 68 4 34 Engine breather hose Replace every 2 years 68 35 Brake pad wear Check Service as required 69 4 36 Parking brake Adjust 69 4 37 Alternator drive belt Adjust 69...

Page 54: ...on exchanged 1 2 L 1 27 U S qts Engine oil API Service Classification SG SH SJ or higher Above 18 0 SAE10W 30 Below 0 32 SAE5W 20 or 5W 30 4 Transmission case 8 5 L 2 2 U S gals KUBOTA UDT or SUPER UD...

Page 55: ...be used in this system We recommend the use of KUBOTA UDT or SUPER UDT 2 fluid for optimum protection and performance Consult your local KUBOTA Dealer for further detail Do not mix different brands o...

Page 56: ...avoid personal injury from contact with moving parts A Never open the operator s seat while the engine is running BHood 1 To open the hood pull up the latch lever to release the latch and open the ho...

Page 57: ...o Bed To avoid personal injury A Make sure the vehicle is on a firm level surface and the parking brake is applied before raising the cargo bed and securing the cargo bed in the raised position A A lo...

Page 58: ...l injury death or vehicle damage A Do not work under the vehicle unless it is secured by safe stands or suitable blocking BFront End Jack up at the front bumper only BRear End Jack up the rear side af...

Page 59: ...uel stale in the fuel tank of the machine Stale fuel condition can cause engine performance troubles by varnish and plugged carburetor components A Seal the fuel storage container tightly and store it...

Page 60: ...fuel The use of methanol additive is not recommended For the best results use unleaded fuel with a minimum of 87 octane BChecking Engine Oil Level To avoid personal injury A Be sure to stop the engine...

Page 61: ...e cap to the first stop and allow sufficient time for excess pressure to escape before removing the cap completely 1 Park the vehicle on a flat surface and raise the cargo bed 2 Check to see that the...

Page 62: ...the ground Start engine only from the operator s seat 1 Park the vehicle on a flat surface and apply the parking brake 2 Start up the engine 3 After starting up the engine get off the operator s seat...

Page 63: ...when filling the reservoir If brake fluid is spilled on power steering hose wash off with water immediately Brake fluid quickly ruins synthetic resin or rubber hoses 1 Park the vehicle on a level grou...

Page 64: ...Inspect the instrument panel for broken gauge s meter s and Easy Checker TM lamps 2 Replace if broken BChecking Head Light etc 1 Inspect the lights for broken bulbs and lenses 2 Replace if broken BCh...

Page 65: ...mount of multi purpose grease to the following points every 50 hours If you operated the vehicle in extremely wet and muddy conditions lubricate grease fittings more often Tire sizes Inflation Pressur...

Page 66: ...ERVICE 48 1 Parking brake pivot spray type grease 1 Range gear shift lever pivot spray type grease 2 4WD lever pivot spray type grease 3 Differential lock lever spray type grease 1 Bypass link spray t...

Page 67: ...VERY 100 HOURS BChecking VHT Neutral Spring 1 Park the vehicle on a flat place 2 Apply the parking brake 3 Shift the range gear shift lever to the neutral position 4 Start the engine 5 Make sure that...

Page 68: ...d A Be sure to refit the cover with the arrow on the rear of cover upright If the cover is improperly fitted evacuator valve will not function and dust will adhere to the element A Do not touch the se...

Page 69: ...t step 4 to measure the belt tension 6 If the deflection of the belt is over the prescribed value the alternator drive belt should be adjusted 7 Replace the alternator drive belt if it is damaged Cons...

Page 70: ...tep 4 to measure the belt tension 6 If the deflection of the belt is over the prescribed value the alternator drive belt should be adjusted 7 Replace the alternator drive belt if it is damaged 8 Make...

Page 71: ...be checked annually or every 100 service hours whichever comes first 1 Park the vehicle on a flat surface and raise the cargo bed 2 The fuel line is made of rubber and ages regardless of service peri...

Page 72: ...es If you are spattered with it wash it away completely with water immediately and get medical attention A Wear eye protection and rubber gloves when working around the battery C Battery Charging To a...

Page 73: ...adjust the electrolyte to the proper level refillable type only and store in a dry place out of direct sunlight 2 The battery self discharges while it is stored Recharge it once every 3 months in hot...

Page 74: ...100 1c C Maintenance and cleanout procedure The screen type spark arrester should be removed cleaned and inspected after every 100 hours of use 1 The spark arrester is located inside the end of the ex...

Page 75: ...rsonal injury A Be sure to stop the engine before changing the oil filter cartridge A Allow engine to cool down sufficiently oil can be hot and can burn 1 Park the vehicle on a flat surface and raise...

Page 76: ...sed oil remove the drain plug at the bottom of the engine and completely drain the oil into an oil pan All the used oil can be drained out easily when the engine is still warm 3 After draining reinsta...

Page 77: ...kPa 2 1 kgf cm 30psi 1 Park the vehicle on a flat surface and raise the seat 2 Remove the radiator maintenance cover 3 Detach the radiator screen 4 Remove all dirt and debris from radiator fins and f...

Page 78: ...e rubber seal of the new filter 6 Quickly tighten the filter until it contacts the mounting surface then with a filter wrench tighten it an additional 2 3 turn only 7 After the new filter has been rep...

Page 79: ...orn or reuse is questionable 6 Inspect spark plugs for cracked porcelain pitted electrodes or other wear and damage Replace the spark plug if necessary A Do not clean the spark plug in a machine using...

Page 80: ...ting the brake C Checking the brake pedal stroke 1 Release the parking brake 2 Step on the pedal and measure the pedal stroke 3 If brake pedal stroke is outside of the specifications contact your loca...

Page 81: ...k to see if radiator hoses are properly fixed every 200 hours of operation or 6 months whichever comes first 1 If hose clamps are loose or water leaks tighten bands securely 2 Replace hoses and tighte...

Page 82: ...as burning get rid of the causes of overheating according to the TROUBLESHOOTING section of this manual and then start the engine again BChecking Intake Air Line 1 Check to see if the hoses and hose...

Page 83: ...n plug Replace it if missing or in poor condition 4 After draining reinstall the drain plug 5 Fill with the new KUBOTA SUPER UDT fluid up to the upper notch on the dipstick See LUBRICANTS FUEL AND COO...

Page 84: ...the proper tools and or are not mechanically proficient consult your local KUBOTA Dealer for this service EVERY 1000 HOURS BReplacing Engine Timing Belt If you do not have the proper tools and or are...

Page 85: ...and let cool 11 Check coolant level of recovery tank and add coolant if necessary A Do not start engine without coolant A Use clean fresh water and anti freeze to fill the radiator and recovery tank A...

Page 86: ...s a mixture leak add the LLC of the same manufacturer and type in the same mixture percentage 6 When the LLC is mixed do not employ any radiator cleaning agent The LLC contains anticorrosive agent If...

Page 87: ...to prevent the vehicle from moving 3 Remove the wheel bolts and the tires 4 Check the brake pads for wear or damage Check the pad s thickness Minimum thickness should be 1mm 3 64 inch If below this or...

Page 88: ...ing FUSE PULLER in the fuse box 4 Insert a new fuse into the fuse box 5 Install the fuse box cover 6 Connect the negative battery cable C How to distinguish between the old and new type of the protect...

Page 89: ...blow fuse 4 Insert a new slow blow fuse into the slow blow fuse box 5 Install the slow blow fuse box cover 6 Connect the negative battery cable C Protected circuit BReplacing Light Bulb 1 Head lights...

Page 90: ...in a dry place where the vehicle is sheltered from the elements Cover the vehicle 9 Store the vehicle indoors in a dry area that is protected from sunlight and excessive heat If the vehicle must be s...

Page 91: ...nes and consult your KUBOTA Dealer A Air cleaner is clogged A Clean or replace the air cleaner element A Spark plug defective A Adjust the spark plug gap or replace the spark plug A Check the spark pl...

Page 92: ...ed A Clean or replace the air cleaner element Exhaust fumes are colored White or Blue A Excessive engine oil A Reduce to the specified oil level A Piston ring is worn or stuck A Consult your KUBOTA De...

Page 93: ...fficiently A Battery must be serviced properly before initial use When viewed from top the top of plates look whitish A Battery was used with an insufficient amount of electrolyte A Add distilled wate...

Page 94: ...oil A Filter is clogged A Replace the filter Machine does not move while engine is running A Parking brake is on A Release the parking brake A Transmission fluid level is insufficient A Replenish oil...

Page 95: ...ler Hitch Pin 2 A Front Work Light for plastic canopy or no canopy one or two A Modular Cab W steel doors A Plastic Canopy Black A Rear Net A Rear Trailer Hitch Pin 2 A Rear Work Light for plastic can...

Page 96: ...F E3 engine conforms to U S EPA and California emission regulations for off road small SI engines A Emission compliance period 1000 HOURS A CARB emissions durability period EXTENDED C Exhaust Emission...

Reviews: