NOTE :
• Always replace the filter when performing
any internal maintenance to the transaxle.
4. After the oil has drained, inspect all parts for
excessive wear or damage. Replace if necessary.
5. Wipe off the filter base surface and apply a film of
new oil to the gasket of the new replacement filter.
6. Install the new filter by hand and turn 3/4 to 1 full
turn after the filter gasket contacts the filter base
surface.
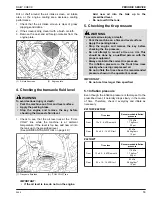
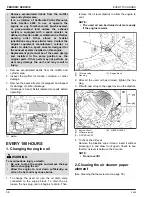
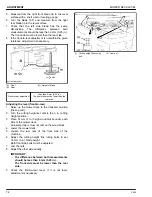
(1) Transaxle
(2) Transaxle oil filter
(3) Filter guard
(4) Hex flange head bolt
(5) Breather port plug
(A) Front
(B) Oil level
7. Reinstall the filter guard (3) with 3 hex head bolts
(4). Torque bolts (4) to 7.35 N
⋅
m (5.42 lbf
⋅
ft)
securely.
8. Repeat steps 2-7 on the opposite side transaxle
drive.
9. Drain the old oil filters of all free flowing oil prior to
disposal. Place the used oil in appropriate
containers and deliver to an approved recycling
collection facility.
10. Remove the breather port plug (5) from the left side
and right side transaxles prior to filling with oil. This
will allow the transaxles to vent during oil fill.
11. Remove the cap from the transaxle fluid tank
located on the machine frame.
12. Fill with 20W-50 motor oil until oil appears just at
the bottom of the breather port. Install the breather
port plug (5) into the transaxle. Torque the plug (5)
to 20.34 N
⋅
m (15.0 lbf
⋅
ft).
13. Continue to fill the transaxles through the transaxle
fluid tank until the
“FULL COLD”
line is reached on
the transaxle fluid tank.
14. Reinstall the transaxle fluid tank cap by hand. Be
careful not to overtighten.
15. Proceed to the purge procedure.
Purging procedures
Due to the effects air has on efficiency in hydrostatic
drive applications, it is critical to purge it from the
system.
Air creates inefficiency because its compression and
expansion rate is higher than the one of the oil
approved for use in hydrostatic drive systems.
These purge procedures should be performed anytime
a hydrostatic system has been opened to facilitate
maintenance or the oil has been changed.
The resulting symptoms in hydrostatic systems may be:
1. Noisy operation.
2. Lack of power or drive after short-term operation.
3. High operation temperature and excessive
expansion of oil.
Before starting, make sure the transaxle oil is at the
proper oil level. If it is not, fill to the specifications
outlined in this manual.
The following procedures are best performed with the
machine drive wheels off the ground. Then, repeat
under normal operating conditions. If this is not
possible, then the procedure should be performed in an
open area free of any objects or bystanders.
1. Disengage the brake if activated.
2. With the bypass valve open and the engine
running, slowly move the motion control levers in
both forward and rearward directions (5 or 6 times).
3. With the bypass valve closed and the engine
running, slowly move the motion control levers in
both forward and rearward directions (5 to 6 times).
Check the oil level, and add oil as required after
stopping the engine.
4. It may be necessary to repeat steps 2 and 3 until all
the air is completely purged from the system. When
the transaxle operates at normal noise levels and
moves smoothly forward and rearward at normal
speed, then the transaxle is considered purged.
2. Changing the transaxle fluid
(See Replacing the transaxle oil filter cartridge on page
64.)
EVERY 500 HOURS
1. Replacing the spark plug
(See Checking the spark plug on page 59.)
EVERY 400 HOURS
PERIODIC SERVICE
Z400
65
Summary of Contents for Z411
Page 3: ...OPERATOR S MANUAL 1SFRT00108A01 READ AND SAVE THIS MANUAL MODELS Z411 Z421 Z421T ...
Page 9: ...4 Z400 ...
Page 16: ...SAFETY LABELS SAFE OPERATION Z400 11 ...
Page 17: ...SAFE OPERATION 12 Z400 ...
Page 18: ...SAFE OPERATION Z400 13 ...
Page 19: ...SAFE OPERATION 14 Z400 ...
Page 20: ...SAFE OPERATION Z400 15 ...
Page 53: ...PERIODIC SERVICE CHART LABEL MAINTENANCE PERIODIC SERVICE CHART LABEL 48 Z400 ...


