3
Issue 01 MAR.19
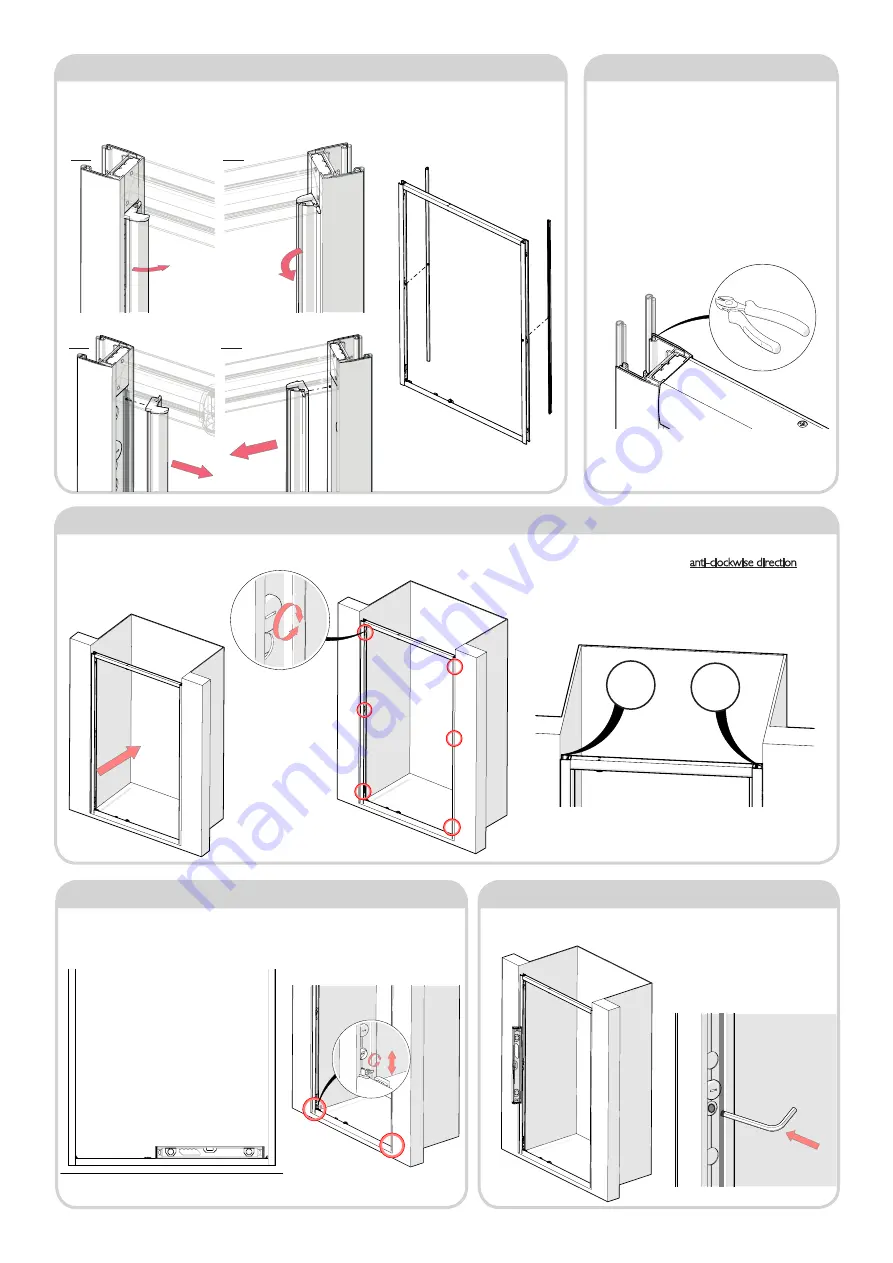
Step 6 - Trim Excess Seal
1.During the manufacturing process the seals on
each side of the frame are often left ‘long’ to allow for
expansion and contraction during transit. Ensure the
seals are sitting flush with the bottom of the frame on
each side.
2.Using cutting pliers, trim the seals on each side flush
with the top of the frame.
Step 5 - Remove Clip-In Extrusions
1. Locate the clip-in extrusions down the in side of the
frame, press and rotate the clip-in extrusion at top, middle
and bottom of door frame, to gently prise the extrusion
away from the frame by hand only.
2. Remove the clip-in extrusion from each side of the frame.
LHS
LHS
RHS
RHS
3. Ensure the removed extrusions are
kept separate, as left and right.
2. Using a flat headed screwdriver, adjust the six nylon adjustment
screws, three down each side, in an anti-clockwise direction, until
the frame has expanded and is only slightly wedged. Try to adjust
each side equally, to achieve equal spacings down each side of the
frame .
=
=
Step 8 - Adjust Height
1. Using a spirit level, check to see if
the bottom frame is level, ensure the
spirit level is sat down fully onto the sill.
2. Using a flat-head screwdriver adjust the
two nylon height adjustment screws (lower
screw in each corner). Adjust until the
bottom frame is level.
Step 9 - Mark Position of Holes
1. Using a spirit level, check that the
frame ‘plumb’ vertical.
2. Using a 4mm rod (we recommend
a small Allen key or drill bit), place a
small amount of marking paste (we
recommend shoe polish) on the end
of the rod, and ‘spot’ through the 3
screw holes down each side of the
frame (blue lined).
Step 7 - Offer Up & Adjust Fit
1. ‘Offer up’ the frame into the recess,
ensuring the bottom is sat firmly on the
shower tray.


