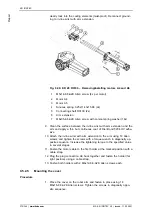
7. Pull the sinuous spring off the motor.
8. If the motor is not to be reinstalled, it must be disposed of properly or
protected against corrosion before being put into storage.
9.5.2.4
Installing motor A5
Procedure
1. If a new motor is to be installed, remove any corrosion protection prior
to installation.
2. Clean the toothing on connecting shaft A5 and check for wear.
In the case of damage and/or wear, connecting shaft A5 must be ex-
changed.
3. Apply a thin but continuous coat of Microlube GL 261 to the toothing
on connecting shaft A5.
4. Mount motor A5 onto the connecting shaft together with the lock
washer and sinuous spring. Do not tilt while fitting.
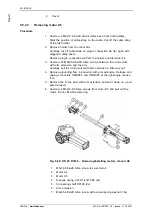
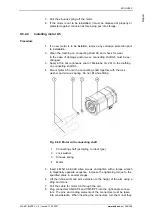
Fig. 9-29: Motor with connecting shaft
1
Connecting shaft (according to robot type)
2
Lock washer
3
Sinuous spring
4
Motor
5. Insert 4 M5x14-8.8-A2K Allen screws and tighten with a torque wrench
in diagonally opposite sequence. Increase the tightening torque to the
specified value in several stages.
6. Lift the in-line wrist and arm extension to the height of the arm using a
sling and crane.
7. Pull the cable for motor A6 through the arm.
8. Plug connectors XM4/XP4 and XM5/XP5 into the right-angle connec-
tors. The pins and coding elements of the connectors must be taken
into consideration. When inserting the connectors, turn them until they
KR IONTEC
MA KR IONTEC V4 | Issued: 11.05.2021
www.kuka.com
| 269/344
Repair
Summary of Contents for IONTEC KR 20 R3100
Page 14: ...KR IONTEC 14 344 www kuka com MA KR IONTEC V4 Issued 11 05 2021 Introduction...
Page 166: ...KR IONTEC 166 344 www kuka com MA KR IONTEC V4 Issued 11 05 2021 Planning...
Page 188: ...KR IONTEC 188 344 www kuka com MA KR IONTEC V4 Issued 11 05 2021 Start up and recommissioning...
Page 310: ...KR IONTEC 310 344 www kuka com MA KR IONTEC V4 Issued 11 05 2021 Repair...
Page 340: ...KR IONTEC 340 344 www kuka com MA KR IONTEC V4 Issued 11 05 2021 KUKA Service...


