background image

Depending on the condition of wheels, bolts, nuts and other fastening parts, fastening with PTS may damage bolts.
( Hereinafter this condition will be referred to as "abnormal fastening").

This machine has the function to immediately detect this "abnormal fastening" and shut down to prevent bolts and
other parts from damages.

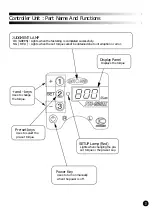
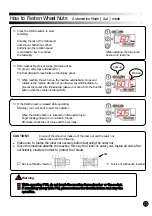
When "abnormal fastening" is detected, "CH1"( CHECK1 ) is displayed on the controller and the machine stops.

When "CH1" ( abnormal fastening ) is displayed, check the following.

【1】If "CH1"(abnormal fastening)  is displayed, please remove the nut.

(Caution)

If the wheel nut is made up of the inner nut and the outer nut, please make sure to fasten the inner nut
with recommended torque after loosening the outer nut.

If "CH1" is displayed, do not continue fastening. Loosen the bolt / nut first. 
Otherwise the bolt may be stretched or the wheel may be deformed.

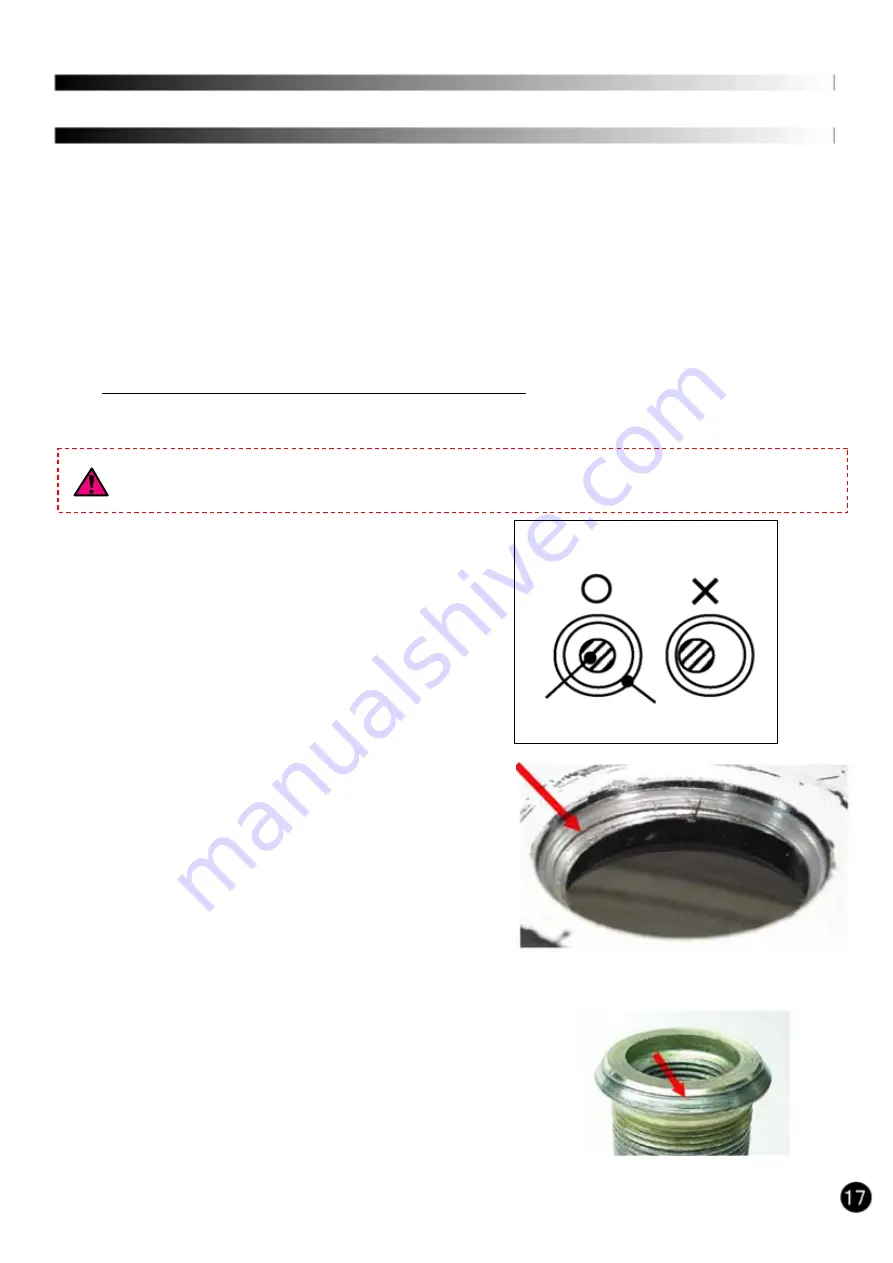
【2】 In case of JIS type ( 8 nuts )

(1) Whether the wheel center is misaligned to the wheel bolt.

(2) Whether there are any damages on the seating surface of

wheels, nuts, and or thread face.
● Replace the parts when there are damages or 

unevenness of seating face.

(3) Whether the wheel bolt is extended ( stretched ).

● If so, replace the bolt with new one.

(4) Whether excessive grease is applied.

● If so, wipe off the grease gently.

● In particular, excessive grease application on the 

aluminum wheel is a cause of excessive axial force
generation*. Pay full attention to the amount or the
portion of grease applied.
Refer automobile manufacturer's instruction.

*Axial Force : Force to pull the bolt (Fastening Force).

(5) Whether the torque is appropriate.

● Refer automobile manufacturer's instruction.

Warning

Troubleshooting (3)-①  

[CH1]

Center

Wheel Bolt

Wheel Hole

Misalignment

of Center

Unevenness of wheel seating surface

(exmaple of iron wheel)

Unevenness of inner nut seating surface

(exmaple of iron inner nut)

Summary of Contents for PTS-800 EX

Page 1: ...KUKEN CO LTD Operation Manual Read this Operation Manual thoroughly and the separate Instruction Manual before using...

Page 2: ...ration Preparation 3 How to Set The Torque How to Fasten Industrial Ind Mode How to Loosen Industrial Ind Mode How to Fasten Wheel Nuts Automotive Aut Mode How to Loosen Wheel Nuts Automotive Aut Mode...

Page 3: ...ches the rotation direction right R left L Battery Box Stores 4 AA batteries to operate the controller unit The Controller To see the torque and to set the torque Reaction Force Absorber Option To abs...

Page 4: ...Lights when the set torque cannot be obtained due to interruption or error and keys Uses to change the torque Display Panel Displays the torque Pre set keys Uses to select the pre set torque SETUP Lam...

Page 5: ...tops the machine when the operation is completed successfully and the judgment lamp turns green Fail Safe Function In case batteries are exhausted or very low the CPU will not be activated but the spi...

Page 6: ...800EXL without a reaction force absorber may cause injuries Please do not operate PTS 800EX PTS 800EXL without a reaction force absorber Warning Preparation 1 Attaching Accessories Attach the couplin...

Page 7: ...ed screws only Maximum Torque Up to the pre set torque Up to the pre set torque selected currently selected currently Maximum Torque Up to the pre set torque Up to 800 Nm for Loosening selected curren...

Page 8: ...selection Then the selection will move to the next setting Press key once to change the mode from the Aut And press again to change the mode back to Ind Press to complete the selection Then the select...

Page 9: ...eases the value quickly To complete the setting press SET key Please make sure the display blinks 0 after setting To pre set other keys repeat above method through Once pre set the torque the value is...

Page 10: ...the rotative direction Reverse Lever R Right Rotation L Left Rotation Fastening the right Fastening the handed screw left handed screw for Aut mode After placing the reaction force absorber next to th...

Page 11: ...es in the reverse direction at an ultra low speed immediately to prevent the socket bite Immediately release your hand from the throttle button when the counter rotating starts If the throttle lever i...

Page 12: ...throttle lever While loosening L will be displayed If exceeding the maximum torque 800 Nm will be displayed and the torque limiter will shut off the machine In this case please use an impact wrench to...

Page 13: ...icate the torque value 600 Nm At this moment the pre set key is selected Selected pre set number is valid until changing to other pre set number Check the rotative direction Reverse Lever L Left Rotat...

Page 14: ...eleased while operating NG lamp red will be lit to alert the operator When the throttle button is released or interrupted due to finger slipping make sure to re fasten the nut Otherwise check the set...

Page 15: ...oosening operation press L will be shown only for 10 seconds After the 10 seconds the power will be turned off Apply the reaction force absorber next to the loosening nut and press the throttle lever...

Page 16: ...gainst the Batteries are not properly placed Battery rotative direction Reverse Lever in the battery housing Securely set batteries in place is displayed 2 Batteries are running low Replace batteries...

Page 17: ...tion on fastening If CH1 is turned on Please see the next page Troubleshooting 3 Result below pre set torque Releasing the throttle lever before reaching Please loosen the nut once and try the pre set...

Page 18: ...stretched or the wheel may be deformed 2 In case of JIS type 8 nuts 1 Whether the wheel center is misaligned to the wheel bolt 2 Whether there are any damages on the seating surface of wheels nuts an...

Page 19: ...e amount and the portion applied Refer automobile manufacturer s instruction For the tapered area apply grease to the degree that the excessive grease does not leak when the nut and the washer are pre...

Page 20: ...torque When exceeding the specified upper limit of torque by tightening once loosen the nut and re fasten it from the beginning Do not insert batteries opposite directions Inserting batteries opposite...

Page 21: ...connected to the printer or the computer 1 And the result can be saved as data 1 PTS can not be connected both the printer and the computer at same time 2 PTS 800EX EXL must be the transmission model...

Page 22: ...or the operation time will not be printed If using the printer please refer Page 7 and select Prn PC Output PTS COM By the installation of the optional software PTS COM to a computer Displays the torq...

Page 23: ...pressed 1Nm is subtracted from the set torque By keep on pressing the key the numeric value can be fast forwarded SET Key After changing the torque value this key is to complete the setting Power Key...

Page 24: ...ngleichung der Rechtsvorschriften der Mitgliedsstaaten f r Maschinen 2006 42 EG entspricht NosotrosKUKEN CO LTD Osaka Jap n declaramos bajo nuestra sola responsabilidad que el producto a que se refier...

Reviews:

Related manuals for PTS-800 EX