background image

- 6 -

GB

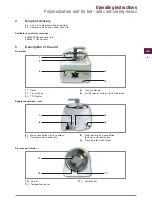
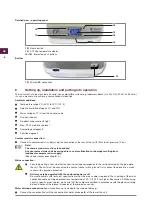
Detailed view – operating panel


13)


Home 

button     

 14)

  ACTUAL temperature display

 15–18)

   Interactive push buttons

Bottom

19


19)

   Micro USB connection

Setting up, installation and putting into operation

The instrument is to be mounted on a solid, non combustible surface (e.g. laboratory bench (H x W x D): 450 x 315 x 550 mm) 
in such a manner as to achieve a secure horizontal position.

Ambient conditions:


Temperature range 0°C (32°F) to 40°C (104°F)


Relative humidity between 30% and 75%


Mains voltage ± 10% from the nominal value


Use only indoors


No direct exposure to UV light


Max. 2.000 m above sea level


Overvoltage category II


Pollution degree 2

Compressed air connection:


Connect to compressed air supply using the connection at the rear of the unit (

7

). Maximum pressure: 10 bar.

 Note!

  The compressed air must be clean and dry!
  Any guarantee claims shall be excluded in case of malfunctions or damage resulting from  

inadequate compressed air supply!

(See special accessories chapter 4.)

Mains connection:


Prior to operating, check whether the nominal voltage corresponds to the value indicated on the type plate 
the unit. The unit must be connected to a contact socket with a ground. Only connect the device to a mains 
socket with a ground connection.


Unit may only be operated with the enclosed power cord!


Be sure to comply with technical specifications when the mains cable is replaced. The sheathing of the mains 
connection cable must be approved for a temperature of 90 °C (194 °F) or higher. See section 9. When using 
country-specific mains cables, make sure that the cables are certified in accordance with the electrical rating 
data and notes of the relevant standards of the respective country.

Water drainage connection

 (red silicone hose not included in the scope of delivery):


Connect hose connection with the connection for water drainage (

8

) at the rear of the unit.

14

13

15

17

16

18

Summary of Contents for 66057661

Page 1: ...Das ist Zahntechnik DE Betriebsanleitung GB Operating Instruction FR Mode d emploi ES Instrucciones de uso IT Istruzioni per l uso NL Gebruiksaanwijzing Palamat Premium DE GB FR ES IT NL...

Page 2: ...n of the unit 5 6 Setting up installation and putting into operation 6 7 Working with the Palamat Premium 7 7 1 Pressure pot 7 7 2 Filling with water 7 7 2 1 Overtemperature protection 8 7 3 Polymeriz...

Page 3: ...2 Designation and type of the unit Designation of the machine Type of machine Valid from Serial no Polymerization unit for cold and hot curing resins Palamat Premium 2019 04 001 1 3 EC Declaration of...

Page 4: ...ore be taken during transportation as well as storage The equipment shipped by Kulzer was checked thoroughly prior to ship ment The unit is correctly protected and packed when delivered Check the unit...

Page 5: ...which was not carried out by Kulzer service partners or by personnel trained by us or in cases where original spare accessory parts were not used during a part replacement Kulzer GmbH is not liable C...

Page 6: ...se red 66056911 Flask basket 5 Description of the unit Front view 1 Cover 4 Pressure Gauge 5 On Off power switch with LED indicator 2 Pressure Pot 3 TFT Display Supply connections rear 6 Mains connect...

Page 7: ...s shall be excluded in case of malfunctions or damage resulting from inadequate compressed air supply See special accessories chapter 4 Mains connection Prior to operating check whether the nominal vo...

Page 8: ...t be in upright position Turn the lid by 90 tilt it and remove it from the pressure pot After completing the polymerization process the handle must be in a perpendicular position to open the lid The l...

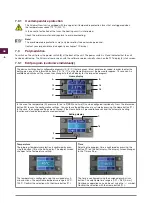
Page 9: ...beep will sound The screen then changes to the Edit display for the respective program Home display In this area the temperature D pressure E on off BAR and time F can be configured individually Pres...

Page 10: ...ightness of the screen does not change J Changing the temperature unit C F 7 3 3 Start pause a process Press one of the buttons 15 16 17 on the Home display to select the corresponding program The cor...

Page 11: ...ding to WEEE Electrical and Electronic Equipment Act ElektroG This Act sets out requirements for electrical and electronic equipment pursuant to directive 2002 96 EG issued by the European Parliament...

Page 12: ...ce partner E 99 Sensor break short circuit water bath or automatic software safety shutdown due to high temperature Press the Home button 11 Turn off the device Check water level see section 7 2 Allow...

Page 13: ...12 GB Subject to modifications Dated 2019 04 12 Document history 2019 04 First edition...

Page 14: ...facturer Kulzer GmbH Leipziger Stra e 2 63450 Hanau Germany W20960 99001462 11 2019 04 Distributed in USA Canada exclusively by Kulzer LLC 4315 South Lafayette Blvd South Bend IN 46614 2517 1 800 431...

Reviews: