background image

67

РУССКИЙ

РУКОВОДСТВО ПОЛЬЗОВАТЕЛЯ

Холодильники и морозильные камеры

2. ПРАВИЛА ИСПОЛЬЗОВАНИЯ ХОЛОДИЛЬНИКА

2.1 Требования к месту установки


Â

Перед началом использования прибора 

удалите все упаковочные материалы, включая 

нижние подкладки, а также находящиеся вну

-

три него пенопластовые вставки и ленты, сни

-

мите все защитные пленки с дверей и корпуса 

холодильника.


Â

Не  подвергайте  прибор  воздействию 

тепла и прямого солнечного света. Чтобы пре

-

дотвратить образование ржавчины и избежать 

ухудшения теплоизоляционных характеристик, 

не допускается устанавливать прибор в поме

-

щениях с повышенной влажностью.


Â

Не  допускается  разбрызгивать  воду  на 

холодильник,  а  также  мыть  его  водой.  Что

-

бы  предотвратить  ухудшение  эффективности 

электроизоляции  прибора,  не  устанавливайте 

его во влажных помещениях, в которых на него 

может попасть вода.


Â

Холодильник  должен  быть  установлен 

в хорошо проветриваемом помещении на ров

-

ной и прочной поверхности (для выравнивания 

прибора и придания ему устойчивости вращай

-

те правый или левый ролик в соответствующем 

направлении).


Â

Сверху холодильника необходимо оста

-

вить свободное пространство не менее 30 см, 

для облегчения открывания и закрывания две

-

ри,  а  также  более  эффективного  рассеивания 

тепла холодильник следует размещать на рас

-

стоянии не менее 10 см от стен.

 Меры предосторожности перед установкой:

Перед установкой или регулировкой дополнительных принадлежностей не

-

обходимо отключить холодильник от сети электропитания.

Необходимо принять соответствующие меры предосторожности, чтобы пре

-

дотвратить травмы при случайном падении ручки.

Summary of Contents for RFCN 2011

Page 1: ...REFRIGERATORS FREEZERS RFCN 2011 TECHNISCHER PASS TECHNICAL PASSPORT K HL UND GEFRIERSCHR NKE...

Page 2: ...ENTSORGUNG 10 2 REGELN F R DIE VERWENDUNG DES K HLSCHRANKS 11 2 1 STANDORTANFORDERUNGEN 11 2 2 EINSTELLBARE F SSE 12 2 3 NEUANORDNUNG EINER T R VON RECHTS NACH LINKS 12 2 4 LAMPEN AUSWECHSELN 15 2 5...

Page 3: ...elen k nnen Im Schadensfall muss das Netz kabel von einem Fachmann des Her stellers seiner autorisierten Service stelle oder einer anderen Person mit den entsprechenden Qualifikationen ausgetauscht we...

Page 4: ...n oder geistigen F higkeiten oder man gelnder Erfahrung und Kenntnis benutzt werden wenn sie beaufsichtigt oder in die sichere Benutzung des Ger ts ein gewiesen und ber die damit verbun denen Gefahren...

Page 5: ...den beachten Sie Folgen des Dieses Gefrierger t ist nicht zum Einfrieren von Lebensmitteln geeig net 4 Wenn das Ger t l ngere Zeit leer steht schalten Sie es aus tauen Sie es ab reinigen Sie es trockn...

Page 6: ...weist auf die Notwendigkeit einer erh hten Aufmerksamkeit hin Mit diesem Zeichen gekennzeichnete Anweisungen erfordern besondere Aufmerksamkeit Wenn Sie nicht ausreichend vorsichtig vorgehen kann dies...

Page 7: ...ter um den Raum zu bel ften Trennen Sie den K hlschrank oder andere Elektroger te nicht von der Stromversorgung da ein versehentlicher Funke einen Brand ver ursachen kann Stellen Sie keine Elektroger...

Page 8: ...insbeson dere keine aus Metall mit nassen H nden aus dem Gefrierschrank Lassen Sie Kinder nicht in oder auf das Ger t klettern dies kann zu Erstickungs oder Verletzungsgefahr f hren wenn sie fallen ge...

Page 9: ...hen oder luftdichten Beh ltern im Gefrierschrank des Ger ts aufzu bewahren da diese Beh lter platzen k nnen wenn die Fl ssigkeiten gefrieren und das Ger t besch digen 1 6 Energiesparrichtlinien 1 Die...

Page 10: ...ntsorgung des Ger ts muss von spezialisierten Unternehmen durchgef hrt werden die ber die ent sprechenden Genehmigungen f r diese Art von Aktivit t verf gen Um Umwelt und Gesundheitssch den zu vermeid...

Page 11: ...Sie das Ger t nicht in feuchten R u men in denen Wasser eindringen kann um eine Verschlechterung der elektrischen Isolationsleis tung des Ger ts zu vermeiden Ihr K hlschrank muss in einem gut bel f t...

Page 12: ...en Sie die rechten und lin ken F e gem dem obigen Verfahren ein so dass das Ger t in einer streng ho rizontalen Position steht Das Bild oben dient nur zur Veranschaulichung Die tats chliche Konfigurat...

Page 13: ...arnier und den Stecker Obere Scharnierabdeckung Oberes Scharnier Stopfen Stopfen Schraube Schraube Mittleres Scharnier Sticker Cap Stopfen Unteres 3 Trennen Sie die Signalleitung von der K hlschrankt...

Page 14: ...Seite an 6 Setzen Sie die Gefrierschrank t r auf das untere Scharnier und mon tieren Sie das mittlere Scharnier die Schrauben die Kappen den Aufkleber und die D bel Entfernen Sie die obere Abdeckung...

Page 15: ...e connection terminal 2 Remove the lampshade with a screwdriver Any replacement or maintenance of the LED lamps is intended to be made by the manufacturer its service agent or similar qualified person...

Page 16: ...frische oder gefrorene Lebens mittel in den K hlschrank stellen schalten Sie ihn ein und lassen Sie ihn ca 2 bis 3 Stunden laufen im Sommer wenn die Umgebungstempe ratur hoch ist bis zu 4 Stunden Lass...

Page 17: ...kann zu schlechter Qualit t und so gar zum Verderben f hren Wickeln Sie die Lebensmittel vor dem Einlegen in den K hlschrank vor sichtig in eine Folie und trocknen Sie die Beh lter Dadurch wird das Ei...

Page 18: ...tkomponenten LED Lampe Regal an der T r Regal an der T r Regal Regal Kasten f r Obst und Gem se Box Box Regal an der T r Das Bild oben dient nur zur Veranschaulichung Die tats chliche Konfiguration h...

Page 19: ...freizugeben und die Extraktion der Produkte und deren Verlegung im Inneren zu erleichtern Gefrierschrank Der Niedertemperatur Gefrier schrank sorgt f r lange Frische und wird haupts chlich zur Lagerun...

Page 20: ...zeigt Anzeige bei normalem K hlschrankbetrieb und bei Fehlfunktionen Wenn eine St rung auftritt beginnen die entsprechenden Symbole zu blinken Nachstehend finden Sie Informationen zu Fehlercodes und F...

Page 21: ...hlungsmodus wird nach 24 Stunden automatisch ausgeschaltet Die Unterk hlungsfunktion kann als Unterk hlungsfunktion verwendet werden Note The quick freezing function is designed to maintain the nutri...

Page 22: ...Einschalten die T r und lassen Sie den K hlschrank auf nat rliche Weise vollst ndig trocknen Es wird empfohlen Bereiche des K hlschranks die auf die bliche Weise schwer zu reinigen sind z B schmale me...

Page 23: ...ppen Schleif mitteln z B Zahnpasta organischen L sungsmitteln z B Alkohol Aceton Verd nnern usw sehr hei em Wasser sauren oder alkalischen Substanzen da sie die Innen und Au enfl chen des K hlschranks...

Page 24: ...en Entfernen Sie vor dem Bewegen des K hlschranks alle Pro dukte befestigen Sie die Glasb den die Gem sebox die Gefrierschubladen und andere hnliche Teile des Ger ts mit einem Klebeband ziehen Sie die...

Page 25: ...ungstemperaturen l nger als gew hnlich Dies ist ein normales Ereignis Stellen Sie nicht zu viele Lebensmittel gleichzeitig in den K hlschrank Stellen Sie keine hei en Speisen in den K hlschrank Warten...

Page 26: ...inem trockenen Handtuch Anormales Rauschen Brummger usch W hrend des Betriebs kann der Kompressor Brummger usche erzeugen w hrend das Brummen beim Ein und Ausschalten besonders laut ist Dies ist ein n...

Page 27: ...ekategorie Freistehender Zweifachk hlschrank Energieeffizienz A Art der Abtauung No Frost Klimaklasse N ST T DiesesGer tistf rdenEinsatzbeiUmgebungstemperaturen von ___ C bis ___ C vorgesehen 16 43 Ai...

Page 28: ...nachdem das letzte Modell in Verkehr gebracht wurde T rgriff Professionelles Wartungs und Reparaturpersonal Mindestens 7 Jahre nachdem das letzte Modell in Verkehr gebracht wurde T rscharniere Profess...

Page 29: ...hlschr nke ndern der Farbe der Materialien des Produkts w hrend des Betriebs des Produkts K hlmittelflussger usch w hrend des Kompressorbetriebs Leichte technische Ger che von Kunststoff in einem neu...

Page 30: ...ller M G HAUSGERATE GMBH Potsdamer Str 92 10785 Berlin Tel 030 544 37 834 Fax 030 544 37 856 Fabriken Niederlassungen des Herstellers Continent Production Solutions LTD 423601 RepublikTatarstan Bezirk...

Page 31: ...WARNINGS FOR ENERGY 37 1 7 WARNINGS FOR DISPOSAL 38 2 PROPER USE OF REFRIGERATORS 39 2 1 PLACEMENT 39 2 2 LEVELING FEET 40 2 3 DOOR RIGHT LEFT CHANGE 40 2 4 CHANGING THE LIGHT 43 2 5 STARTING 44 2 6 E...

Page 32: ...lammable liquids inside this appliance The appliance has to be un plugged after use and before carrying out user maintenance on the appliance WARNING ventilation openings in the appliance enclosure or...

Page 33: ...ease respect the following instruc tions Opening the door for long peri ods n cause significant increase of the temperature in the compartments of the appliance Clean regularly surfaces that n come in...

Page 34: ...d with this symbol may result in damage to the product r endanger the per sonal safety of the user This is warning symbol It is required to operate in strict observance of instructions marked with thi...

Page 35: ...electrical appliances The power cord should be firmly contacted with the socket r else fires might be caused Please ensure that the grounding elec trode of the power socket is equipped with re liable...

Page 36: ...the finger Please be gen tle when switching off the refrigerator door to avoid falling articles Do not pick foods r containers in the freezing chamber when the refrigerator is run ning especially met...

Page 37: ...hamber of the refrigerator r otherwise the bottles r enclosed containers may crack due to freezing to cause damages 1 6 Warnings for energy 1 Refrigerating appliances might not operate consistently po...

Page 38: ...shall be kept away from n fire source and be recov ered b special recovering company with corresponding qualification other than be disposed b combustion so as to prevent damage to the environment r n...

Page 39: ...to be splashed with water so as not to affect the elec trical insulation properties of the refrigerator The refrigerator is placed in well venti lated indoor place the ground shall be flat and sturdy...

Page 40: ...et counterclockwise to lower the refrigerator c Adjust the right and left feet based on the procedures above to hor izontal level The picture above is only f reference The actual configuration will de...

Page 41: ...inge cover top hinge and the hole Top hinge cover Top hinge Hole cap Hole cap Screw Screw Middle hinge Sticker Cover Hole cap Bottom hinge 3 Remove the refrigerating door signal line Take off refriger...

Page 42: ...door nd mount it on the other side 6 Place freezing door on bottom hinge nd mount middle hinge screws screw cover sticker nd hole Re move the freezing door upper cover in stall the upper hinge sleeve...

Page 43: ...er Any replacement or maintenance of the LED lamps is intended to be made by the manufacturer its service agent or similar qualified person 1 Please take out the plug before removal Light source in th...

Page 44: ...to the mains Before putting fresh or frozen food into the refrigerator turn it on and let it run for about 2 3 hours or 4 hours in summer when the ambi ent temperature is high Leave enough free space...

Page 45: ...t in poor quality and even spoilage Before placing food inside the refrigerator wrap it carefully for ex ample with plastic wrap and wipe the containers dry This will reduce the freezing of ice on the...

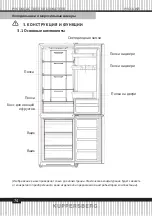
Page 46: ...URE AND FUNCTIONS 3 1 Key components LED lighting Door tray Door tray Shelf Shelf Fruits and vegetables b Drawer Drawer Door tray The picture above is only for reference The actual configuration will...

Page 47: ...shelves n be adjust ed up or down for reasonable amount of storage space and easy use Freezing chamber The low temperature freezing chamber may keep food fresh for long time and it is mainly used to s...

Page 48: ...tor the icons Super 2 3 4 6 8 and button lighten for 3s then the screen displays the setting temperature Display of normal running On the occurrence of failure the corresponding icons will give combin...

Page 49: ...ood in the freezer It can freeze the food in the shortest time If a large amount of food is frozen at one time it is recommended that the user turn on the quick freezing function and put the food in A...

Page 50: ...w sandwiches gaps or corners it is rec ommended to wipe them regularly with soft rag soft brush etc and when nec essary combined with some auxiliary tools such as thin sticks to ensure n contaminants...

Page 51: ...has automatic defrosting function Frost formed due to change of season r tem perature may also be manually removed b disconnection of the appliance from power supply r b wiping with dry towel 4 3 Out...

Page 52: ...o much food in the appliance at the same time Food shall get cool before being put into the appliance The doors are opened too frequently Doors cannot be properly closed The door is stuck b food packa...

Page 53: ...and the buzzes r loud particularly upon start r stop This is normal Creak Refrigerant flowing inside of the appliance may produce creak which is normal 6 PARAMETERS 6 1 Technical parameters Table 1 C...

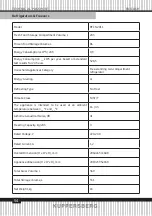
Page 54: ...liances Category Free standing two compartment refrigerator Energy Grading A Defrosting Type No Frost Climate Class N ST T The appliance is intended to be used at an ambient temperature between __ C a...

Page 55: ...model is launched on the market door handles Professional repairers and final users At least 7years after the last model is launched on the market door hinges Professional repairers and final users A...

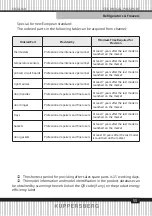
Page 56: ...nsidered as defects of the Product Refrigerators Discoloration of product materials when using the product Noise of flowing coolant during compressor operation Minor technical smells of plastic coming...

Page 57: ...rs M G HAUSGERATE GMBH Potsdamer Str 92 10785 Berlin Tel 030 544 37 834 Fax 030 544 37 856 Factories branches of the manufacturer Continent Manufacturing Solutions Ltd 423601 Republic of Tatarstan Ela...

Page 58: ...58 1 59 1 1 59 1 2 62 1 3 62 1 4 63 1 5 65 1 6 65 1 7 66 2 67 2 1 67 2 2 68 2 3 68 2 4 71 2 5 72 2 6 73 3 74 3 1 74 3 2 76 4 78 4 1 78 4 2 79 4 3 80 5 81 6 82...

Page 59: ...59 1 1 1...

Page 60: ...60 are are are EN 8 3 8...

Page 61: ...61 48 5 1 2 3 4 4 1 2 3 4 F...

Page 62: ...62 1 2 1 3...

Page 63: ...63 1 4...

Page 64: ...64...

Page 65: ...65 1 5 1 6 1 2...

Page 66: ...66 3 4 5 1 7 are are...

Page 67: ...67 2 2 1 30 10...

Page 68: ...68 2 2 1 a b c 2 3 5 16...

Page 69: ...69 1 2 3 4...

Page 70: ...70 5 6...

Page 71: ...ers 1 Please take out the plug before removal 3 Take down the lamp panel 4 Remove the connection terminal 2 Remove the lampshade with a screwdriver Any replacement or maintenance of the LED lamps is i...

Page 72: ...72 2 5 2 3 4 3 Take down the lamp panel 4 Remove the connection terminal 3 Take down the lamp panel 4 Remove th terminal...

Page 73: ...73 2 6...

Page 74: ...74 3 3 1...

Page 75: ...75 3 5...

Page 76: ...76 3 2 A 1 1 8 C 2 2 6 C 3 3 4 C 4 4 3 C 5 5 2 C 6 6 Super cooling 3 Super 2 3 4 6 8 E1 Super 2 E5 Super 3 E6 2 4 E7 Super 4 E10 2 3...

Page 77: ...It can freeze the food in the shortest time If a large amount of food is frozen at one time it is recommended that the user turn on the quick freezing function and put the food in At this time the fre...

Page 78: ...78 4 4 1 NORMAL COLD 35 C COLD NORMAL COLDER COLDER...

Page 79: ...79 4 2...

Page 80: ...80 4 3 45...

Page 81: ...81 5 5 1...

Page 82: ...82 are 6 6 1 1 C SN 10 32 N 16 32 ST 16 38 T 16 43...

Page 83: ...83 RFCN 2011 245 86 24 0 9 ___ 24 328 5 A No Frost N ST T __ C __ C 16 43 41 24 4 220 240 1 2 x x 2064x657x688 x x 2010x595x630 360 331 65...

Page 84: ...84 7 7 7 7 7 7 7 7 10 15 QR 10 32 C 16 32 C 16 38 C 16 43 C...

Page 85: ...85...

Page 86: ...86 92 10785 423601 2 4 2 4 66 141400 4 0122 00001...

Page 87: ...87 Kuppersberg 7 Kuppersberg 24 2 19 1 2 6 3 4 15...

Page 88: ...88 5 6 7 8 9 10 1 2 3 4 5 13109 97 6...

Page 89: ...89 7 8 9 10 11 12 13 14 15 3 16 17 are 7...

Page 90: ...90 1 2 3 4 5 6 7 8 Kuppersberg www kuppersberg ru...

Page 91: ...91 KUPPERSBERG KUPPERSBERG 24 KUPPERSBERG...

Page 92: ...92 7 495 236 90 67 KUPPERSBERG 8 800 250 17 18 9 00 18 00 KUPPERBERG www kuppersberg ru 1 2 3...

Page 93: ...93 13109 87 50696 2006 2 04 02 84 KUPPERSBERG 1 2 3...

Page 94: ...94 KUPPERSBERG KUPPERSBERG KUPPERSBERG KUPPERSBERG 3 7 495 236 90 67 9 00 18 00 1 2 3...

Page 95: ......

Page 96: ...Kuppersberg www kuppersberg ru info kuppersberg ru...

Reviews: