14
ETS 457.0
Assembly and installation
Safety instructions
• This appliance must be installed in accordance with the ruling regulations
and may only be used in well ventilated rooms. Please read the instructions
before installing and commissioning the appliance.
• The appliance should only be used in its newly installed condition.
• Connection to the mains, maintenance and repair of the appliance must
only be done by a duly authorized and qualified expert in accordance with
the applicable safety regulations. Work which has been improperly carried
out endangers the safety of the user!
• When the appliance has been built in it should not be possible to come into
contact with parts that are under electric current.
• If the power supply cable of this device is damaged, it must be replaced by
a special supply cable available from the manufacturer directly or the cu-
stomer service.
• The earth wire must be sufficiently long so that if the strain relief fails, the
live wires ofthe connecting cable are subjected to tension before the earth
wire.
• No changes may be made to the appliance unless with the express appro-
val of the manufacturer.
• Statutory regulations and the connection specifications issued by the local
power supply company must be strictly observed.
• If the connection plug is not accessible, protect the appliance with an all-
pole isolating device such as line safety switches, fuses, or contactors with
a contact opening gap of at least 3 mm.
• When the appliance is being connected up and when repair work is being
carried out on it, the appliance should be disconnected from the electricity
supply using one of these devices.
Conditions for building in the appliance
When unpacking the appliance, check it for transport damage. Report any such
damage to your supplier immediately.
The hob is built into a worktop opening, which must be cut in accordance with
the dimensions specified below.
The underside and front of the appliance must be protected from contact with
floor cupboards (e.g. knives, etc. accidentally poking through ventilation holes,
or contact with base-insulated cables).
The appliance must only be installed in fitted kitchen sections, where adjacent
furniture does not just out over the edge of the surface.
The wall above the wall connection strip in the area around the appliance must
be made of non-inflammable material. Wood, plastic, PVC foil etc. do not meet
this requirement.
The plastic finish or the veneer of built-in kitchen furniture must have been pro-
duced using a heat-resistant adhesive (100°C).
Minimum distance to adjacent wall cupboards hung high above the hob is 650
mm. Please take note of the instructions of the respective manufacturer of the
cooker hood.
Electrical connection
An earthed shockproof socket is required for electrical connection. The electri-
cal connection must be carried out in compliance with VDE guidelines and
should preferably be in an adjacent cabinet. The appliance has been designed
for a mains supply of 220-240 V/50 Hz. For details of electrical power input,
please refer to the Technical Data on page 15.
The connection cables must be laid in such a way that they do not heat up and
become damaged when the appliance is in operation.
Installation
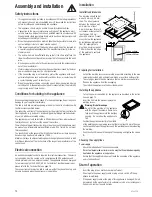
Installation dimensions
The worktop should be bet-
ween 30 mm and 40 mm
thick. The side clearance
between the hob and wall
units must be at least
55 mm. However, for practi-
cal reasons, a clearance of at
least approx. 300 mm
should be ensured. Prevent
access below the appliance
by installing an intermediate
floor, for example.There
must be a minimum gap of
100 mm from the top edge
of the worktop to ventilate
the appliance.
Preparing for installation
–
Cut out the worktop recess as accurately as possible according to the mea-
surements provided with a straight saw blade or a surface milling cutter.
The cut edges should then be sealed so that no moisture can penetrate.
–
Remove the appliance from the packaging.
–
Then install the appliance in the described manner.
Installing the appliance
–
Set up the power connection for the appliance as described in the instruc-
tions on page 14.
–
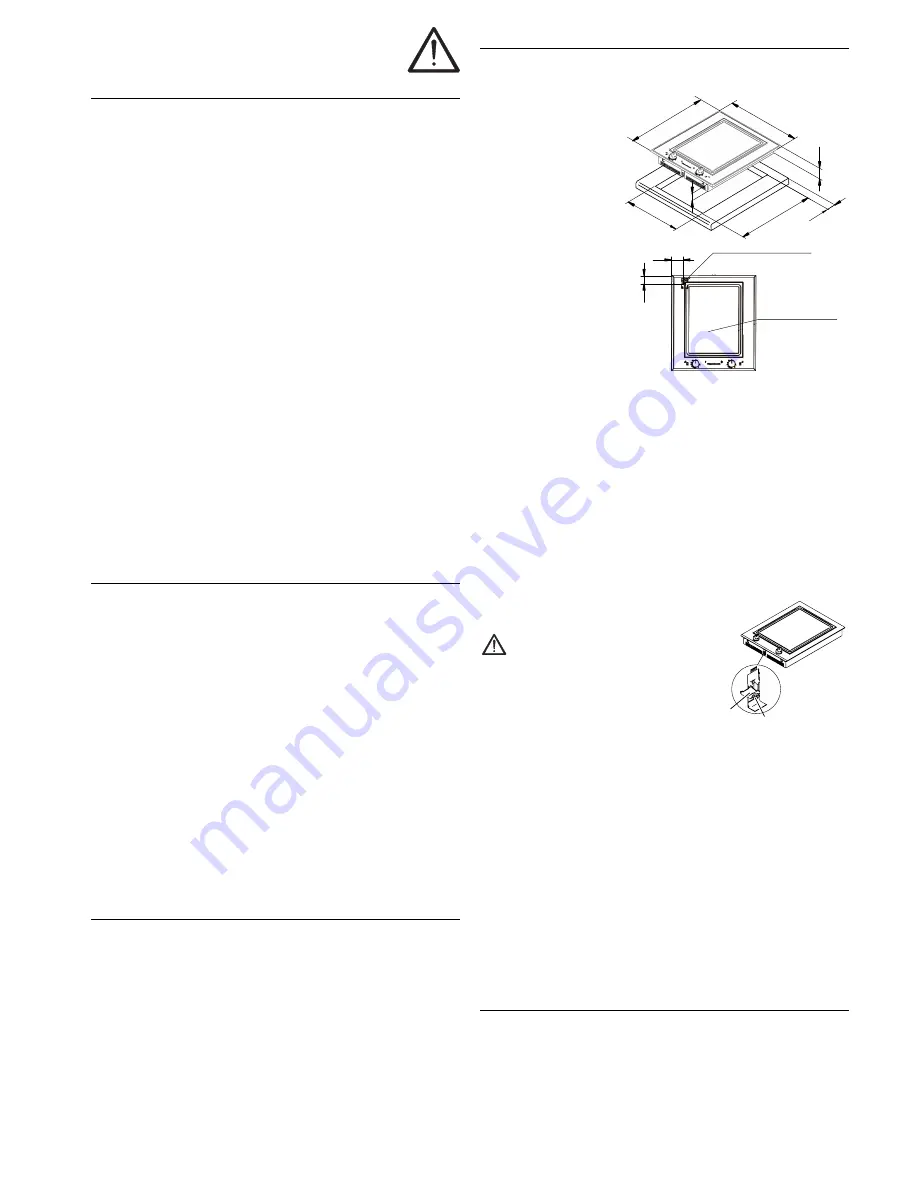
Insert the hob into the previously-prepared
worktop recess.
Warning: Risk of breakage
Do not hit the worktop of the appliance
with the edge of the ceramic frame. Care-
fully insert the appliance into the worktop
opening. Do not allow the appliance to
fall.
–
Position the appliance directly in the middle
of the worktop opening, making sure that there is at least 5 mm of free spa-
ce all around between the appliance and the worktop to avoid overheating
the worktop.
–
Push the clips (10) beneath the edge of the opening and tighten the screws
(9).
Checking the supply lines
Power supply
–
Check the installation of the connection cable.
It must not be jammed nor laid in such a way that it could be damaged by
heat when the appliance is in operation.
–
Ensure that the supply cable does not touch the underside of the appliance
and is fed directly out.
Start of operation
–
Insert the plug into an earthed shock-proof socket.
–
If damage to the power supply cable or plug occurs, switch off the ap-
pliance immediately.
–
If the power supply cable or the plug of this appliance is damaged, it must
be replaced by the manufacturer, its customer service, or a similarly quali-
fied person, in order to avoid hazards.
380
500
55
75
(E-Connectio
n)
465
519
70
70
44
Electrical Connection
Grilling surface:
350mmx260mm
9
10


