background image

18

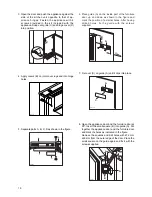
6. Place guide (A) on the inside part of the furniture

door, up and down as shown in the figure and
mark the position of external holes. After having
drilled holes, fix the guide with the screws
supplied.

20mm

A

50mm

PR166

7. Fix cover (C) on guide (A) until it clips into place.

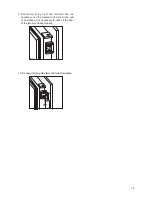
8. Open the appliance door and the furniture door at

90¡. Insert the small square (B) into guide (A). Put
together the appliance door and the furniture door
and mark the holes as indicated in the figure. 

Remove the squares and drill holes with ¯ 2 mm
at 8 mm from the outer edge of the door. Place the
small square on the guide again and fix it with the
screws supplied.

P R 3 3 / 2

C

A

8mm

PR167

A

B

3. Open the door and push the appliance against the

side of the kitchen unit opposite to that of ap-
pliance hinges. Fasten the appliance with 4
screws provided in the kit included with the
appliance. Snap vent grille (C) and hinge cover (D)
into position.

D727

C

D

4. Apply covers (B) on joint cover lugs and into hinge

holes.

D013

B

B

5. Separate parts A, B, C, D as shown in the figure.

PR266

A

B

C

D

Summary of Contents for IKE 167-6

Page 1: ...n store them in a safe place Important Lire attentivement et ranger soigneusement ce mode d emploi Belangrijk Beslist lezen en bewaren Importante È necessario leggere attentamente queste istruzioni e conservarle con cura Importante Leerlas imprescindiblemente y guardarlas Integrierte Einbau KŸhlgerŠte Integrated refrigerator Réfrigérateur à intégrer Integreerbare koelkasten Frigoriferi integrabili...

Page 2: ...uired to install this appliance should be carried out by a qualified electrician or competent person Ensure that the appliance does not stand on the electrical supply cable Do not use electrical appliances inside the appliance Do not keep carbonated drinks or bottles in the freezer compartment The glass bottles may break Ice lollies can cause Ôfrost freezer burnsÕ if consumed straight from the fre...

Page 3: ...e PS polystyrene PP polypropylene All materials are environmentally sound Disposal of old Appliances Information concerning collection schedules or locations can be obtained from your local Council or Environmental Health Office Use and Control Before Use Wait two hours before connecting the appliance to allow the oil to flow back in the compressor Before using the appliance for the first time was...

Page 4: ...ge of food packages of various sizes the central door shelf can be adjusted in height D338 CP1OEM Hints Saving Energy Pay careful attention to where the cabinet is placed See the section ÒInstallationÓ When installed correctly the cabinet will consume less energy Try to avoid keeping the doors open for long periods or opening the doors too frequently as warm air will enter the cabinet and cause th...

Page 5: ...ly perfumed cleaning products or wax polishes to clean the interior as these will damage the surface and leave a strong odour Clean the inside with warm water and bicarbonate of soda Rinse and dry thoroughly To guarantee a safe operation of the fridge once a year remove the ventilation grille at the base and clean the air channels with a vacuum cleaner When the appliance is not in use Disconnect t...

Page 6: ...in bowl Sometimes this is normal Temperature control may cause clicking sounds when the system is connected or disconnected The injected cooling gas may produce a gurgling sound while passing through the tubes The motor may cause a humming noise and or slight bumping The insulation material used has a tendency to slighly increase noise levels how ever it allows for much better insulation and a low...

Page 7: ...appliance so as not to cause any damages to the cooling unit with consequent possible fluid leakages During normal operation the condenser and compressor at the back of the appliance heat up considerably Always ensure that there is adequate ventilation as a failure to do this will result in component failure and possible food loss See installation instructions Important if the supply cord is damag...

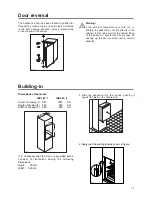
Page 8: ...of the gasket or accelerate this process by heating up the part involved with a normal hairdrier D163 B A Building in Dimensions of the recess IKE 167 7 IKE 247 8 Height of housing 1 880 1225 mm Depth of housing 2 550 550 mm Width of housing 3 560 560 mm It is necessary that the niche is provided with a conduct of ventilation having the following dimensions Depth 50 mm Width 540 mm PR0 540 50 3 2 ...

Page 9: ... and mark the holes as indicated in the figure Remove the squares and drill holes with 2 mm at 8 mm from the outer edge of the door Place the small square on the guide again and fix it with the screws supplied PR33 2 C A 8mm PR167 A B 3 Open the door and push the appliance against the side of the kitchen unit opposite to that of ap pliance hinges Fasten the appliance with 4 screws provided in the ...

Page 10: ... of the furniture door be necessary use the clearance of slots At the end of operations it is necessary to check if the door of the furniture closes properly PR168 10 Fix cover D on guide B until it clips into place PR167 1 D B ...

Page 11: ...nkirchen Küppersbuschstr 16 D 45883 Gelsenkirchen Telefon 02 09 4 01 0 Telefax 02 09 4 01 3 03 www kueppersbusch de Küppersbusch Ges m b H Eitnergasse 13 1231 Wien Telefon 01 8 66 80 0 Telefax 01 8 66 80 72 www kueppersbusch at e Mail verkauf kueppersbusch at ...

Reviews: