background image

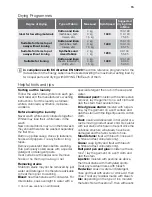
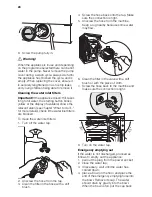
on the hose. Empty the bowl. Repeat the
procedure until water stops flowing out;

5. clean the pump if necessary as previously

described;

6. replace the emergency emptying hose in

its seat after having plugged it;

7. screw the pump again.

Frost precautions

If the machine is installed in a place where the
temperature could drop below 0°C, proceed
as follows:
1. close the water tap and unscrew the wa-

ter inlet hose from the tap;

2. place the end of the emergency emptying

hose and that of the inlet hose in a bowl
placed on the floor and let water drain
out;

3. screw the water inlet hose back on and

reposition the emergency emptying hose
after having put the cap on again.

By doing this, any water remaining in the ma-
chine is removed, avoiding ice forming and
consequently damage to the appliance.
When you use the machine again, make sure
that the ambient temperature is above 0°C.

What to do if…

Certain problems are due to lack of simple
maintenance or oversights, which can be
solved easily without calling out an engineer.
Before contacting your local Service Centre,
please carry out the checks listed below.
During machine operation it is possible that
the 

yellow

 pilot light of button 

8

 blinks, one

of the following alarm codes appears on the
display and at the same time some acoustic
signals sound every 20 seconds to indicate
that the machine is not working:

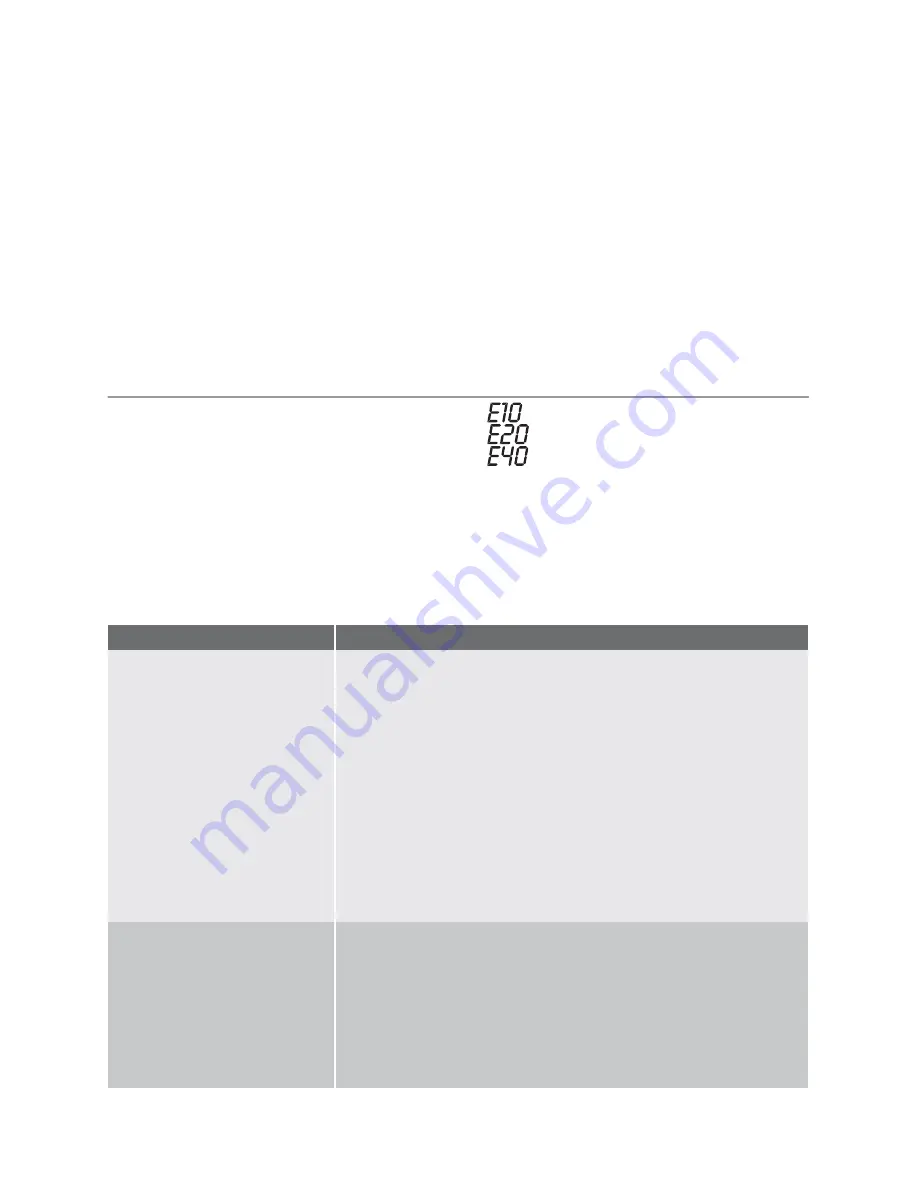
 : problem with the water supply

 : problem with the water draining

 : door open

Once the problem has been eliminated,
press the button 

8

 to restart the programme.

If after all checks, the problem persists, con-
tact your local Service Centre.

Problem

Possible cause/Solution

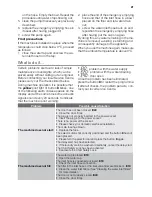
The machine does not start:

The door has not been closed. 

E40

• Close  the  door  firmly.
The plug is not properly inserted in the power socket.
• Insert the plug into the power socket.
There is no power at the socket.
• Please check your domestic electrical installation.
The main fuse has blown.
• Replace the fuse.
The selector dial is not correctly positioned and the button 

8

 has not

been pressed.
• Please turn the selector dial and press the button 

8

 again.

The delay start has been selected.
• If the laundry are to be washed immediately, cancel the delay start.
The Child Safety Lock has been activated.
• Deactivate the Child Safety Lock.

The machine does not fill:

The water tap is closed. 

E10

• Open  the  water  tap.
The inlet hose is squashed or kinked. 

E10

• Check the inlet hose connection.
The filter in the inlet hose or the inlet valve filter are blocked. . 

E10

• Clean the water inlet filters. (See "Cleaning the water inlet filters"

for more details) .

The door is not properly closed. 

E40

• Close  the  door  firmly.


 21

Summary of Contents for IWT 1459.2 W

Page 1: ...User manual Washer dryer IWT 1459 2 W ...

Page 2: ...tact your supplier If the appliance is delivered in the winter months when there are minus tempera tures Store it at room temperature for 24 hours before using for the first time General safety It is dangerous to alter the specifications or attempt to modify this product in any way During high temperature wash pro grammes the door glass may get hot Do not touch it Make sure that small pets do not ...

Page 3: ...ne washed Garments which have been in contact with volatile petroleum products should not be machine washed If volatile cleaning fluids are used care should be taken to ensure that the fluid is removed from the garment before placing in the machine As some duvets and eiderdowns should be washed dried in large commercial ma chines because of their bulk please check with the manufacturer of the item...

Page 4: ...wise until the groove is horizontal If necessary use a coin To disable this device and restore the pos sibility of closing the door rotate the but ton counterclockwise until the groove is vertical Product description Your new appliance meets all modern re quirements for effective treatment of laundry with low water energy and detergent con sumption The NEW JET system allows total use of de tergent...

Page 5: ...sh programme The stain remover is added during the STAIN Action phase in the main wash Compartment for powder or liquid deter gent used for main wash Compartment for liquid additives fabric softener starch Follow the product manufacturer s recom mendations on quantities to use and do not exceed the MAX mark in the detergent dispenser drawer Any fabric softener or starching additives must be poured...

Page 6: ...ti cally on the basis of the maximum recom mended load for each type of fabric After the programme has started the time remaining is updated every minute Selected drying time After selecting a drying programme the dry ing time is displayed in minutes and or hours see paragraph Drying only After the pro gramme has started the remaining time is updated every minute Alarm codes In the event of operat...

Page 7: ...g the door is opening light off the door can be opened First use Ensure that the electrical and water connections comply with the installa tion instructions Remove the polystyrene block and any material from the drum Before the first wash run a cotton cy cle at the highest temperature without any laundry in the machine to remove any manufacturing residue from the drum and tub Pour 1 2 a measure of...

Page 8: ...sure out the amount of deter gent required pour it into the main wash compartment and if you wish to carry out the prewash phase or to perform the stain function pour the detergent or the stain remover into the compartment marked 2 If required pour fabric softener into the compartment marked the amount used must not exceed the MAX mark in the drawer Close the drawer gently Select the required prog...

Page 9: ...mes and the options see chap ter Washing Programmes Select the STAIN option Button 3 Select this option to treat heavily soiled or stained laundry with stain remover extended main wash with time optimised stain action phase The relevant light will light up This option is not available with a tempera ture lower than 40 C If you wish to perform a programme with the stain option pour stain remover in...

Page 10: ...ble only by resetting it Turn the programme selector dial to and then to the new pro gramme position Start the new programme by pressing the 8 button again The washing water in the tub will not emptied out Interrupting a programme Press the button 8 to interrupt a programme which is running the corresponding light starts blinking Press the button again to re start the programme Cancelling a progra...

Page 11: ...tton 8 to start the programme The selected drying time on the display de creases by one unit every minute Note The programme time will automatically increase by some minutes Note The different type of cottons towelling sheets shirts and so on or eventual laundry rolling up during spinning phase may cause a not uniform dryness So in the exceptional case that at the end of the cycle the laundry rema...

Page 12: ...mmes Programme Maximum and Minimum Temperature Cycle Description Maximum Spin Speed Maximum Fabrics Load Type of Laundry Options Detergent Compartment COTTON 95 30 Main wash Rinses Long spin Maximum spin speed 1400 rpm Max load 6 kg Reduced load 3 kg For white and coloured cotton normally soiled items SPIN NO SPIN STAIN1 TIME SAV ING2 EXTRA RINSE COTTON ECONOMY 40 Main wash Rinses Long spin Maximu...

Page 13: ... EXTRA RINSE WOOL HANDWASH 30 Cold Main wash Rinses Short spin Maximum spin speed 1200 rpm Max load 2 kg Washing programme for machine washable wool as well as for hand washable woollens and delicate fabrics Note A single or bulky item may cause imbalance If the appliance doesn t perform the final spin phase add more items redistribute the load manually and then se lect the spinning programme SPIN...

Page 14: ...pm Max load 3 kg This programme may be used for quick wash for sport items or cotton and synthetic items lightly soiled or worn once SPIN COTTON ECONOMY 60 Main wash Rinses Long spin Maximum spin speed 1400 rpm Max load 6 kg White and fast coloured cotton This programme can be selected for slightly or normally soiled cotton items The temperature will decrease and the washing time will be extended ...

Page 15: ... before washing Rub particularly soiled areas with a special detergent or detergent paste Treat curtains with special care Remove hooks or tie them up in a bag or net Removing stains Stubborn stains may not be removed by just water and detergent It is therefore advisable to treat them prior to washing Blood treat fresh stains with cold water For dried stains soak overnight in water with a special ...

Page 16: ... use Use less detergent if you are washing a small load the laundry is lightly soiled large amounts of foam form during wash ing Degrees of water hardness Water hardness is classified in so called de grees of hardness Information on hardness of the water in your area can be obtained from the relevant water supply company or from your local authority If the water hard ness degree is medium or high ...

Page 17: ... shrinking Care and cleaning You must DISCONNECT the appliance from the electricity supply before you can carry out any cleaning or maintenance work Descaling The water we use normally contains lime It is a good idea to periodically use a water softening powder in the machine Do this separately from any laundry washing and according to the softening powder manufac turer s instructions This will he...

Page 18: ...sting foreign bodies in the washing or tap water containing iron Important Do not clean the drum with acidic descaling agents scouring agents containing chlorine or iron or steel wool 1 Remove any rust deposits on the drum with a cleaning agent for stainless steel 2 Run a washing cycle without any washing to clean off any cleaning agent residues Programme Short Cotton Programme at maximum temperat...

Page 19: ...wait until the water has cooled down 3 Place a container close to the pump A to collect any spillage A B 4 Release the emergency emptying hose B place it in the container and remove its cap cover 5 When no more water comes out un screw the pump and remove it Always keep a rag nearby to dry up spillage of water when removing the pump 6 Remove any objects from the pump im peller by rotating it 7 Put...

Page 20: ... inlet filters 1 Turn off the water tap 2 Unscrew the hose from the tap 3 Clean the filter in the hose with a stiff brush 4 Screw the hose back onto the tap Make sure the connection is tight 5 Unscrew the hose from the machine Keep a rug nearby because some water may flow 6 Clean the filter in the valve with a stiff brush or with the piece of cloth 7 Screw the hose back to the machine and make sur...

Page 21: ...ollowing alarm codes appears on the display and at the same time some acoustic signals sound every 20 seconds to indicate that the machine is not working problem with the water supply problem with the water draining door open Once the problem has been eliminated press the button 8 to restart the programme If after all checks the problem persists con tact your local Service Centre Problem Possible ...

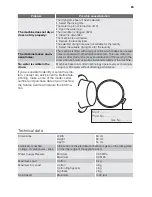
Page 22: ...been treated prior to washing Use commercial products to treat the stubborn stains The correct temperature was not selected Check if you have selected the correct temperature Excessive laundry load Reduce the laundry load The door will not open The programme is still running Wait the end of washing cycle The door lock has not been released Wait until the pilot light 10 3 goes off There is water in...

Page 23: ...g as well as increased stability of the machine No water is visible in the drum Machines based on modern technology operate very economically using very little water without affecting performance If you are unable to identify or solve the prob lem contact our service centre Before tele phoning make a note of the model serial number and purchase date of your machine the Service Centre will require ...

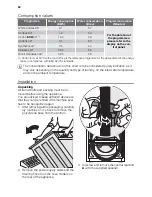
Page 24: ...on data shown on this chart is to be considered purely indicative as it may vary depending on the quantity and type of laundry on the inlet water temperature and on the ambient temperature Installation Unpacking All transit bolts and packing must be re moved before using the appliance You are advised to keep all transit devices so that they can be refitted if the machine ever has to be transported...

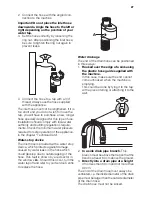
Page 25: ...and the six smaller bolts C C C B B Remove the bracket D D 5 Tighten up the six smaller bolts C C C 6 Fill the smaller upper hole and the two large ones with the corresponding plastic plug caps supplied in the bag containing the instruction booklet 25 ...

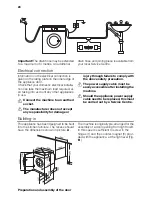
Page 26: ...minium foil on the side facing the cooker or stove must be inserted between the two ap pliances The machine must not be installed in rooms where the temperature can drop below 0 C The water inlet hose and the drain hose must not be kinked Please ensure that when the appliance is in stalled it is easily accessible for the engineer in the event of a breakdown Carefully level by screwing the adjustab...

Page 27: ...e is provided with a water stop device which protects against damage caused by water leaks in the hose which could develop due to natural ageing of the hose This fault is shown by a red sector in the window A Should this occur turn the water tap off and refer to your Service Centre to replace the hose A Water drainage The end of the drain hose can be positioned in three ways 1 Hooked over the edge...

Page 28: ...cept any responsibility for damage or injury through failure to comply with the above safety precaution The power supply cable must be easily accessible after installing the machine Should the appliance power supply cable need to be replaced this must be carried out by a Service Centre Building in This appliance has been designed to be built into the kitchen furniture The recess should have the di...

Page 29: ...Fig B sup plied with the appliance Mounting the door Fix the hinges 1 to the machine by means of the M5x15 screws 3 Fig B The hing es can be adjusted to compensate for possible uneven thickness of the door To align the door perfectly it is necessary to loosen the screw 3 Fig B adjust the door and tighten the screw again Counter magnet 6 The appliance is prearranged for a mag netic closure of the d...

Page 30: ...1 2 3 7 6 5 4 30 ...

Page 31: ...31 ...

Page 32: ...132 952 820 00 222009 ...

Reviews: