15
GB
○
○
○
○
○
○
○
○
○
○
○
○
○
○
○
○
○
○
○
○
○
○
○
○
○
○
○
○
○
○
○
○
○
○
○
○
○
○
○
○
○
○
○
○
○
○
○
○
○
○
○
○
○
○
○
○
○
○
○
○
○
○
○
○
○
○
○
○
○
○
○
○
○
○
○
○
○
○
○
○
○
○
○
○
○
○
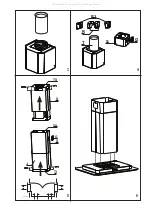
• Fitting the telescopic chimney.
• Electrical connection and testing.
• Fitting the hood canopy
Installing the Frame
The frame is suitable for fixing to the ceiling or to a
wooden buttress of suitable thickness, which must
be firmly anchored to the ceiling or to other bearing
structures.
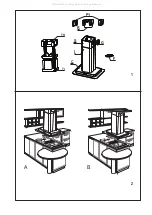
• Using a plumb line or similar tool, identify and mark
the centre on the ceiling or buttress, starting from the
centre of the cooking appliance.
• Use the cardboard template provided to mark the
ceiling or wooden buttress, making sure that the
centres coincide and lining up one of the two axes (A
or B) of the template so that it is parallel with the long
side of the cooking appliance.
• Mark the position of the 4 fixing holes indicated on the
drilling template.
• Drill the holes as follows:
- Ceiling: 4 holes Ø 10 mm to fix the frame in position;
- Buttress: 4 holes Ø 8 mm to fix the frame in position.
Fixing to the Ceiling
Attention: Due to the many differing types of ceiling
construction, the choice of fixings is left to the
discretion of the installer. It is necessary to emphasise
that the fitting has to be absolutely accurate because
of the weight of the cooker hood and because of the flexing caused by accidental lateral
stresses on the appliance. Only the following types of ceiling are suitable for installing
the Island cooker hood:
• Solid concrete ceiling: use dowels for concrete, not supplied.
• Solid wooden buttress ceiling: use Ø 10 mm wood screws with a minimum length of 120
mm, not supplied.
• Cavity ceiling with inner space, having a wall thickness of about 20 mm; use, in this case
only, the 4 dowels and screws supplied in bag (1). Once fixed, make sure that the base
is absolutely stable, even when the metal frame is subjected to lateral stress. In all other
cases, if the ceiling is not strong enough in the area where the hood is to be fixed, the
installer must strengthen the area using suitable plates and counterplates anchored to
resistant structures.
Fixing to the Wooden Buttress
• Connect the base of the frame to the beam using the 4 screws size 5.2x70 with nuts and
washers, provided in bag (1)
TS
TI
4324665 01 - 001201
All manuals and user guides at all-guides.com


