

12
GB
Indication of saturation of the metal grease filters
After
200 hours
use,
one quick flash of the LED 1
will indicate that you must clean the metal grease
filters. (See chapter on ‘Maintenance’).
To reset the 200 hours timer back to zero requires the motor and lights must be switched ‘OFF’; then and
proceed as follows:
Press the LED button ‘+’ for 3 to 4 seconds and the LED lights 1,2,3, 4 and 5 will flash to confirm the
programme has been reset to zero.
Indication of saturation of the active charcoal filter
After
400 hours
use,
two quick flash of the LED 1
will indicate that you must replace the active charcoal
filter and clean the metal grease filters. (See chapter on ‘Maintenance’).
To reset the 400-hour timer the motor and lights must be switched ‘OFF’.
Push the LED button ‘+’ for 10 seconds.
One flash of the LED lights 1,2,3,4 and 5 = function is switched ‘OFF’.
Two flashes of the LED lights 1,2,3,4 and 5 = function is switched ‘ON’.
Instructions for replacing the active charcoal filter are given in the chapter on ‘Recycling’.
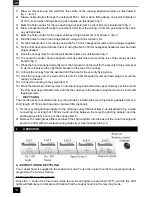
Setup Process
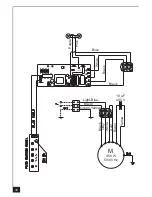
Modification: How to adjust the internal microprocessor data to suit the type of motor fitted to
this appliance and the supply frequency of 50 or 60 Hz..
1 - Disconnect the cooker hood from the mains supply.
2 - Push the button 0/1 MOTOR.
3 - Reconnect the mains supply while pushing the button 0/1 MOTOR for at least 2 seconds.
4 - Release the button 0/1 MOTOR (the Leds flash for about 3 seconds : capacity’s confirmation SETUP
PROCESS).
5 - While the LED is flashing select the motor type used while pushing one of the 5 buttons in accord-
ance with the following:
BUTTON 0/1 Light
:
Motor EBM PRO 220-240 V AC 50/60 Hz.
BUTTON 0/1 Motor
:
Motor FABER 8/28 e 8/50 220-240 V AC 50/6 0 Hz.
BUTTON Speed ( - )
:
Motor EBM MISTRAL 220-240 V AC 50/60 Hz.
BUTTON Speed (+ )
:
Motor EBM PRO 220-240 V AC 50/60 Hz.
BUTTON Intensive speed
:
Motor FABER K40-K50 220-240 V AC 50/60 Hz.
N.B. : If you have not selected a motor type while the LED is flashing the microprocessor will automati-
cally select the default motor EBM PRO 220 - 240 V AC 50/60 Hz.
5
USEFUL HINTS
• To obtain the best performance it is advisable to switch ‘ON’ the cooker hood a few minutes (in the
boost setting) before you start cooking and you should leave it running for approximately 15 minutes after
finishing.
•
IMPORTANT: NEVER DO FLAMBÉ COOKING UNDER THIS COOKER HOOD
•
Do not leave frying pans unattended during use as over-heated fat and oil might catch fire.
•
Do not leave naked flames under this cooker hood.
•
Switch ‘OFF’ the electric and gas before removing pots and pans.
•
Ensure heating areas on your hotplate are covered with pots and pans when using the hotplate
and cooker hood simultaneously.
6
MAINTENANCE
Before carrying out any maintenance or cleaning isolate the cooker hood from the mains supply.
The cooker hood must be kept clean; a build up of fat or grease can be a fire hazard.
Summary of Contents for KD 12450
Page 1: ......
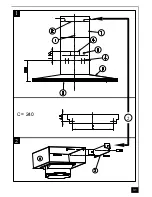
Page 9: ...31 2 2 1 C 240 ...
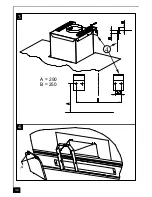
Page 10: ...32 3 4 4 A 290 B 250 A ...
Page 11: ...33 ...


