background image

15

GB

INSTALLATION

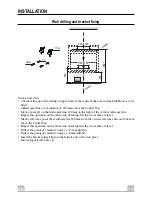
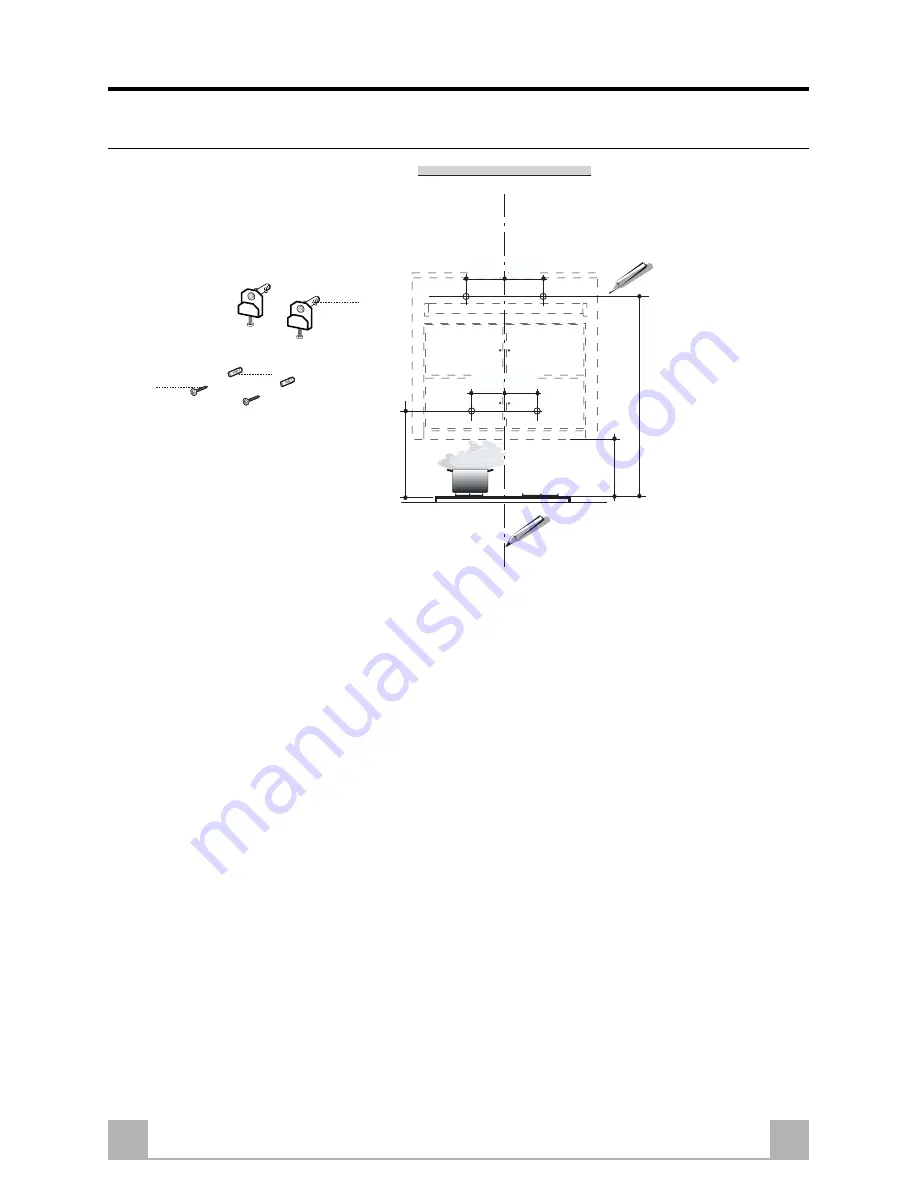
Wall drilling and bracket fixing

On the wall, draw
• a Vertical line up to the ceiling or upper limit, at the centre of the area in which the Hood is to be

fitted;

• a Horizontal line at a minimum of  960 mm above the Cooker Top.
• Mark a point 

(1)

 on the horizontal line, 200 mm to the right of the vertical reference line.

• Repeat this operation on the other side, checking that the two marks are level.
• Mark a reference point 

(2)

 as indicated at 180 mm from the vertical reference line and 362 mm

above the Cooker Top.

• Repeat this operation on the other side, checking that the two marks are level.
• Drill at the points 

(1)

 marked, using a ø 12 mm drill bit.

• Drill at the points 

(2)

 marked, using a ø 8 mm drill bit.

• Insert the bracket plugs 

11a

 into the holes 

1

 and screw into place.

• Insert plugs 

11

 into holes 

2

.

11a

1

1

11

12a

2

2

180

200 200

960

362

180

250

Summary of Contents for KD 9550

Page 1: ...KD 9550 KD 9550 KD 9550 KD 9550 KD 9550 Bedienungsanleitung Instructions Booklet Mode d emploi Libretto Istruzioni Gebruiksaanwijzing Manual de instrucciones Manual de instruções NL IT FR GB DE ES PT ...

Page 2: ...recommendations contained in this Instruction Manual your appliance will give you constant high performance and will remain efficient for many years to come RECOMMENDATIONS AND SUGGESTIONS 13 CHARACTERISTICS 14 INSTALLATION 15 USE 17 MAINTENANCE 18 ...

Page 3: ... room in order to prevent the backflow of exhaust gas The kitchen must have an opening communicating directly with the open air in order to guarantee the entry of clean air USE The extractor hood has been designed exclusively for domestic use to eliminate kitchen smells Never use the hood for purposes other than for which it has ben designed Never leave high naked flames under the hood when it is ...

Page 4: ...with Controls Light Blower Filters 8 1 Directional Air Outlet grille 16 1 Filter cover Ref Q ty Installation Components 11 2 Wall Plugs 11a 2 Wall Plugs SB 12 10 12a 2 Screws 4 2 x 44 4 12c 4 Screws 2 9 x 6 5 12d 2 Screws 2 9 x 9 5 Q ty Documentation 1 Instruction Manual 1 16 12c 11 12a 12d 8 11a ...

Page 5: ...line Repeat this operation on the other side checking that the two marks are level Mark a reference point 2 as indicated at 180 mm from the vertical reference line and 362 mm above the Cooker Top Repeat this operation on the other side checking that the two marks are level Drill at the points 1 marked using a ø 12 mm drill bit Drill at the points 2 marked using a ø 8 mm drill bit Insert the bracke...

Page 6: ...Version of the hood the optional Ducting chimney kit must be purchased RECIRCULATION VERSION AIR OUTLET To install the Recirculation Version of the hood the optional Activated charcoal cartridge kit must be purchased Screw the filter cover onto the air outlet using four screws 12c 2 9 x 12 5 Fix the directional grille 8 on the recirculation air outlet using the 2 screws 12d 2 9 x 9 5 provided ELEC...

Page 7: ...of any residual smells Can be enabled at any speed and is disabled by pressing the button briefly T3 Speed on Third speed T4 Speed Fixed Max speed Flashing Intensive speed Suitable for the strongest cooking vapours and odours The function becomes active when the button is pushed for about 2 seconds After 10 minutes of functioning it turns off automatically This function can be interrupted by means...

Page 8: ...e and must be cleaned when led S1 flashes or at least every 2 months of opera tion or more frequently for particularly heavy us age Remove the filters one at a time by pushing them towards the back of the group and pulling down at the same time Wash the filters taking care not to bend them Allow them to dry before refitting When refitting the filters make sure that the handle is visible on the out...

Page 9: ...ation version Hoods the Filter saturation alarm can be enabled on installation or at a later date Turn the Lights and the suction Motor off Disconnect the Hood using the Main switch or the double pole switch on the mains power supply Restore the connection by pressing and holding T1 Release the button All five LEDs are turned on Within 3 seconds press T1 until LEDs T1 and T4 flash in confirmation ...

Reviews: