6 | Function description
Temporarily editing the soldering profile in the [Rework] tab
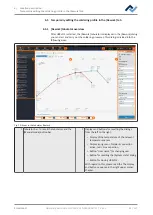
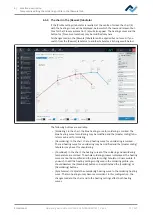
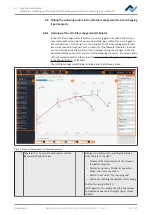
6.5.4.1 The heating curves in the [Rework] tab
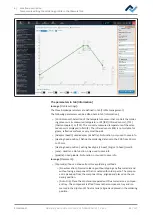
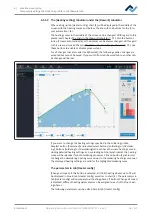
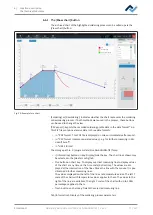
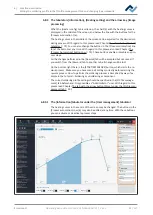
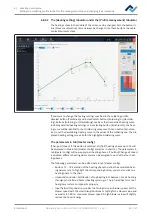
The heating curve is determined by the selected soldering profile. Depending on
how often the heating curve is kinked, there will be 2, 3 or 4 heating phases. With
regard to this, please also read Chapter Create, copy, delete and save soldering
profiles in the [Profile management] tabulator [
82]. Temperature, duration and
heat output (°C/s) can be assigned to each heating phase.
– The heating curves in the chart may only be set if the [Soldering] or [Desolder-
ing] button above the chart has been adjusted.
– Soldering profiles classified as "linear" have two heating phases, which cannot
be set differently.^
– Soldering profiles classified as "bent once" (kinked once) always have three
heating phases that can be set individually.
– Soldering profiles classified as “bent twice” (kinked twice) and “soak zone” al-
ways have three heating phases that can be set individually. The plateau is the
soldering process phase with the hottest temperature, which precedes the
cooling phase. The plateau is always flat, that is, temperature is always con-
stant.
– The [Tinit] point is the minimum temperature at which the process is depicted
in the chart.
– [TP] (pipette temperature) is the temperature at which the pipette moves to
the component to lift it. Only when desoldering.
– TL: (Liquidus temperature) Temperature at which the solder becomes liquid.
No function. You can highlight the TL temperature with this.
Cooling ventilation will start after the plateau phase and run until the T5 point set
temperature is reached. At the end of the plateau phase, the heaters are switched
off, while the component is lifted during desoldering.
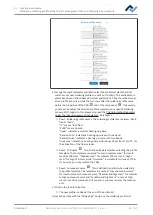
Setting the heating curves
– To simultaneously change the temperature and the heating phase duration:
Click on one of the points [Tinit], T1, T2 ... on the heating curve and keep the
mouse button pressed until the temperature indicated there is displayed in
bold. Now move the point by pressing the mouse button.
– To change temperature:
In the point to be changed, click on the temperature displayed there. Enter the
desired temperature or use the “Up Arrow” and “Down Arrow” keys to change
the temperature value.
– To change the heat output:
click on the value of the heat output (°C/s) to be changed in the heating phase.
Enter the new value. The maximum heat output is 2.5 K/s (2.5 °C/s).
The displayed heat output can be switched in the [Administration ] tab
between K/s and °C/s.
– To change the heating phase duration:
Click on the time value (s) to be changed in the heating phase. Enter the de-
sired duration (in seconds) or use the “Up Arrow” and “Down Arrow” keys to
change the duration value.
– To change [TP] (pipette temperature):
Click on the [TP] temperature value. Enter the desired temperature to start lift-
ing the pipette or use the “Up Arrow” and “Down Arrow” keys to change [TP].
– To change [TL] (liquidus temperature):
Click on the [TL] temperature value. Enter the desired liquidus temperature or
use the “Up Arrow” and “Down Arrow” keys to change the [TL] number.
Ersa GmbH
Operating instructions HR 550 XL EN 3BA00247-01 | Rev. 1
73 / 157

