B--2
Updating PC3 Software and Objects
The most common use of the Bootloader menu is to update your PC3 using new versions of
software and objects supplied by Kurzweil. New versions will be made periodically as we add
new features or improve performance; download these free upgrades from our website at
www.kurzweilmusicsystems.com.
There are two ways to send files to the PC3: using an xD memory card, or via the USB cable
connected to a computer. The Bootloader recognizes both methods, and will choose the one that
is active when requested, i.e. a card plugged into the socket on the rear panel or the USB cable
plugged in to an active computer supporting USB communications.
To use a card you’ll need a valid xD card (16MB to
256
MB cards are currently supported) and a
card writer that will allow you to copy files to the card from a computer. Most modern Windows
and MacOS computers support card writing in a very straightforward way. You should be able
to drag and drop the PC3 files right onto the card directory. After the files are copied, remove the
card from the card writer and place it in the xD slot on the rear panel of the PC3. The card
contacts face upward.
To use a USB transfer, you should plug the USB cable into the PC3 and the computer. After you
enter the bootloader menu, the computer should recognize that a new device is available having
the name “KurzweilPC3”. Files can be dragged and dropped directly to this device icon and will
be immediately available on the PC3.
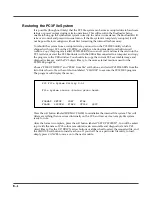
The UPDATE IMAGE menu looks like this:
Use the soft buttons below the display to choose the appropriate module to update. Most of the
time you’ll want to choose “MAIN IMAGE” or “MAIN OBJECT”. The executable image file will
be a file with a name like: PC3SY150.BIN. The object library file will have a name like:
OBJ120.PC3. After choosing a module type to load, the PC3 will present a list of files available
on the active transfer media (card or USB). If both a card and a USB cable are plugged in and
have files on them, you will be offered a choice.
Use the UP and DOWN arrow buttons or the alpha wheel to choose a file from the file list
displayed on the screen. The asterisk on the left side points to the file selected. If there are
subdirectories on the card, you can use the soft buttons labeled DOWN and UP to navigate
through them. When you’ve selected the file you want to install, press the soft button labeled
CHOOSE to perform the installation.
If you have updated an image but wish to return to the earlier version, you can use the
RESTORE OLDER feature in the UPDATE IMAGE menu. You will again be asked to choose the
image to restore. Note that only one version of the previous image is available to be restored. If
you’ve restored once, another restore will bring back the most recently updated version.
What module do you want to update?
MAIN DIAG MAIN ALT RESTORE
IMAGE IMAGE OBJECT OBJECT OLDER <back>
Summary of Contents for PC3
Page 24: ...1 6 Introduction Options ...
Page 50: ...4 4 The Operating Modes Using the Modes ...
Page 174: ...7 54 Setup Mode The Utility Soft Buttons ...
Page 178: ...8 4 Quick Access Mode Making Your Own QA Banks ...
Page 204: ...9 26 Effects Mono Algorithms ...
Page 266: ...A 2 MIDI Implementation Chart ...
Page 308: ...Index x ...


