6.7 Castors
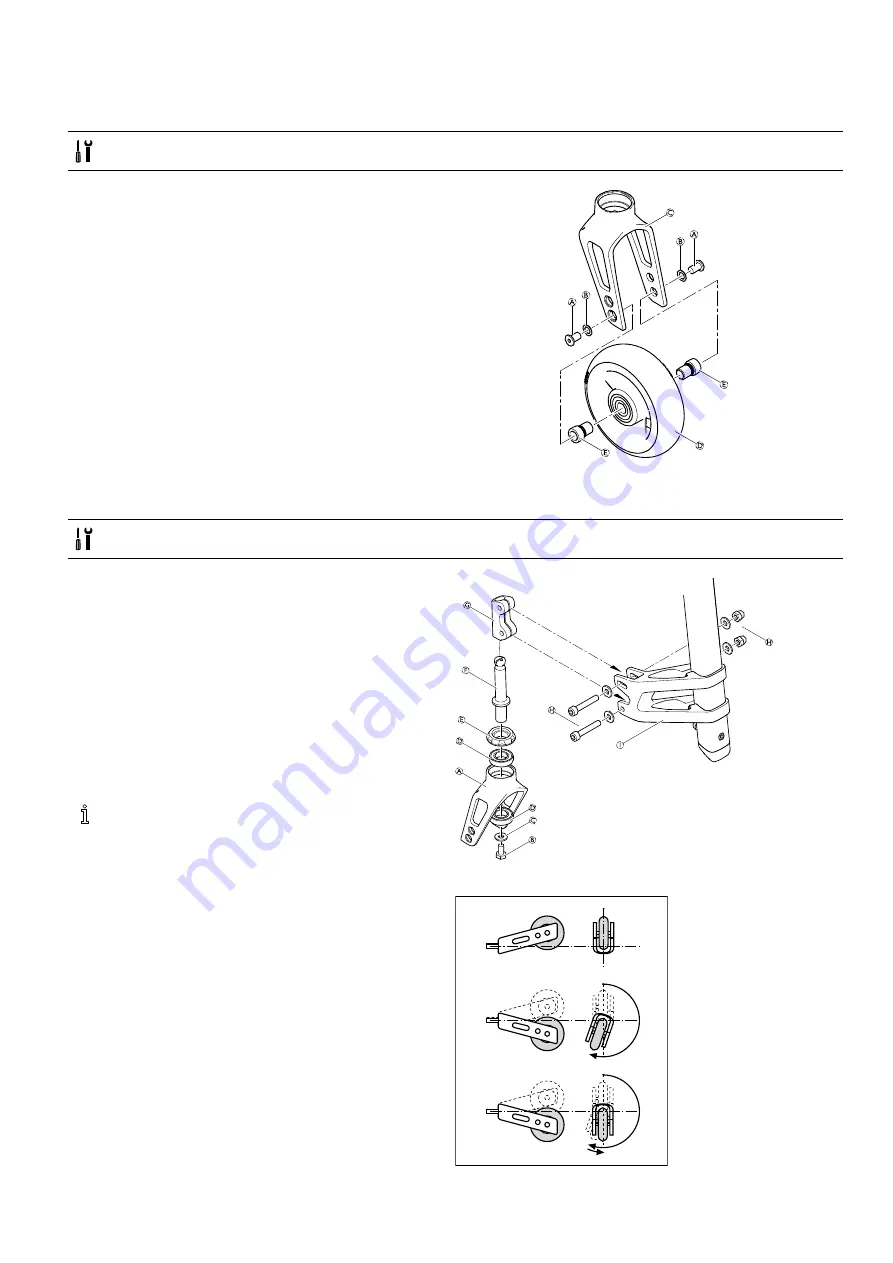
6.7.1 Replacing the castor wheel
Allen key (3 mm)
■□□
1.
Remove the screws
A
and washers
B
.
2.
Remove the castor wheel
D
from the castor fork
C
.
3.
Place the sleeves
E
in the bearing of the new castor
wheel.
4.
Place the castor wheel with sleeves in the required
position of the fork.
5.
Secure the castor wheel to the fork using screws and
washers.
A
= 4 Nm
Function check:
The wheel may not wobble, but must rotate easily.
6.7.2 Replacing the castor fork
Allen key (5 mm) / Socket spanner (10 mm)
■■□
1.
Remove the castor wheel, see
.
2.
Remove bolt
B
, washer
C
, the castor fork
A
with
bearings
D
and part
E
from the clevis pin
F
.
3.
Replace the castor fork and reinstall in reverse order.
IMPORTANT!
Risk of damaging the castor fork bearing
– Do not overtighten the bolt
B
.
– Tighten the screw only so far that the fork can still
be turned freely.
4.
Reinstall the castor wheel.
If the clamping part
G
must be replaced, remove
bolts, washers and nuts
H
from the castor supporter
I
and reinstall a new clamping part.
H
= 10 Nm
Function check
Tip the wheelchair backwards by 90° so that it is lying on
the backrest and the rear wheels. Make sure that the clevis
pin is as horizontal as possible. Turn the fork upwards
(position A) and let it tip downwards. The fork has been
correctly adjusted if it easily turns to slightly beyond the
bottommost point (position B) and then maximally turns
back to the bottommost point (position C). If the fork turns
back over the bottommost point or even swings back and
forth, it has not been sufficiently tightened. There is a risk
that the castor wheel will start to wobble at high speeds.
A
B
C
1659360-B
33
Summary of Contents for CHAMPION
Page 11: ...Instructions 6 Instructions 1659360 B 11 ...
Page 42: ...Notes ...
Page 43: ...Notes ...


