background image

 10 


0

 R33


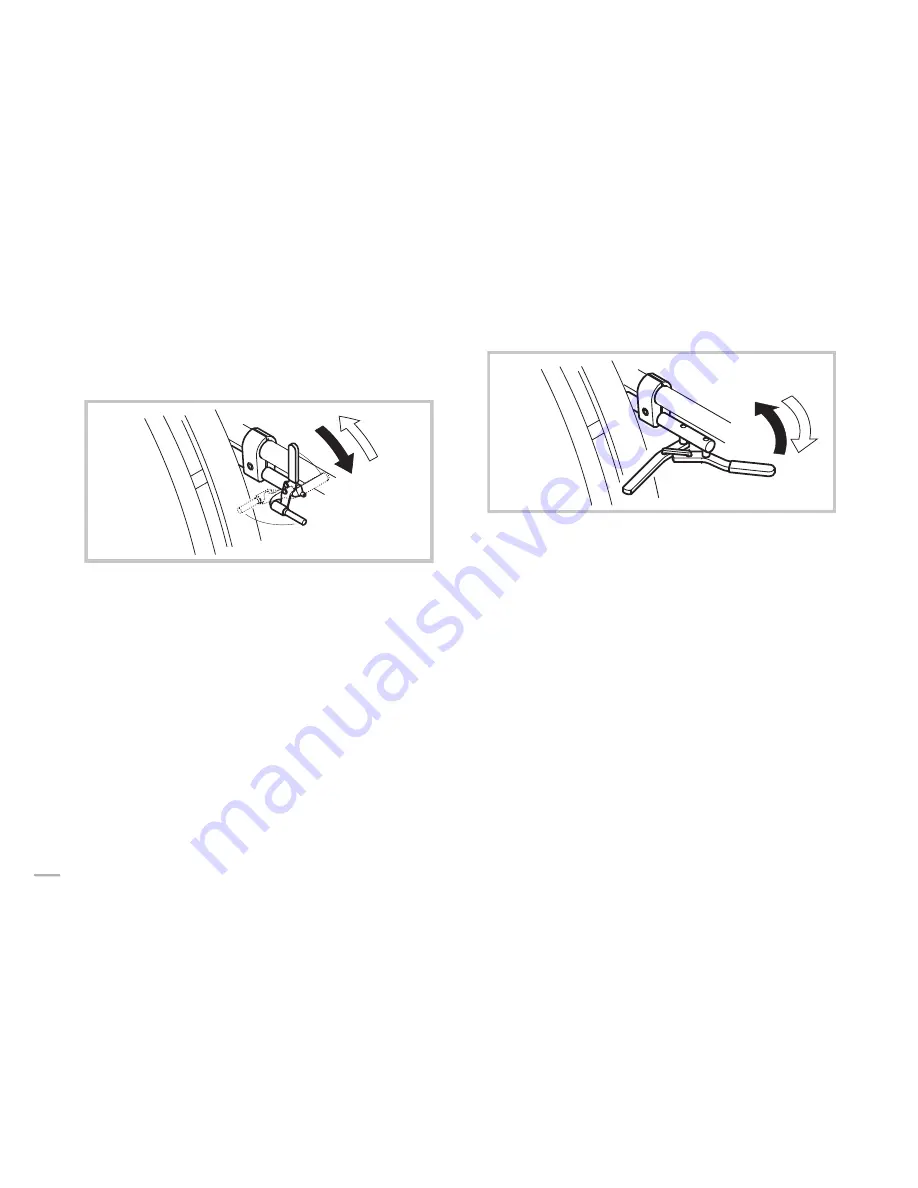
Releasing the brake 


Pull the braking lever back. 

Performance brake 


Figure 10 

Applying the brake 


Push the brake lever forward until it reaches the stopper. 

Releasing the brake 


Pull the braking lever back. 

Active brake 


Figure 11 

Applying the brake 


Pull the braking lever forward (beside or between your legs) 
until it reaches the stopper. 

Releasing the brake 


Push the braking lever back (beside or between your legs). 


Summary of Contents for R33

Page 1: ...Gebrauchsanleitung User manual Mode d emploi deutsch english français ...

Page 2: ...lding and unfolding the wheelchair 11 3 2 Removing and installing the rear wheels 12 4 Adjustments and options 14 4 1 Adjusting the parking brakes 14 4 2 Adjusting the tension of the backrest cover 14 4 3 Foldable Push handles 15 4 4 Mudguards 15 4 5 Antitipper 15 4 6 Security belt 16 4 7 Passive lighting 16 4 8 Air pump 16 5 Service 17 5 1 Cleaning 17 5 2 Maintenance 17 5 3 Service life and dispo...

Page 3: ...2 0 R33 Figure 1 Front frame Seatmodule Axle tube Rear wheel Backrest Footrest Front wheel ...

Page 4: ...lements The front wheels as well as the footrest are fixed to the front frame See figure 1 1 4 Use as per specifications The wheelchair is driven manually and is used for independent or guided locomotion of gait impaired persons e g hemiplegia paraplegia tetraplegia multiple sclerosis traumatic brain injury etc The wheelchair may only be used without a guide by persons who are physically competent...

Page 5: ... tipping point of the wheelchair depends on the adjustment of the seat position The correct seat position is adjusted depending on parameters such as the weight of the user the type of handicap and the driver s driving skills The seat position which is adjusted upon delivery corresponds to the information indicated in your order Figure 2 To find the tipping point of your wheelchair proceed as foll...

Page 6: ...irs and steps Always be very careful and move slowly when driving over curbstones stairs or other steps Do not try to drive over steps which have a height of more than 25 cm Only drive on stairs with more than one step if an aide is behind the wheelchair With an aide Figure 3 Driving down a step Drive to the edge of the step make sure that the wheelchair is in a straight position Hold on to the tw...

Page 7: ...out an aide If you want to drive down a step without a guide you must have perfect control over your wheelchair and must be able to balance it on the rear wheels see Finding the Tipping Point in Chapter2 2 Figure 4 Driving down a step Drive to the edge of the step make sure that the wheelchair is in a straight position Lift up the front wheels from the floor by shifting your body weight and keep y...

Page 8: ... the wheelchair Do not drive on steep or lateral slopes max assending grade 7 Danger of tipping Avoid abrupt changes of direction when driving on slopes Danger of tipping Never pull the parking brakes when the wheelchair is in motion Danger of tipping Driving uphill To drive uphill you must set the wheelchair in motion and maintain the motion in order to be able to control the direction Figure 5 L...

Page 9: ... side or backwards This has a great influence on the stability of the wheelchair In order to keep your balance at any time please observe the following Leaning forward Figure 7 Align the front wheels to the front To do this move the wheelchair slightly forward and then back again Apply both parking brakes When leaning forward make sure that your abdomen remains above the front wheels Do not lean f...

Page 10: ...brake deceleration is effected manually by applying force on the hand rims of the rear wheels The parking brakes are used only for keeping the wheelchair in place when standing and to prevent it from rolling away The correct function of the parking brakes is ensured only if sufficient air is in the tire see Chapter 5 2 Maintenance Never apply the parking brakes when the wheelchair is in motion Dan...

Page 11: ...h the brake lever forward until it reaches the stopper Releasing the brake Pull the braking lever back Active brake Figure 11 Applying the brake Pull the braking lever forward beside or between your legs until it reaches the stopper Releasing the brake Push the braking lever back beside or between your legs ...

Page 12: ...rial abrasion could affect the strength of load bearing parts 3 1 Folding and unfolding the wheelchair The K Series has a rigid frame But the backrest can be folded down and fixed click into position nonetheless Folding the wheelchair Figure 12 Remove the seat cushion if present Flip clothes guard inward to rest against backrest Both sides Pull the pull strap on the back of the wheelchair 1 Fold t...

Page 13: ...irst Check that the backrest has really snapped into position before using the wheelchair 3 2 Removing and installing the rear wheels To reduce the size of your wheelchair you can remove the rear wheels Figure 14 Removing the rear wheels Release the brakes With one hand hold the wheelchair in an upright position With the other hand hold the wheel at the spokes around the wheel hub see Figure 14 Pr...

Page 14: ...4 Press the axle knob with your thumb keep it pressed Now insert the axle in the adapter sleeve of the axle tube until it comes to a rest Release the axle knob Now the wheel fits tightly After fitting the wheels always make sure that the removable axles are engaged completely The head must be extended completely Check by pulling the wheels outwards ...

Page 15: ...tyre more than 4 mm Tighten the hexagon socket bolt at the brake holder again The function of the parking brakes is only ensured if sufficient air is in the tyre see Chapter 5 2 Maintenance 4 2 Adjusting the tension of the backrest cover If your wheelchair is equipped with a backrest cover with adjustable tension you can adjust the tension of the backrest cover to your individual requirements Figu...

Page 16: ...andles have actually been snapped into position so that they cannot accidentally fold down again when pushing the wheelchair 4 4 Mudguards Removable mudguards can be mounted to the wheelchair to prevent dirt and mud from spraying from the rear wheels onto clothes when driving outdoors 4 5 Antitipper The Antitipper device prevents the wheelchair from tipping backward Figure 18 Installing the Antiti...

Page 17: ...pening the belt Press on the PRESS button and pull the locker out of its socket The buckle will open up Closing the belt Insert the locker completely into the buckle socket Pull the belt until you are secured in the wheelchair 4 7 Passive lighting You can install two reflectors on the rear wheels 4 8 Air pump The air pump is delivered with a valve adapter Depending on the size of the valve of your...

Page 18: ...cedures detailed below In order to make sure that your wheelchair will give you the necessary safety and reliability over its whole service life you should carry out the following work regularly or have it carried out by your authorized dealer Maintenance plan Weekly Check air pressure in tyres Check the proper fitting of the rear wheel axle in the sleeve Monthly Check bolted connections Oil remov...

Page 19: ...ivers in order to prevent the inner tube from being damaged Pull the tube out of the tire Repair the tube using a bicycle tire repair kit If repairing is not possible replace the tube Fitting tires Inflate the tube slightly until it has its round shape Insert the valve in the valve hole of the wheel rim and insert the tube in the tire the tube should be inside the tire completely without folds Sta...

Page 20: ...the wheelchair is maintained properly the lifetime of the Küschall wheelchairs is approximately 5 years If the wheelchair is used less frequently e g if you use it inside your apartment only and if it is maintained perfectly the service life will increase accordingly For proper disposal of your wheelchair please contact your authorized dealer 5 4 Environmental Conditions The wheelchair should not ...

Page 21: ...t wheel bearings dirty or damaged Clean or replace bearing Rear wheel mounted too far to the front Mount rear wheel further back only possible with rear wheel extension Chapter 6 4 Wheelchair tips too easily Backrest angle too large Reduce backrest angle Chapter 6 3 Poor or asymmetric brake grip Wrong air pressure in one or both rear wheels Correct air pressure Chapter 5 2 Rear wheels are off trac...

Page 22: ...eat angle cm Variable ST Seat depth cm 37 5 45 UL Length of lower leg cm 39 48 RH Backrest height cm 27 48 RLW Backrest angle 74 78 82 86 90 Weight 3 kg 9 8 9 5 Maximal load kg 100 1 GB SB 22 5 cm with rear wheel camber of 3 2 Depends on seat level length of lower leg rear wheel and position of footrest 3 With standard configurations can vary Figure 20 RH GL SW SHv SHh U L SB GB ...

Page 23: ...ecome defective due to faulty workmanship or materials will be renewed or repaired free of charge by the Küschall dealer 5 The warranty will be forfeited should any unauthorised alteration be made to the equipment 6 The purchaser s statutory rights under the consumer Protection Act are not affected 7 If the purchaser mounts additional adaptions to their Küschall wheelchair they must obtain a writt...

Page 24: ...ide of the backrest Attach the Velcro band and re assemble the adjustable backrest cover 6 2 Backrest angle adjustment Figure 22 Fold down backrest loosen the counter nut of the placement bolt and tighten the bolt completely Loosen the lens head bolt Remove excenter turn or flip and turn to create correct angle Replace and retighten bolt Open the backrest up until the bolts click into place Unscre...

Page 25: ...l all parts fit together Fasten the spring unit with the bolt Make certain to use the correct boltlength see table Tighten the screws max 8Nm SHh43 SHh45 SHh47 The removal and fixation of the bolt is easier if the chair is put under pressure and the spring somewhat compressed Fixed seating Figure 24 Loosen the screws and remove bolt Lift up the seat module and remove the seat to frame connection a...

Page 26: ...ction until all parts fit together Fasten the seat to frame connection with the bolt Slide 1 or 2 rings onto the bolt when necessary according to the table Tighten the screws max 8Nm SHh40 SHh41 SHh42 SHh42 SHh43 SHh44 SHh44 SHh45 SHh46 SHh46 SHh47 SHh48 S S S M M M L L L XL XL XL ...

Page 27: ...er Drucklegung auf dem neuesten Stand befindet Im Rahmen der fortlaufenden Verbesserungen der Produkte behält sich die Küschall AG das Recht vor jederzeit Änderungen an den präsentierten Modellen vorzunehmen Diese Änderungen werden den küschall Händlern umgehend mit geteilt Jegliche Verwendung dieser Publikation ganz oder auszugsweise sowie die Verfielfältigung von Abbildungen sind ohne schriftlic...

Reviews: