3
Before you begin, follow these steps to ensure
you have everything needed to complete the
installation.
a.
Unpack the box and ensure it contains
everything shown on the
Kitpack Contents
List. Save the packaging for future use.
b.
Carefully examine all of the supplied parts to
ensure nothing was damaged in shipment.
c.
Gather the tools and materials listed below.
• Flat-head and Phillips-head screwdrivers
• Electric drill and 1/8" (3 mm) and
5/8" (16 mm) drill bits
• 5/32" hex key
• 7/16" open-end torque wrench(es) set to
15 in.-lbs and 20 in.-lbs (2.25 N-m)
• 1/2" open-end wrench
• 3/4" and 7/16" sockets/ratchets
• 3/4" socket/torque ratchet set between
35 and 40 ft-lbs (47 and 54 N-m) of torque
• Light hammer and center punch
• Adhesive tape and scriber or pencil
• RG-11 or RG-6 RF coax cable(s), with “F”
connectors, and termination tools (RG-11
must be used for RF1; see
• Silicone sealant or equivalent
• Satellite TV receiver(s)/DVRs for your
desired service (see Figure 2)
• Multimeter
• Wi-Fi-enabled laptop PC Apple
®
iOS or
Android
™
smartphone or tablet with the
KVH TracVision TV-series app, and the
latest software and satellite library
downloaded from the KVH Partner Portal
(www.kvh.com/partners)
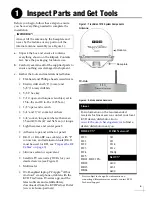
Always lift the antenna by the baseplate and
never by the radome or any portion of the
internal antenna assembly (see Figure 1).
TV-Hub
Radome
Baseplate
Antenna
Figure 1: TracVision TV10 System Components
Figure 2: KVH-Validated Receivers
* List is subject to change. For information on
connecting different receiver models, contact KVH
Technical Support.
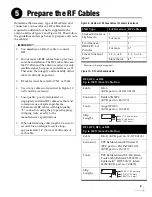
Linear
For information on the recommended
receivers for linear service, contact your local
KVH dealer/distributor. Go to
www.kvh.com/wheretogetservice
to find a
dealer/distributor near you.
DIRECTV*
DISH Network*
H20
H21
H22
H23
H24
H25
HR21, HR21 Pro
HR22
HR23
HR24
311
211
211k
211z
Wally
Bell TV*
6100
6131
6400
Inspect Parts and Get Tools
1
IMPORTANT!
Summary of Contents for TracVision TV10
Page 1: ...TracVision TV10 Installation Guide ...
Page 53: ......


