background image

46    |    kvm-tec

kvm-tec    |    47

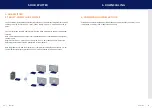
9.2 rEQUIrEMEnTs fIbEr cablE

9.2.1 MUlTI-MoDE (sTanDarD)

A multi-mode fiber cable should meet the following requirements
• 

The maximum length should be 300 m (984ft).  The UVX-F is equipped with a multimode - 

         SFP+  module, which allows a transmission distance of up to 300 m /984ft

• 

Dedicated fiber optic connection cable type Duplex Multimode with LC plug 

9. cablE rEQUIrEMEnTs


10. TroUblEsHooTInG

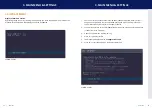
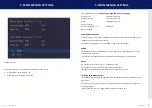
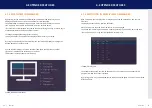
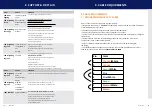
10.1 rEQUIrEMEnTs nETWorK sWITcH

The entire switching network system requires its own dedicated network. For security reasons it 

cannot be integrated into an existing company network.

The network switch must meet the following specifications:

10 Gigabit Switch, with a port-to-port transfer rate of 10 Gigabit/second

10. sWITcH sPEcIfIcaTIon  

Summary of Contents for 4K Ultraline DP 1.2 FIBER UVX-F

Page 1: ... tec com line ultra kvm tec User Manual 4K Ultraline DP 1 2 UVX 6901 SET COPPER 6901L CPU LOCAL 6901R CON REMOTE 4K Ultraline DP 1 2 FIBER UVX F 6902 SET FIBER 6902L CPU LOCAL 6902R CON REMOTE connect collaborate communicate control kvm tec C 4 ...

Page 2: ...em status 21 3 2 Features menu 21 3 3 update Menu 22 3 4 Settings 26 3 4 1 DDC Settings 27 3 4 2 Select keyboard layout 28 3 4 3 Keyboard shortcuts 29 3 4 4 Mouse settings 30 3 4 5 Definition local settings 31 3 4 6 Overlay 32 3 4 7 Video sync setting 33 3 5 About this device 34 4 Extender features 35 4 1 Menu features 35 4 1 2 Multiview commander 36 4 1 3 Switching in multiview commander 37 4 1 4...

Page 3: ... using your product Use the product only in the manner as described and for the areas of application as stated Following proper use and maintenance your Ultraline UVX1 UVX1 F KVM Extender will bring you joy for many years to come Table of content 7 2 Disposal 42 8 Support first aid 43 9 Cable requirements 45 9 1 Requirements for CAT 7 cable 45 9 2 Requirements fiber cable 46 9 2 1 Multi mode stand...

Page 4: ...urer is not liable for cases of material damage or personal injury caused by incorrect handling or non compliance with the safety instructions In such cases the warranty will be voided This product is not intended for use by persons including children with restricted physical sensory or intellectual capability or lack of experience and or knowledge unless they are supervised by a person who is res...

Page 5: ...Alterations to the product and technical modifications are not permitted Use the device with a suitable properly installed and easily accessible power outlet The appliance plug serves as a disconnection point 1 3 Technical specifications Type KVM Extender local unit CPU und remote unit CON Model 4K Ultraline UVX1 UVX1 F KVM Extender Power plug input voltage internal power supply AC 100 240V 50 60H...

Page 6: ...in Audio In from microphone etc 16 audio out Audio Out to speakers etc 17 RS232 RS232 18 power Power Switch ON OFF 19 grounding Grounding screw 20 Power Connection for 100 240V AC power supply 21 kvm link Connection for CAT 7 cable or fiber cable 22 DC Connection für 12V power supply 23 dp out 2 Displayport Output to Monitor 2 24 dpout 1 Displayport Output to Monitor 1 25 AUX Auxilary Gigabit Netw...

Page 7: ... its operating safety Make sure that the packaging contains the following content 1x UVX1 local Extender CPU 1x UVX1 remote Extender CON 2x power cable IEC C13 1x DP DP cable 1 8 m 5 9ft 1x USB A B cable 1 8m 5 9ft 8 x mounting feets UVX Fiber 1 x SFP Module Multimode up to 300m 984ft Normal Operation UVX only Rem Only Colour Blinking Physical Link Active Connection Video Extended USB Initialisati...

Page 8: ...lu faceplate 2 3 Installing the extender WARNING Read and understand all safety information before installing the product The units can be set up to access point to point or over a Switching System with a host computer In the case of the latter an additional 10 G Network Switch and a Windows PC or tablet with the Switching Manager must be installed with a Network Switch each user can gain quick ac...

Page 9: ...le Optio nally you can also use a 12V 2A power supply 2 Now connect the USB cable to a USB port on your PC and connect the other end to the CPU Local Unit Connect keyboard and mouse to the CON Remote Unit 3 Connect the CPU Local and the CON Remote Unit with a network cable 4 Connect the DP cable in the DP socket of the PC in and to the DP socket DP in of the local device and connect the screen on ...

Page 10: ...The monitor will displays your computer s desktop or any open applications 2 5 Replacing the SFP module The UVX1 F is delivered with a multimode SFP module To replace an SFP module with a different SFP module 1 Remove the black dust protector from the SFP module 2 Pull the metal latch of the SFP module forwards until it is at a right angle 3 Replace the SFP module with the other module Put the met...

Page 11: ...rent status F Features Menu activated features U Update update firmware G Settings settings A About this device Informationen about the unit 3 1 System status By pressing the S key or by selecting the arrow keys you access the status menu where you will find information about hardware and software versions as well as the activated upgrades The menu displays information about the connection the res...

Page 12: ...www kvm tec com support Each update file contains a detailed description of the update process For further information please refer to the update chapter 2 Connect the USB stick to the CON REMOTE unit wait a few seconds until the USB stick is connected to the CON unit 3 Open the update menu with the U key 4 Press S to display this file 5 The firmware is displayed with Configuration found 6 Press U...

Page 13: ...th directions Furthermore the embedded sound information of the display port is transmitted RS 232 A maximum serial transfer rate of 115200kBd possible It is not necessary to set the baud rate and bits per character R appears in the menu item and this function is permanently active Switching up to 2000 endpoints The already activated Switching upgrade can be activated from the Switching menu in th...

Page 14: ...DDC information used in the PC 1 Make sure that the main menu is open 2 Press the O to display the DDC option menu 5 x scroll 3 Press 1 to display the DDC information of the monitor connected to the remote CON 4 The Extender is connected The DDC information is automatically saved 5 Press 2 for a fix resolution 1920 x 1080 6 Press 3 for a fix resolution 2560 x 1440 7 Press 4 for a fix resolution 38...

Page 15: ... Multiview Commander 3 4 3 Keyboard shortcuts By pressing the S key or by selecting the arrow keys you will access the Keyboard Shortcuts menu If you want to change one of the shortcuts you have to press the letter specified for the shortcut Now you can press any key or key combination Please note that only a key combination with the keys 1 or F1 is possible with point F Use the arrow keys to dete...

Page 16: ...ouse Settings where you can adjust the speed of the mouse with the arrow keys SCREEN Mouse Settings 3 4 5 Definition local settings By pressing the G key or by selecting the arrow keys you can access the Menu Local Settings Press the L key to open the Local Settings Here you will find the Remote Wakeup setting SCREEN Local Settings 3 MAIN MENU SETTINGS 3 MAIN MENU SETTINGS ...

Page 17: ...ith this setting the names are only displayed if the red frame is active OFF No names are displayed with this setting 3 4 7 Video sync setting Pressing the V button or selecting the arrow buttons selects the Video Sync Settings menu SCREEN Video Syny Setting This feature can be used to determine the control loop for video synchronization The following modes can be used HARD key H Rapid rate of reg...

Page 18: ... 1 Menu features Pressing the F key or selecting the arrow keys you will access the FEATURES menu where you can select all the functions and the features V Multiview Commander M Mouse Glide Switch P Point to point Mode on off S Matrix Switching Mode D Displayport Multistream SCREEN Menü FEATURES Two features are already pre installed which can be set by pressing F in the main menu You can activate...

Page 19: ...he Local Units Use the Number buttons to select a Local Unit and press the C button to confirm If you want to disconnect a local unit use the D key To disconnect all connections press the E key SCREEN Multiview Commander 4 extender features 4 1 3 Switching in multiview commander With a multiview commander setup multiple sources can be displayed on one or more monitors The displayed source can be s...

Page 20: ...Use the C key to reset all settings Press the A key to apply all the settings you have made SCREEN Mouse glide switch 4 extender features 4 1 5 point to point By pressing P you reach the configuration point to point By default the remote is directly connected to the Local 4 1 6 Matrix switching system Pressing S takes you to the Matrix Switching System configuration If this function is active the ...

Page 21: ... content is transmitted which is available on both outputs at the same time With a resolution of 2 times 2560 x 1440 60 Hz or 2 times 3840 x 2160 30 Hz two different picture contents can be transferred to two monitors Both the graphics card and the monitor must comply with the Displayport Standard 1 2 For some monitors the Display port function 1 2 must be activated in the monitor menu 5 Hub split...

Page 22: ...ere for you to answer your questions about installation Manual download www kvm tec com or kvm tec Installationchannel on our homepage personally 43 2253 81912 Video error stripes in the picture USB is not working No Power No LED Check the powerplug Is the power supply ok Try another Unit Try reprogramming the Unit by using a JTAG programmer Contact kvm tec support Are the USB Devices plugged in c...

Page 23: ...n The screen flkers has an incorrect display Install current firmware from our homepage http www kvm tec com support LED is lighting in green Different firmware or USB is not compatible Please contact the kvm tec support team via e mail support kvm tec com or by phone 43 2253 81912 30 LEDS different different firmware To enter on screen menu check firmware version To enter the On screen menu press...

Page 24: ...of up to 300 m 984ft Dedicated fiber optic connection cable type Duplex Multimode with LC plug 9 cable requirements 10 Troubleshooting 10 1 Requirements network switch The entire switching network system requires its own dedicated network For security reasons it cannot be integrated into an existing company network The network switch must meet the following specifications 10 Gigabit Switch with a ...

Page 25: ...Switche 11 warranty The warranty period is 24 months from the date of purchase The warranty expires in case of External effort improper maintenance Violation of the operating instructions lightning damage Please contact us first before returning the product 11 1 Extended warranty 2 years standard warranty Art Nr 9003 warranty extension to 5 years per Set Art Nr 9002 warranty extension to 5 years p...

Page 26: ...81 912 Fax 0043 0 2253 81 912 99 Email support kvm tec com Web www kvm tec com Find our newest updates and FAQs on our homepage http www kvm tec com support 12 adDress Phone email kvm tec Inc USA Sales p 1 213 631 3663 43 225381912 22 email officeusa kvm tec com kvm tec ASIA PACIFIC Sales p 9173573 20204 email sales apac kvm tec com kvm tec China Sales P 86 1360 122 8145 email chinasales kvm tec c...

Reviews: