background image

First 

Aid

kvm-tec 

MASTERLINE MVX

smart connection

Delivery content 

LOCAL/CPU Unit MVX1-F 

1 x MVX1-F local (CPU)
1 x wall power supply unit l 12V 1A (EU-
plug or INT. plug)
1 x DVI - DVI cable 1,8m/5.9ft
1 x USB cable 1, 8m/5.9 ft.
1 x VGA - DVI cable 1, 8m/5.9 ft.  (opt)
2 x Audio cable 1, 8m/5.9 ft. (opt)
1 x SFP Module-Multimode up to 
500m/1640 ft.
alternativ with Single-Mode up to 20km/
12mi- ItemNr6831
4 x rubber feet

REMOTE/CON Unit 

1 x MVX1-F remote (CON)
1 x wall power supply unit 12V 1A 
(EU-plug or INT. plug)
4 x rubber feet
1 x SFP Module Multimode up to 
500m/1640 ft.
alternativ with Single-Mode up to 20km/
12mi ItemNr6831

to unlock upgrades, please send an email or give us a 

calll. Please have your ID code ready.( you fi nde your ID 

in the OSD menu by pressing the button „M“ - Device ID 

You´ll get a code from our support team.

Please, enter  the code.  

possible upgrades for 

MASTERTLINE MVX1 -F

USB Memory

Analog VGA- transmitted as DVI 

(included in US) 

Sound analog in both directions as CD quality

Matrix Switching System up to  48 endpoints

 ( included in US )  

1. Power plug
12V 1A

fibre

4. D

VI in

 fr

om PC

2. USB to PC

4. D

VI out

 to Monitor

5. Audio

fr

om PC

6. Audio to PC

fibre

2. USB fr

om

Ke

yboar

d and mouse

6. Audio from 
Microphone

5. Audio to 
Speaker

1. Power plug
12V 1A

4. D

VI out to Monitor

3. Multimode OM3-Fiber cable up to 500m/1640 ft

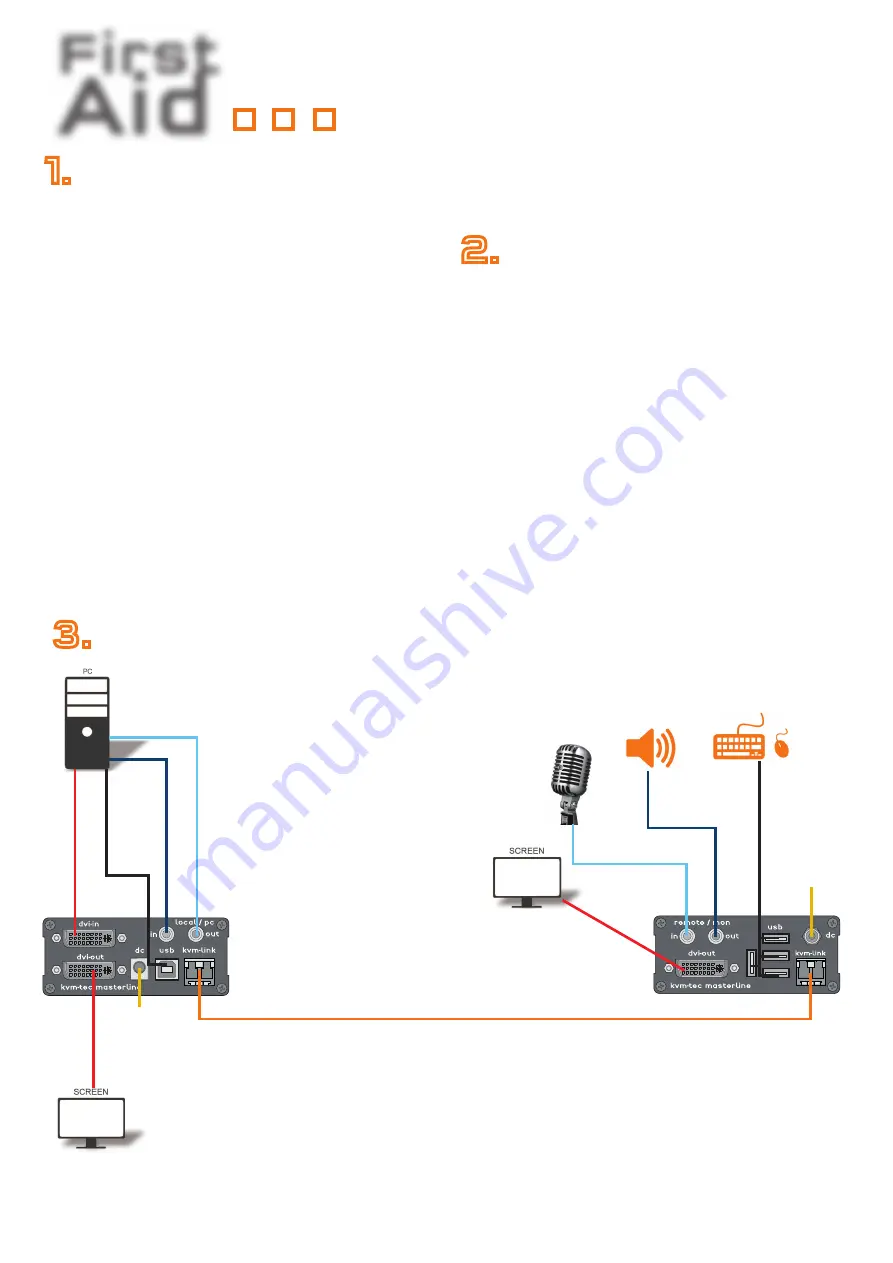
Quick Installation MVX1-F  FIBER MASTERLINE


local / CPU – remote/ CON

1.   Connect the CON / Remote and the CPU / Local Unit to the included 12V 1A power supply.
2.   Now connect the USB cable to a USB port on your PC and connect the other end of the USB cable to the CPU / 

Local Unit. Connect keyboard and mouse to the CON / Remote Unit.

3. 

 Connect the CPU / Local and the CON / Remote Unit with a fi ber cable.

4.  Now connect the DVI cable to the DVI socket of the PC and the other end to the DVI socket of the CPU / Local Unit 

(DVI-in). Then connect the monitor to the CON / Remote Unit with a DVI cable.

5.  Then connect PC audio out with the audio cable to Local Audio in. Then connect audio / out via the audio cable
6.  Almost done! Now connect the audio cable Local Audio / out to the PC Audio in and Remote Audio / out with the 

audio cable to the microphone

HAVE FUN - your kvm-tec Extender is now in use for many years ( MTBF approx 10 years) 

1.

 First check your delivery content MVX1-F....

2.

 Are your upgrades for 

MASTERLINE unlocked

3.

 Than check your installation....

Summary of Contents for 6801

Page 1: ...m 6801 SET Masterline MVX1 F in Fiber 6801L CPU LOCAL 6801R CON REMOTE 6802 SET Masterline DUAL MVX2 F in Fiber 6802L CPU LOCAL 6802R CON REMOTE CHECK YOUR EXTENDER line line master kvm tec First Aid connect collaborate communicate control kvm tec C 4 ...

Page 2: ... DVI in from PC 2 USB to PC 4 DVI out to Monitor 5 Audio from PC 6 Audio to PC fibre 2 USB from Keyboard and mouse 6 Audio from Microphone 5 Audio to Speaker 1 Power plug 12V 1A 4 DVI out to Monitor 3 Multimode OM3 Fiber cable up to 500m 1640 ft Quick Installation MVX1 F FIBER MASTERLINE local CPU remote CON 1 Connect the CON Remote and the CPU Local Unit to the included 12V 1A power supply 2 Now ...

Page 3: ... 12V 3A 2 USB from keyboard and mouse 6 Audio from microphone 5 Audio to speaker 2 USB zu PC 1 power plug 12V 3A 4 DVI out to Monitor 4 DVI out to Monitor 4 DVI out to Monitor Quick Installation MVX2 FIBER Masterline local CPU remote CON 1 Connect the CON Remote and the CPU Local Unit with the included 12V 2A power supply 2 Now connect the USB cable to a USB port on your PC and connect the other e...

Page 4: ...is not working Plug out in USB of keyboard and wait until driver is installed after few seconds Check all USB connections on both sides Local and Remote If it is still not working plug out in DC once more LED is lighting green No audio Establish audio connection plug stereo jack to the audio output of the PC green connection with local IN remote headset OUT Establish microphone connection plug ste...

Page 5: ... cables are plug ged in correctly Check if the PC is sending a Image by plugging in a monitor on the local out of the local Unit Check if the DDC is set correctly in menu under point O Check if both Units have the correct firmware No Video Contact kvm tec support Check if all cables are plug ged in correctly Check if the PC is sending a Image by plugging in a monitor on the local out of the local U...

Page 6: ...e 3 Press the A key to do an automatic update 4 Press the U key to do a direct update 5 Press the S key to do a USB Update Update service with kvm tec Switching Manager For all our devices of the SVX and MVX series we deliver a free demo version of the kvm tec Switching Manager Software Item No 4004 for a comfortable update of all units in the switching system For our devices of the MX and UVX ser...

Page 7: ...up only one local and one remote at the same place connect the monitor directly to the PC does the monitor display an image follow the mentioned steps from above LED status is red or blinking this can be a cable problem try to get a short patchcable and to connect the units and be sure that it s not a cross over cable USB problems with mouse and keyboard please try a different type of mouse and ke...

Page 8: ...ur ticket system where all informati on about your support case is stored and are traceable at any time This way the support team has all the infor mation about your system in a direct con versation and your advantage is that the questions can be answered in a targeted and faster way Problem description Almost done If you want to be even faster on the phone the following data would be helpful No p...

Page 9: ...232 VGA Sound Switching Other connected devices Switches HUBs Touch screens Webcams Problem description Almost done If you want to be even faster on the phone the following data would be helpful No power No Link VGA problem No connection DOA dead on arrival Stripy screen No Video No USB Mouse Key board doesn t work LED Status local CPU LED Status remote CON red orange green glowing flashing red ora...

Reviews: