background image

TABLE OF CONTENTS

INTRODUCTION

This High De

fi

 nition HD/SD digital A/V Mixer has two (2) input BUSES, each with six 

(6) inputs (2 x HDMI’s, 2 x Component and 2 x S-Video/Composite video) and also 
a Background Color feature for greater ef

fi

 ciency. The device has 1 x HDMI, 2 x 

Components / 2 x S-Video or 2 x Composite video output ports and also allows you to 
make adjustments to the position of your video. The compatible output resolutions are 
HD/SD, NTSC, NTSC-4.43, PAL, PAL-M, PAN-N, SECAM, 480i, 576i, 480p, 576p, 720p 
50/60 and 1080i 50/60. The output resolutions can also be automatically adjusted so it 
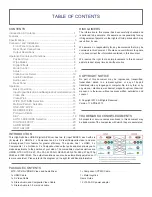
is more consistent. Please refer to the diagram on the right for additional information. 

PACKAGE CONTENTS

MTX-12P-UNV SD/HD Video and Audio Mixer  


1× Component (YPbPr) Cable

1x 

HDMI 

Cable 

      1× 

Metal 

Joystick 

1x 

S-Video 

Cable 

     Users 

Guide

1x Stereo Audio and Composite Video Cable 


12 V/5.0 A DC power adaptor

1× Stereo Audio to 3.5 mm Jack cable

CONTENTS 

Introduction & Contents ........................................................1
Features  ................................................................................ 2
Speci

fi

  cations ........................................................................ 3

Connector and Installation ..................................................4

Front Panel Connection .................................................4
Rear Panel Connections ................................................4
Output Resolutions .........................................................4

Operation Controls and Functions  ........................................ 2

Position/Time ..................................................................5
Wipe Modes ....................................................................6
Digital Effects .................................................................7 
Mode Control ..................................................................8
Adjust .............................................................................9
Video Source Select .....................................................10
Audio/Video Mixer ..........................................................11
Audio Level ...................................................................12
Rear Panel ...................................................................13

Operation ............................................................................. 14

Basic Operation ...........................................................14
Input Signal Selection and Background color Selection ..14
Video Mix .....................................................................14
Video Wipe ...................................................................15
WIPE PATTERN Selection .........................................15
Multiple Pattern Selection ..........................................17
ONE-WAY WIPE ..........................................................17
REVERSE WIPE .........................................................17
Picture-In-Picture ..........................................................18
KEY ...............................................................................19
AUTO FADE/WIPE Selection .....................................20
DIGITAL EFFECT .........................................................20
AUDIO MIXER .............................................................20
OSD ADJUST .............................................................21

DISCLAIMERS

The information in this manual has been carefully checked and 
is believed to be accurate. We assume no responsibility for any 
infringements of patents or other rights of third parties which may 
result from its use.

We assume no responsibility for any inaccuracies that may be 
contained in this document. We make no commitment to update 
or to keep current the information contained in this document.

We reserve the right to make improvements to this document 
and/or product at any time and without notice.

COPYRIGHT


NOTICE

No part of this document may be reproduced, transmitted, 
transcribed, stored in a retrieval system, or any of its part 
translated into any language or computer 

fi

 le, in any form or by 

any means—electronic, mechanical, magnetic, optical, chemical, 
manual, or otherwise—without express written permission and 
consent

© Copyright 2012. All Rights Reserved.
Version 1.1 APRIL 2013

TRADEMARK


ACKNOWLEDGMENTS

All products or service names mentioned in this document may 
be trademarks of the companies with which they are associated.

1

Summary of Contents for MTX-12P-UNV

Page 1: ...MTX 12P UNV HD SD Digital Multi Format Live Video Production Switcher INSTRUCTION MANUAL 118 W Streetsboro Street Ste 125 Hudson OH 44236 Toll Free 866 865 7737 V 1 1...

Page 2: ...on 12 This unit should be installed in a cool dry place away from sources of excessive heat vibration dust moisture and cold Do not use the unit near stoves heat registers radiators or other heat prod...

Page 3: ...ct 10 Audio VideoMixer 11 Audio Level 12 Rear Panel 13 Operation 14 Basic Operation 14 Input Signal Selection and Background color Selection 14 Video Mix 14 Video Wipe 15 WIPE PATTERN Selection 15 Mul...

Page 4: ...Composite S Video source inputs 1x HDMI recording output 2x Component YPbPr recording outputs 1x Composite and S Video recording outputs 1x Composite and S Video preview outputs with On screen Display...

Page 5: ...1 0 Vp p 75 composite signal Pin Jack NTSC NTSC 4 43 PAL PAL M PAL N SECAM Audio Output 2x 6 dBs 20 k Pin Jack L R PREVIEW OUTPUT OSD Y C Output 1x Y Signal 1 0 Vp p 75 Mini Din 4 pin connector C Sig...

Page 6: ...audio out 1 Audio output Jack Program audio out 2 Audio output Jack Power ON OFF Switch Source 1 HDMI input 1 Source 2 HDMI input 2 Source 3 HD Component Video input 1 Source 4 HD Component Video inpu...

Page 7: ...ystem resolution or a short cut is to press two keys for 1 second simultaneously The combinations below button button 480p60 button button 576p60 button button 720p50 button button 720p60 button butto...

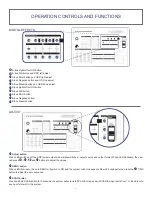
Page 8: ...e functions Joystick Control This joystick control has two functions control the position of the square wipe pattern and P IN P picture FUNCTIONS One way wipe button Reverse wipe button Multiple wipe...

Page 9: ...be selected by pressing this button Mix Fade button Press this button to select the fade In Out mode KEY button This button allows you to tune in a best performance point for the blue key and luma ke...

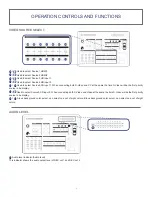
Page 10: ...utton ADJUST Adjust button When LED switched off the SDP review output side will show AB bus output source and output format When LED illuminate the user can press and buttons to adjust the values DEM...

Page 11: ...n is set to ON START button Automatic MIX and WIPE operation can be performed by pressing the START button Transition time can be adjusted via TIME When transition time lapsed the LED goes off VIDEO s...

Page 12: ...the time S Video will be the first priority source to be display Used to select Source5 SD input 2 When connecting both S Video and Video at the same the time S Video will be the first priority sourc...

Page 13: ...ource thru Source and Background color button You will see the corresponding picture on the screen Press a Background color button to select the background color you need Any of the 8 Background color...

Page 14: ...PE Reset the operation panel to initial mode Press the WIPE button Press one of the A bus selection button Press one of the B bus selection button WIPE effect will be controlled by video slide which m...

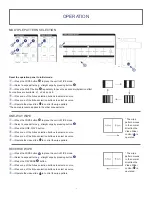
Page 15: ...ble Top right to bottom left bottom right to top left bottom left to top right and top left to bottom right Press the triangle wipe button repeatedly to toggle through the available wipe patterns Four...

Page 16: ...place the unit in WIPE mode Select a wipe pattern e g straight wipe by pressing button Press the ONE WAY 3 button Press one of the A bus selection buttons to select a source Press one of the B bus se...

Page 17: ...picture box at 1 3 size without the frame edge Shows the picture in picture box at 1 4 size without the frame edge Shows the picture in picture box at 1 2 size with the frame edge Shows the picture in...

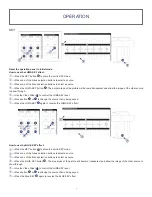
Page 18: ...he LUMA KEY level Press button or to change the source that is being keyed Press the LUMA KEY again to reverse the LUMA KEY effect How to use the BLUE KEY effect Press the KEY button to place the unit...

Page 19: ...ailable in the picture in picture frame in PIP mode A bus B bus digital effect ON button STILL button creates a still frame PAINT button creates a paint effect Repeatedly pressing the PAINT button wil...

Page 20: ...ASPECT FULL AUTO FULL 16 9 4 3 CONTRAST 58 0 63 BRIGHT 31 0 63 MENU 2 B PICTURE COLOR 31 0 63 HUE 31 0 63 DETAIL 10 0 63 ASPECT FULL AUTO FULL 16 9 4 3 A AUDIO AUTO AUTO CH1 CH2 CH3 CH4 CH5 CH6 B AUD...

Page 21: ...State of Texas United States of America KVM SWITCH TECH makes no representation that materials pertaining to the Product are appropriate or available for use in other locations other than the shippin...

Reviews: