background image

WARRANTY AND SERVICE

WARRANTY CARD - WARRANTY CONDITIONS

KWAZAR CORPORATION Sp. z o.o provides full warranty and post-warranty service.
1.   An applicator that is sent for repair (regardless of cause) must be complete and clean - free of any spray 

liquid residue.

2.   Warranty repairs will be performed only if a completed warranty card and proof of purchase is provided 

with the applicator.

3.   Warranty and post-warranty repairs are conducted at the seat of the company and in Authorised KWAZAR 

Service Centres - the list is available at www.kwazar.com.pl in the SERVICE tab.

SPARE PARTS AND ACCESSORIES

Spare parts are available for the applicator. For more information, visit www.kwazar.com.pl or the web store 
at www.sklep.kwazar.com.pl

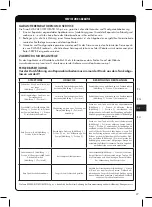
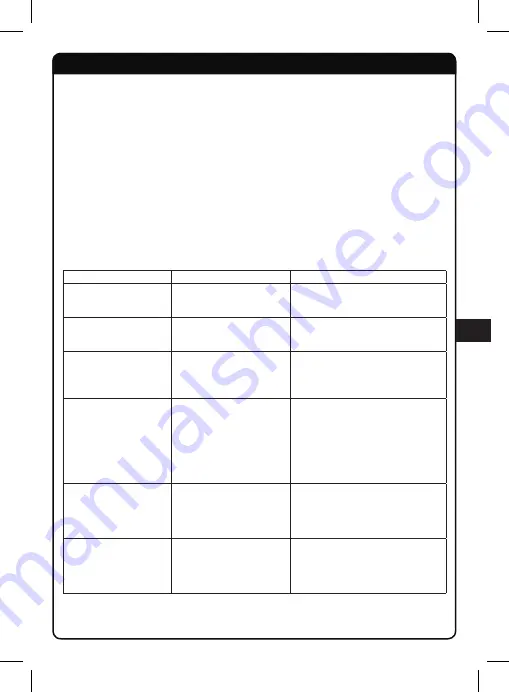
TROUBLESHOOTING

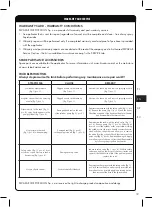
Always depressurise the tank before performing any maintenance or repair work!!!

KWAZAR CORPORATION Sp. z o.o. reserves the right to change product composition and design.

EN

PL

19

RU

DE

SYMPTOMS

CAUSE

REMEDY

Low lance output pressure 

(fig. 1/pos. 1).

Clogged nozzle on the lance tip 

(fig. 7/pos. 1).

Unscrew the lance tip and remove spraying nozzle 

(fig. 7/pos. 1).

Irregular stream from the spraying 

nozzle (fig. 7/pos. 1).

Clogged nozzle on the lance tip

(fig. 7/pos. 1).

Unscrew the lance tip and remove spraying nozzle 

(fig. 7/pos. 1).

Pressure drop in the tank (fig. 1/

pos. 8), spray liquid appears in the 

pump cylinder (fig. 1/pos. 5).

Damaged head seal on the end 

of the cylinder pump (fig. 9/pos. 3).

Depressurise the tank with the safety valve (fig. 1/pos. 

6). Remove the pump (fig. 1/pos. 5) and the mixer. 

Check the condition of the head seal. Replace if dama-

ged. Reassemble in the reverse order.

No pressure in the tank 

(fig. 1/pos. 8) when pumping.

Damaged seal (fig. 9/pos. 2) 

on the pump piston rod (fig. 1/pos. 5)

Depressurise the tank with the safety valve (fig. 1/

pos. 6). Remove pump (fig. 1/pos. 5). Slide the pi-

ston rod out of the cylinder as far as possible. Holding 

the cylinder, turn the piston handle counterclockwise, 

which will undo the guides and allow you to remove 

the piston from the cylinder. Check the condition of the 

piston seal (fig. 9/pos. 2). Replace if damaged. Apply 

a small amount of silicone oil (included). Reassemble 

by following the procedure backwards.

Safety valve (fig. 1/pos. 6) does 

not close or open. Pressure in tank is 

decreasing (fig. 1/pos. 8)

Damaged safety valve.

Lubricate safety valve (fig. 1/pos. 6). With the safety 

valve open, apply a few drops of silicone oil inside and 

operate it back and forth a little. If the problem persists, 

replace the valve.

No spray liquid stream.

Suction tube fell off the hose.

Depressurise the sprayer with the safety valve (fig. 1/

pos. 6). Remove the hose and properly insert the suc-

tion tube as far as possible applying a turning motion, 

then reconnect the hose to the sprayer head. 

Summary of Contents for VEGA

Page 1: ...ИИ BEDIENUNGSANLEITUNG OWNER MANUAL MADE IN POLAND Nr indeksu instrukcji SIO 1256 Wersja instrukcji v1 0 Data wydania 01 2018 VEGA APLIKTOR DO BIELENIA 9 0L VEGA BLEACHING APPLICATOR 9 0L VEGA APPLIKATOR ZUM WEISSEN 9 0L VEGA ОПРЫСКИВАТЕЛЬ ДЛЯ ПОБЕЛКИ 9 0L ...

Page 2: ...be 4 Head 5 Pump with mixer 6 Safety valve 7 Shoulder strap 8 Pressure tank with sight glass and stand 9 Strainer DE 1 Lanze mit Zerstäuberdüse 2 Griff der Lanze mit Kugelventil 3 Schlauch mit Saugrohr 4 Sprühkopf 5 Pumpe mit Mischer 6 Sicherheitsventil 7 Schultergurt 8 Druckbehälter mit Sichtstreifen und Sockel 9 Sieb RU 1 Штанга с соплом 2 Рукоятка штанги с фильтром 3 Шланг с всасывающей трубкой...

Page 3: ... DATEN ТЕХНИЧЕСКАЯ ХАРАКТЕРИСТИКА MODEL MODEL MODELL МОДЕЛЬ Vega 9 0L Wymiary długość x szerokość x wysokość mm Dimensions depth x width x height mm Abmaße Länge x Breite x Höhe mm Размеры длина x ширина x высота мм 230 x 280 x 680 Pojemność nominalna litr Dimensions depth x width x height mm Nominales Fassungsvermögen Liter Номинальная вместимость литр 9 0 Pojemność maksymalna litr Maximum capaci...

Page 4: ...NIĆ PRZED UDERZENIAMI MAKSYMALNA TEMPERATURA CIECZY ROBOCZEJ NIE MOŻE PRZEKROCZYĆ 30 C ZABRANIA SIĘ ODKRĘCANIA GŁOWICY ZE ZBIORNIKA PRZEZNACZENIE Aplikator do bielenia Vega to wielofunkcyjne i uniwersalne urządzenie ciśnieniowe o pojemności 9 litrów Przeznaczony jest do prac polowych i inwentarskich Może być wykorzystany do bielenia wapnem drzew bielenia pomieszczeń gospodarczych zacieniania szkla...

Page 5: ...y przygotować w naczyniu do tego przeznaczonym 12 Ciecz robocza nie powinna przedostać się do wód otwartych 13 Niedopuszczalne jest stosowanie środków mogących spowodować wybuch substancji żrących i łatwo palnych 14 Prace z użyciem środków chemicznych w pomieszczeniach zamkniętych powinny być prowadzone w towarzystwie co najmniej dwóch osób 15 Resztki substancji roboczej należy rozcieńczyć i zużyć...

Page 6: ...yć z lancą rys 2b poz 2 wkręcając uzyskując szczelne połączenie Rys 3 Zamontować pas naramienny wyregulować jego długość według potrzeb EN PL 6 RU DE Rys 2a Rys 2b 2 2 1 1 PRZYGOTOWANIE DO PRACY Przed rozpoczęciem pracy należy przetestować działanie zaworu bezpieczeństwa Opisane poniżej czynności należy wykonać przy zbiorniku napełnionym wodą do pojemności nominalnej patrz tabela z danymi technicz...

Page 7: ...otnym do kierunku ruchu wskazówek zegara Tłoczysko niezablokowane Rys 5a Tłoczysko zablokowane Rys 5b 2 1 Do kielicha głowicy rys 6 poz 2 włożyć sitko rys 6 poz 1 i wlać wodę Usunąć sitko rys 6 poz 1 z kielicha głowicy rys 6 poz 2 Zabrania się blokowania i dokonywania zmian konstrukcyjnych w zaworze bezpieczeństwa Wkręcić pompę i wykonać kilka ruchów tłoczyskiem rys 4c doprowadzając do samoczynneg...

Page 8: ... rys 1 poz 5 w głowicę rys 1 poz 4 W tym celu zablokować tłoczysko pompy rys 5b poz 1 w uchwytach cylindra rys 5b poz 2 Należy pamiętać o zachowaniu szczelności połączenia Zablokowane w ten sposób tłoczysko może służyć jako uchwyt transportowy Oczyścić sitko z ewentualnych zanieczyszczeń Przenieść aplikator w miejsce pracy Wykonując ruch tłoczyskiem rys 4c poz 1 pompować wykonać około 20 pełnych r...

Page 9: ... pompę rys 1 poz 5 do zbiornika rys 1 poz 8 wlać czystą wodę około 0 25 pojemności zbiornika wkręcić pompę rys 1 poz 5 do uzyskania szczelnego połączenia i napompować zbiornik Na wcześniej opryskane powierzchnie wykonać oprysk w celu przepłukania układu urządzenia Po skończeniu spuścić ciśnienie ze zbiornika rys 1 poz 8 za pomocą zaworu bezpieczeństwa rys 4a poz 1 i wykręcić pompę rys 1 poz 5 Wyla...

Page 10: ...ienia z tytułu udzielonej gwarancji będą realizowane jedynie po przedstawieniu przez reklamującego ważnej karty gwarancyjnej oraz czytelnej tabliczki znamionowej znajdującej się na zbiorniku aplikatora 2 Gwarancja jest udzielona na okres 24 miesięcy od daty zakupu nie więcej jednak niż 36 miesięcy od daty produkcji Okres ten nie dotyczy zastosowań komercyjnych 3 Dla zastosowań komercyjnych gwaranc...

Page 11: ...ciśnienia w zbiorniku ciśnie niowym rys 1 poz 8 w cylindrze pompy rys 1 poz 5 pojawia się ciecz robocza Uszkodzona uszczelka grzybek na końcu cylindra pompy rys 9 poz 3 Spuścić ciśnienie ze zbiornika za pomocą zaworu bezpieczeństwa rys 1 poz 6 Wykręcić pompę rys 1 poz 5 i zdjąć mieszacz Sprawdzić stan uszczelki grzybek Jeśli uszkodzona wymienić Zmontować w odwrotnej kolejności Brak ciśnienia w zbi...

Page 12: ...R PRESSURE PROTECT AGAINST IMPACT THE MAXIMUM TEMPERATURE OF SPRAY LIQUID MAY NOT EXCEED 30 C DO NOT REMOVE THE HEAD FROM THE TANK WARNING SIGNS Vega bleaching applicator is a multi function universal device with the capacity of 9 litres It is intended for outdoor and indoor work It can be used to whitewash trees utility rooms shade greenhouses disinfect utility rooms apply emulsion paints impregn...

Page 13: ...ons 1 1 Prepare the spray liquid in a vessel intended for this purpose 12 The spray liquid should not spill into unenclosed waters 13 It is prohibited to use explosive corrosive and flammable agents 14 If working in enclosed spaces chemicals should be handled in the presence of at least two other persons 15 Dilute the remaining spray liquid and use it on the previously sprayed areas 16 After work ...

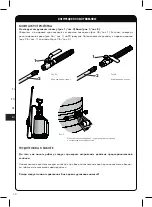
Page 14: ...s 1 Next the handle with ball valve fig 2b pos 1 connect with lance fig 2b pos 2 Fig 3 Attach the shoulder strap adjust length as needed Fig 2a Fig 2b 2 2 1 1 PREPARATION FOR WORK Before work test the functioning of the safety valve The following actions should be performed with the tank filled with water to its rated capacity see technical data table Always depressurise the tank before unscrewing...

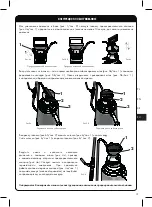
Page 15: ...ew the pump counterclockwise holding the piston rod fig 5b pos 1 The piston rod unlocked Fig 5a The piston rod locked Fig 5b 2 1 Insert the strainer fig 6 pos 2 to the head cup fig 6 pos 1 and pour in water Remove the strainer fig 6 pos 1 from the head cup fig 6 pos 2 Do not block or modify the safety valve Screw in the pump and operate the piston rod several times fig 4c in order for the safety v...

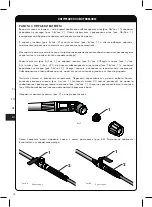
Page 16: ...g 6 pos 1 from the head cup fig 6 pos 2 Screw the pump fig 1 pos 5 into the head fig 1 pos 4 To do this lock the piston rod fig 5b pos 1 in the cylinder brackets fig 5b pos 2 Remember that the connection must be airtight The locked piston rod may be used as a transport handle Clean any dirt off the strainer Move the applicator to the work site Use the piston rod fig 4c pos 1 to pump the applicator...

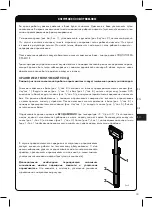
Page 17: ...ean water into the tank fig 1 pos 8 approx 0 25 of the tank capacity screw in the pump fig 1 pos 5 until sealed and pump the tank Conduct some spraying onto the previously sprayed surfaces in order to rinse the device s spraying system After you finish depressurise the tank fig 1 pos 8 with the safety valve fig 4a pos 1 and remove the head fig 1 pos 5 Remove the remaining water from the tank The a...

Page 18: ...s will be honoured only if you have a valid warranty card and if the name plate on the applicator tank is legible 2 The warranty is given for the period of 24 months from purchase date but no more than 36 months from manufacturing date This period does not apply to commercial use 3 For commercial use the warranty is give for the period 12 months from purchase date but no more than 24 months from m...

Page 19: ...essure drop in the tank fig 1 pos 8 spray liquid appears in the pump cylinder fig 1 pos 5 Damaged head seal on the end of the cylinder pump fig 9 pos 3 Depressurise the tank with the safety valve fig 1 pos 6 Remove the pump fig 1 pos 5 and the mixer Check the condition of the head seal Replace if dama ged Reassemble in the reverse order No pressure in the tank fig 1 pos 8 when pumping Damaged seal...

Page 20: ...TZEN DIE MAXIMALE TEMPERATUR DES ARBEITSMEDIUMS DARF 30 C NICHT ÜBERSCHREITEN DAS ABSCHRAUBEN DES SPRÜHKOPFS VOM TANK IST VERBOTEN BESTIMMUNG Der Applikator zum weissen Vega ist ein universelles Multifunktions Druckgerät mit einem Volumen von 9 Litern Er ist für Feldarbeiten und den Einsatz in Stallungen bestimmt Er kann zum Weißen von Bäumen mit Kalk zum Weißen von Wirtschaftsräumen zum Verdunkel...

Page 21: ...speziell dazu bestimmten Gefäß vorzubereiten 12 Das Arbeitsmedium darf nicht in offene Gewässer gelangen 13 Unzulässig ist der Einsatz von explosionsgefährdeten Mitteln ätzenden und leicht brennbaren Stoffen 14 Arbeiten unter Verwendung chemischer Mittel in geschlossenen Räumen dürfen nur bei Anwesenheit von mindestens zwei Personen ausgeführt werden 15 Die Reste des Arbeitsmediums sind zu verdünn...

Page 22: ...gelventil Abb 2b Pos 1 mit der Lanze Abb 2b Pos 2 Abb 3 Schultergurt montieren und seine Länge nach Bedarf einstellen Abb 2a Abb 2b 2 2 1 1 VORBEREITUNG AUF DIE ARBEIT Vor Beginn der Arbeiten ist die Funktion des Sicherheitsventils zu testen Die nachfolgend beschriebenen Handlungen sind mit einem mit Wasser bis zum nominalen Fassungsvermögen gefüllten Tank auszuführen siehe Tabelle mit den technis...

Page 23: ...lten wird Kolbenstange nicht verriegelt Abb 5a Kolbenstange verriegelt Abb 5b 2 1 In den Kelch des Sprühkopfes Abbildung 6 Position 2 das Sieb Abbildung 6 Position 1 einsetzen und Wasser hineingießen Sieb Abbildung 6 Position 1 vom Kelch des Sprühkopfs Abbil dung 6 Position 2 trennen Die Blockierung und die Vornahme von konstruktiven Veränderungen am Sicherheitsventil sind verboten Pumpe anschraub...

Page 24: ...on 2 trennen Pumpe Ab bildung 1 Position 5 aus dem Sprühkopf Abbildung 1 Position 4 abschrauben Dazu Kolbenstange Abbildung 5b Position 1 im Griff des Zylinders Abbildung 5b Position 2 blockieren Es muss an die Aufrechterhaltung der Dichtheit der Verbindung gedacht werden Die auf diese Weise blockierte Kolbenstange kann als Transportgriff dienen Sieb von eventuellen Verunreinigungen säubern Applik...

Page 25: ...s Wasser ca ein Viertel des Fassungsvermögens des Tanks in den Tank Abbildung 1 Position 8 füllen Pumpe Abbildung 1 Position 5 bis zum Erreichen einer dichten Verbindung festdrehen und Tank aufpumpen Auf zuvor besprühte Flächen das Wasser versprühen um das System des Geräts zu reinigen Nach der Beendigung mit Hilfe des Sicherheitsventils Abbildung 4a Position 1 Druck aus dem Tank Abbildung 1 Posit...

Page 26: ...ser Garantie werden ausschließlich dann realisiert wenn der Reklamierende eine gültige Garantiekarte und ein leserliches Typenschild am Tank des Applikators vorlegt 2 Die Garantie wird für einen Zeitraum von 24 Monaten nach dem Kauf nicht mehr jedoch als 36 Monate nach der Herstellung erteilt Dieser Zeitraum betrifft keine kommerziellen Verwendungen 3 Für kommerzielle Verwendungen beläuft sich die...

Page 27: ... Abbildung 7 Position 1 herausnehmen Druckabfall im Druckbehälter Ab bildung 1 Position 8 im Zylinder der Pumpe Abbildung 1 Position 5 erscheint Arbeitsmedium Pilzdichtung am Ende des Zylinders der Pumpe Abbildung 9 Position 3 beschädigt Druck aus dem Tank mit Hilfe des Sicherheitsventils Abbildung 1 Position 6 ablassen Pumpe Abbildung 1 Position 5 abschrauben und Mischer abnehmen Zustand der Pilz...

Page 28: ...СТИ ВНИМАНИЕ ОПРЫСКИВАТЕЛЬ ПОД ДАВЛЕНИЕМ БЕРЕЧЬ ОТ УДАРОВ МАКСИМАЛЬНАЯ ТЕМПЕРАТУРА РАБОЧЕЙ ЖИДКОСТИ НЕ МОЖЕТ ПРЕВЫШАТЬ 30 С ЗАПРЕЩАЕТСЯ ОТКРУЧИВАТЬ ГОЛОВКУ ЕМКОСТИ НАЗНАЧЕНИЕ ОПРЫСКИВАТЕЛЬ ДЛЯ ПОБЕЛКИ VEGA это многофункциональные и универсальные работающее под давлением устройство вместимостью 9 литров Оно предназначено для полевых и хозяйственных работ Оно может использоваться для побелки деревье...

Page 29: ...следует подготовить в предназначенной для этого емкости 12 Рабочая жидкость не должна попадать в отрытые водоемы 13 Не допускается использование средств которые могут привести к взрыву едких и легковоспламеняющихся веществ 14 Работы с использованием химических средств в закрытых помещениях должны выполняться в присутствии по крайней мере двух лиц 15 Остатки рабочего вещества необходимо развести и ...

Page 30: ...аном рис 2b поз 1 со штангой рис 2b поз 2 Рис 3 Установить плечевой ремень отрегулировать его длину в соответствии с потребностями Рис 2a Рис 2б 2 2 1 1 ПОДГОТОВКА К РАБОТЕ До того как начать работу следует проверить исправность действия предохранительного клапана Нижеописанные действия следует выполнять при баке заполненном водой до номинального объема см таблица с технической характеристики Всег...

Page 31: ...лении обратном направлению движения часовой стрелки Поршневой шток не заблокирован Рис 5a Поршневой шток заблокирован Рис 5б 2 1 В воронку головки рис 65 поз 2 вложить ситечко рис 6 поз 1 и залить воду Снять ситечко рис 6 поз 1 с воронки головки рис 6 поз 2 Запрещается блокировать и вносить конструкционные изменения предохранительного клапана Вкрутить насос и выполнить несколько движений с помощью...

Page 32: ...с 6 поз 2 Вкрутить насос рис 1 поз 5 в головку рис 1 поз 4 С этой целью заблокировать шток насоса рис 5б поз 1 с помощью держателей цилиндра рис 5б поз 2 Следует помнить о сохранении герметичности соединения Заблокированный таким образом шток может служить в качестве рукоятки для транспортировки Очистить ситечко от возможных загрязнений Перенести опрыскиватель на место работы Качать выполняя движе...

Page 33: ...оз 1 Вкрутить насос рис 1 поз 5 в бак рис 1 поз 8 налить чистую воду около 0 25 вместимости бака вкрутить насос рис 1 поз 5 до получения герметичного соединения и накачать бак На раньше обработанных с помощью опрыскивания поверхностях выполнить опрыскивание с целью промыть систему устройства После окончания снизить давление в баке рис 1 поз 8 с помощью предохранительного клапана рис 4а поз 1 и вык...

Page 34: ... УСЛОВИЯ ГАРАНТИИ 1 Обязательства по гарантии будут выполняться только после предоставления лицом предъявляющим претензию действительного гарантийного талона а также разборчивого заводского щитка находящегося на емкости пеногенератора 2 Гарантия предоставлена на срок 24 месяцев со дня покупки однако не более чем на 36 месяцев от даты производства Этот срок не относится к использованию в коммерческ...

Page 35: ...7 поз 1 очистить и собрать Снижение давления в напорном баке рис 1 поз 8 в цилиндре насоса рис 1 поз 5 появляется рабочая жидкость Повреждена прокладка грибок на конце цилиндра насосы рис 9 поз 3 Снизить давление в баке с помощью предохранительного клапана рис 1 поз 6 Выкрутить насос рис 1 поз 5 Проверить состояние прокладки грибка Если она повреждена заменить Монтировать в обратной последовательн...

Page 36: ...fs Stempel und Unterschrift des Verkäufers Место покупки штамп и подпись продавца Data zgłoszenia i opis reklamacji Complaint date and description Datum der Meldung und Beschreibung der Reklamation Дата предъявления и описание претензии Producent KWAZAR CORPORATION Sp z o o Budy Grzybek ul Chełmońskiego 144 96 313 Jaktorów Polska Tel fax 48 46 856 40 30 Fax 48 46 856 41 33 e mail kwazar kwazar com...

Reviews: