background image

 A

 B

W

F

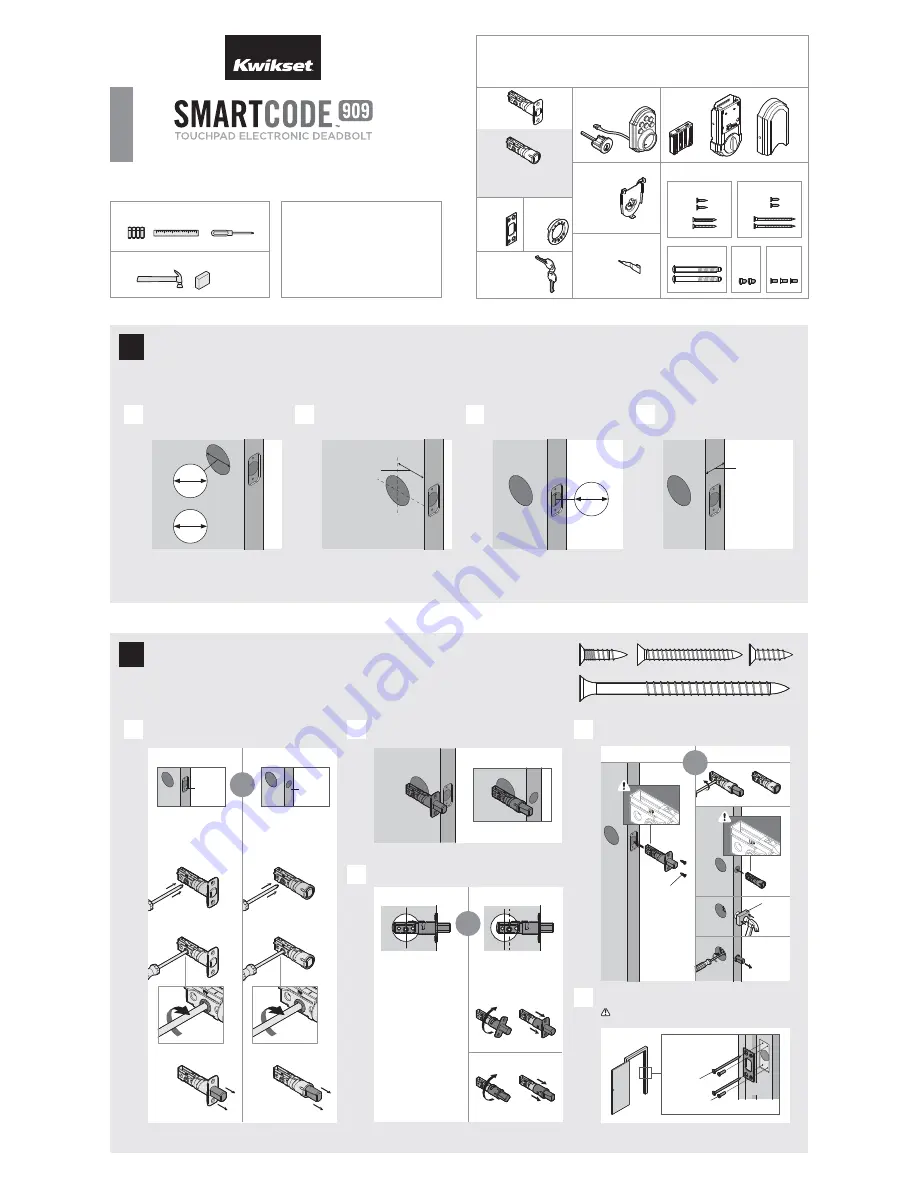
Parts in the box

Latch

“B” is not included. If needed, 

please contact Kwikset to order 

a drive-in latch for your lock.

Exterior 
Assembly

Strike

Adapter 
ring


C


D

 E

Keys

Mounting 
Plate

SmartKey 
Tool

 G

H

03809

46780

 N

 Q

 S

P

Fasteners

48654

27526

64109

Interior 
Assembly


K


L


M

 T


U


V

A

N or P 

(2x)

N

P

S

Q

A

A

B

B

B

A

B

If drilling a new door, use the supplied template and the complete 
door drilling instructions available at www.kwikset.com/doorprep.

Note: Additional door preparation may be 
required for doors with 1-1/2" (38 mm) holes. 
Consult the deadbolt drilling instructions at 
www.kwikset.com/doorprep.

or

backset

Measure to confirm that the hole in 
the door is either 2-1/8" (54 mm) or 
1-1/2" (38 mm).

Measure to confirm that the backset is 
either 2-3/8" or 2-3/4" (60 or 70 mm).

2-3/8" or 2-3/4"

60 or 70 mm

1-3/8" – 1-3/4"*

35 – 44 mm*

Measure to confirm that the hole in 
the door edge is 1" (25 mm).

Measure to confirm that the door is 
between 1-3/8" and 1-3/4"* (35 mm 
and 44 mm*) thick.

A

A

B

C

D

B

C

D

Is the door edge chiseled?

Are the latch holes centered in the door hole?

Which latch are you installing?

Hold the latch in front of the door hole, with the latch 
face flush against the door edge.

2-1/8"

54 mm

1-1/2"

38 mm

1"

25 mm

YES

YES

NO

NO

Use latch “A”. If the 
latch bolt is not already 
extended, extend the 
latch bolt as shown.

No adjustment is required. 
Proceed to next step.

Rotate latch face as 
shown to extend latch.

wood 
block

actual 

size

Use latch “B” (not 
included). If the latch 
bolt is not already 
extended, extend the 
latch bolt as shown.

Latch “A”

Latch “B”

(2x)

C

(2x)

Longer screws 
install closest to 
the door jamb.

door frame

E

Install strike on the door frame.

 Make sure the hole in the door frame is drilled a 

minimum of 1" (25 mm) deep.

or

chiseled

not 
chiseled

or

or

1

Prepare the door and check dimensions

2

Install the latch and strike

*Service kits for 2-1/4" (57 mm) thick doors 
are available through Kwikset.

1 / 4

62888 / 01

Installation and User Guide

Kwikset

1-800-327-5625

www.kwikset.com

ENGL

IS

H

Required tools

Ruler

4 AA Batteries

Hammer

Wood block

Phillips head screwdriver

Additional Tools (depending on application)

Summary of Contents for SmartCode 909

Page 1: ...and 44 mm thick A A B C D B C D Is the door edge chiseled Are the latch holes centered in the door hole Which latch are you installing Hold the latch in front of the door hole with the latch face flush against the door edge 2 1 8 54 mm 1 1 2 38 mm 1 25 mm YES YES NO NO Use latch A If the latch bolt is not already extended extend the latch bolt as shown No adjustment is required Proceed to next ste...

Page 2: ...osition A B C vertical M L K L Do not install batteries until step 5 Note Turnpiece may not rotate smoothly until after step 5 Connect cable Ensure tight cable connection Lay cable flat against the interior housing Push turnpiece shaft onto torque blade Secure interior assembly with supplied screws D E F G turnpiece shaft torque blade L U 2x actual size U Install the interior assembly YES NO or Do...

Page 3: ...rocedure Beeping sound will only be heard if switch 3 on the lock interior is in the on positon See Switches and Status LED Colors on page 4 Mastercode For enhanced security a mastercode may be used when adding and deleting user codes For more information about the mastercode download the Programming and Troubleshooting Guide on the SmartCode 909 page at www kwikset com 2x One green flash with one...

Page 4: ...ware is available in multiple performance grades to suit the application In order to enhance security and reduce risk you should consult a qualified locksmith or other security professional Important Safeguards 4 4 SmartCode at a Glance Deleting a user code In order to delete a user code you must override the code by adding a different user code in the same position For example if you want to dele...

Page 5: ...del orificio de la puerta con la cara del pestillo al ras con el borde de la puerta If the latch holes are centered in the door hole no adjustment is required Proceed to step 4 If the latch holes are NOT centered adjust latch See Latch Adjustment step 3C Si los orificios del pestillo están centrados con el orificio de la puerta no se requiere ajustarlo Vaya al paso 4 Si los orificios del pestillo ...

Page 6: ...nob with the screw holes is on the interior side of the door slant of latch bolt faces door frame la inclinación del perno queda enfrentada al marco de la puerta door frame marco C 2x wood block bloque de madera slant of latch bolt faces door frame la inclinación del perno queda enfrentada al marco de la puerta door frame marco Remove plates Elimine las placas Install drive in collar Instale el ar...

Reviews: