


30
SECTION: 20
TROUBLE SHOOTING
1.
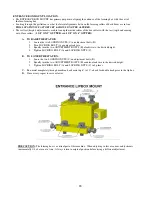
ADJUSTING THE TOP LIP OF GUTTER
The two conditions listed below will be corrected using the
SWING SHAFT
(BLUE station).
(SEE SWING SHAFT ASSEMBLY PG. 16)
a.
Top lip lines #3 & #4 are running DOWN and AWAY from the fascia. (SEE PG. 42)
The bottom lines #6 & #7 are STRAIGHT and PARALLEL to the fascia board and are satisfactory.
b.
Top lip lines #3 & #4 are running UP and INTO the fascia. (SEE PG. 42)
The bottom lines #6 & #7 are STRAIGHT and PARALLEL to the fascia board and are satisfactory.
** CAUTION
: Over-adjustment will cause
OPPOSITE
reaction. **
A.)
To correct for
DOWN and AWAY
from fascia: Add pressure to the SWING SHAFT.
i.
Turn LOCKING BOLT E counter-clockwise to loosen (2 places).
ii.
Turn ADJUSTMENT BOLT F clockwise to tighten 1/16 of a turn per adjustment.
iii.
Re-tighten LOCKING BOLT E (2 places) (SEE PG. 16).
B.)
To correct for
UP and INTO
the fascia: Relieve pressure from the SWING SHAFT.
i.
Turn LOCKING BOLT E counter-clockwise to loosen (2 places).
ii.
Turn ADJUSTMENT BOLT F counter-clockwise to loosen 1/16 of a turn per adjustment.
iii.
Retighten LOCKING BOLT E (SEE PG.16).
NOTE
: After adjustment is made, run an 8’ section of gutter to inspect it. If more adjustment is needed, repeat procedure.
NOTE
: Adjusting SWING SHAFT will not increase or decrease the amount of lip.
NOTE
: The SWING SHAFT should not be used to try and change the size of the hanger lip.
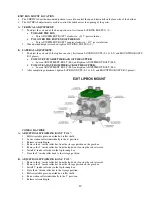
2.
ADJUSTING THE BOTTOM PORTION OF GUTTER
The two conditions listed below will be corrected using the
EXIT-END BOX MOUNT
(GREEN station)
.
(SEE EXIT BOX MOUNT ASSEMBLY PG. 18)
a.
The whole gutter is running
DOWN
and AWAY
from the fascia board. (SEE PG. 42)
The top lip lines #3 & #4 are
PARALLEL
to lines #6 & #7 of the bottom.
b.
The whole gutter is running
UP and INTO
the fascia board. (SEE PG. 42).
The top lip lines #3 & #4 are
PARALLEL
to lines #6 & #7 of the bottom.
** CAUTION
: Over-adjustment will cause
OPPOSITE
reaction. **
A.)
To correct for
DOWN and AWAY
from the fascia board: Move exit mount of the box downward.
i.
Turn LOCKING BOLT G counter-clockwise to loosen.
ii.
Turn ADJUSTMENT BOLT H counter-clockwise 1/16 of a turn per adjustment.
iii.
Retighten LOCKING BOLT G.
B.)
To correct for
UP & INTO
the fascia board: Move exit mount of the box upward.
i.
Turn LOCKING BOLT G counter-clockwise to loosen.
ii.
Turn ADJUSTMENT BOLT H clockwise 1/16 of a turn per adjustment.
iii.
Retighten LOCKING BOLT G.


