background image


Connection 

21


4.6 Alarm Port 

The device provides an alarm terminal block on the front panel for alarm output. When the 

switch  works  properly,  the  normally-open  contacts  of  the  alarm  relay  are  closed  and  the 

normally-closed contacts are open; when an alarm occurs, the normally-open contacts are 

open  and  the  normally-closed  contacts  are  closed.  The  alarm  is  outputted  through  a 

M12-A-4P-M terminal block. 

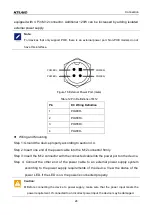
  Pin Definition 


Figure 15 Main Power Port (male) 

Table 9 Pin Definitions of Power Port 

Pin 

Wiring Definition 

COM 

Open 

NC 

Close 


Note


Pin 1 and pin 2 are normally-open contacts; pin 1 and pin 4 are normally-closed contacts. When 

the switch works properly, pin 1 and pin 2 are closed, pin 1 and pin 4 are open; when an alarm 

occurs, pin 1 and pin 2 are open; pin 1 and pin 4 are closed.


  Wiring and Mounting 

Step 1: Remove the alarm terminal block from the switch. 

Summary of Contents for Aquam8112 Series

Page 1: ...Aquam8112 8612 8120 8620 8128 8628 Series Industrial Ethernet Switches Hardware Installation Manual Publication Date Apr 2021 Version V1 2 No 112023104...

Page 2: ...urate and as updated as possible This document is not guaranteed to be error free and we reserve the right to amend it without notice to users All rights reserved No part of this documentation may be...

Page 3: ...als on the device or cables Ensure adequate heat dissipation and tidy cable layout without knots Wear antistatic gloves or take other protective measures when operating the device Avoid any exposed me...

Page 4: ...ion or performance has abnormally changed The equipment emits odor smoke or abnormal noise NOTE This equipment has been tested and found to comply with the limits for a Class A digital device pursuant...

Page 5: ...unctions 12 4 1 2 Pin Definitions and Wiring Sequence 13 4 2 10 100 1000Base T X Ethernet Port 15 4 3 Console Port 17 4 4 Grounding 18 4 5 Power Port 19 4 6 Alarm Port 21 4 7 Bypass Port 22 4 8 USB Po...

Page 6: ...system The series switches provide powerful network management functions The devices can be managed through CLI Telnet Web and SNMP based network management software Aquam8612 Aquam8620 and Aquam8628...

Page 7: ...eight 10 100Base T X M12 POE ports 4GE8P four 10 100 1000Base T X M12 ports eight 10 100Base T X M12 POE ports PS1 power input 1 L2 24 48VDC H6 72 110VDC PS2 power input 2 L2 24 48VDC H6 72 110VDC ETB...

Page 8: ...24 48VDC H6 72 110VDC ETBN TRDP TTDP TTDB functions Table 3 Aquam8128 Aquam8628 Models Model Aquam8128 PORT PS1 PS2 Aquam8128 B PORT PS1 PS2 Aquam8628 PORT PS1 PS2 Aquam8628 B PORT PS1 PS2 Aquam8628 N...

Page 9: ...Connector M12 A 4P M Male cable connector with M12 A Coding 4 Pin Console or USB interface Connector M12 A 4P M Male cable connector with M12 A Coding 4 Pin Alarm connector M12 D 4P M Crimp Male cabl...

Page 10: ...e and Interface 5 2 Structure and Interface Caution It is recommended to purchase the port dustproof shield optional to keep ports clean and ensure switch performance 9 1 10 11 13 14 12 15 16 2 3 4 5...

Page 11: ...3 4 5 6 7 8 9 10 11 13 14 12 15 16 17 1 2 3 4 5 6 7 8 9 10 11 13 14 12 17 15 16 Figure 1 Front Panel 1 Power 1 LED 2 Power 2 LED 3 External power LED 4 Ring LED 5 Alarm port 6 USB Port 7 Console port...

Page 12: ...hernet Port POE LED 15 10 100 1000Base T X Ethernet port connection status LED 16 10 100 1000Base T X Ethernet port 17 External Power Port Note Non POE products have no POE indicator and no external p...

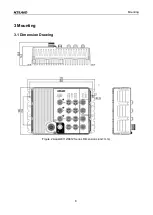
Page 13: ...Mounting 8 3 Mounting 3 1 Dimension Drawing Figure 2 Aquam8112 8612 Series Dimensions unit mm...

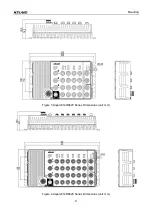
Page 14: ...Mounting 9 Figure 3 Aquam8120 8620 Series Dimensions unit mm Figure 4 Aquam8128 8628 Series Dimensions unit mm...

Page 15: ...ct sunlight distant from heat source and areas with strong electromagnetic interference 5 Devices are to be installed in an authority certified enclosure and accessible only by the use of a tool 6 Dev...

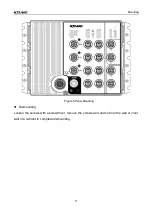
Page 16: ...Mounting 11 Figure 5 Panel Mounting Dismounting Loosen the screws with a screwdriver remove the screws and device from the wall or inner wall of a cabinet to complete dismounting...

Page 17: ...mode The port can also adapt to MDI or MDI X connection automatically You can connect the port to a terminal or network device with a straight through or cross over cable POE Serving as the Power Sou...

Page 18: ...nd an RJ45 port For pin definitions see the following table Table 5 Pin Definitions of M12 RJ45 Port Pin MDI X Signal MDI Signal POE M12 Port 1 Receive Data RD Transmit Data TD V 2 Transmit Data TD Re...

Page 19: ...differentiated signal pins in pairs The orange and white and orange pair green and white and green pair blue and white and blue pair and brown and white and brown pair in twist pair cables must be use...

Page 20: ...ith a straight through or cross over cable Pin Definition Figure 9 M12 Port female 1 8 8 1 Figure 10 RJ45 Port You can use an M12 M12 or M12 RJ45 cable to connect the port for communication The preced...

Page 21: ...RD1 Transmit Receive Data TRD0 2 Transmit Receive Data TRD1 Transmit Receive Data TRD0 3 Transmit Receive Data TRD0 Transmit Receive Data TRD1 4 Transmit Receive Data TRD3 Transmit Receive Data TRD2 5...

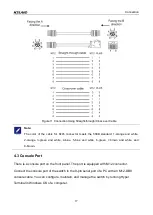
Page 22: ...en and white 4 blue 5 blue and white 6 green 7 brown and white and 8 brown 4 3 Console Port There is a console port on the front panel The port is equipped with M12 connector Connect the console port...

Page 23: ...nce M12 DB9 Console Cable Table 7 Pin Definition of DB9 Port 9 Pin Serial Port and M12 Port Console Port DB9 Port 9 Pin Serial Port M12 Port Console Port Pin Signal Pin Signal 2 RXD Receive Data 1 RXD...

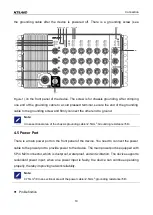
Page 24: ...ross sectional area of the chassis grounding cable 2 5mm2 Grounding resistance 5 4 5 Power Port There is a main power port on the front panel of the device You need to connect the power cable to the p...

Page 25: ...other end of the power cable to an external power supply system according to the power supply requirements of the device View the status of the power LED If the LED is on the power is connected proper...

Page 26: ...s are closed The alarm is outputted through a M12 A 4P M terminal block Pin Definition Figure 15 Main Power Port male Table 9 Pin Definitions of Power Port Pin Wiring Definition 1 COM 2 Open 3 NC 4 Cl...

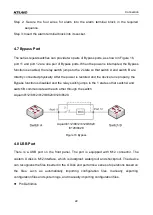
Page 27: ...he device runs properly the Bypass function is disabled and the relay switch jumps to the 1 state so that switch A and switch B communicate with each other through the switch Aquam8112 8612 8120 8620...

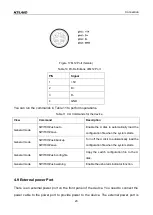
Page 28: ...tion file when the system starts General mode SWITCH usb backup SWITCH save Turn off the U disk to automatically load the configuration file when the system starts General mode SWITCH usb config file...

Page 29: ...ound the device properly according to section 4 4 Step 2 Insert one end of the power cable into the M12 connector firmly Step 3 Insert the M12 connector with the connected cable into the power port on...

Page 30: ...ning Do not touch any exposed conducting wire terminal or component with a voltage warning sign because it may cause personal injury Do not remove any part or plug in or out any connector when the dev...

Page 31: ...d or operates abnormally Running LED Run On The device is starting up Blinking The CPU operates properly Off The device does not start up Alarm LED Alarm On An alarm occurs Off No alarm occurs Ring LE...

Page 32: ...LEDs 27 Off The POE port provides no power supply Note Non POE products have no POE indicator and no external power interface and indicator...

Page 33: ...he 9 pin serial port of a PC with the M12 DB9 console cable Step 2 Open Hyper Terminal in Windows OS On the computer s desktop click Start All Programs Accessories Communications Hyper Terminal Step 3...

Page 34: ...munication port in use right click My Computer and select Property Click Hardware Device Manager Port to view the communication port Step 5 Set port parameters Bits per second 115200 Data bits 8 Parit...

Page 35: ...vileged mode SWITCH show interface vlan 1 Query the IP address of the switch Privileged mode SWITCH show version Query the version of the switch Privileged mode SWITCH reboot Restart the switch Privil...

Page 36: ...the commands in Table 14 to perform operations 6 3 Access through Web Step 1 Connect the network port of the PC to the Ethernet port of the device with a network cable Step 2 Enter the IP address def...

Page 37: ...ion Aquam8112 8612 without POE 24W MAX Aquam8112 8612 with POE 174 1W MAX Aquam8612 NAT without POE 25 88W MAX Aquam8612 NAT with POE 184W MAX Aquam8120 8620 without POE 30 5W MAX Aquam8120 8620 with...

Page 38: ...MAX 2 41A 72VDC MAX 1 55A 110VDC Aquam8120 8620 without POE MAX 1 25A 24VDC MAX 0 65A 48VDC MAX 0 45A 72VDC MAX 0 3A 110VDC Aquam8120 8620 with POE MAX 7 1A 24VDC MAX 3 5A 48VDC MAX 2 49A 72VDC MAX 1...

Page 39: ...8628 NAT with POE MAX 6 36A 24VDC MAX 3 28A 48VDC MAX 2 5A 72VDC MAX 1 69A 110VDC Physical Characteristics Housing Metal fanless Installation Panel mounting Dimensions W H D Aquam8112 8612 270mm 189mm...

Page 40: ...Basic Features and Specifications 35 MTBF MTBF Aquam8112 8612 535254h Aquam8120 8620 602392h Aquam8128 8628 496657h Warranty Warranty Five years...

Page 41: ...FAX 86 10 88796678 Website http www kyland com Email support kyland com For more information about KYLAND products please visit our website http www kyland com...

Reviews: